The question of what to do with a child at home is relevant even for experienced parents. Interesting idea about using scrap materials in entertaining games for children and making them yourself original crafts from magazines and newspapers will be very useful.
Children, both boys and girls, love to build all kinds of houses, shelters and play in them both on the street and in the house. It could be a military tent, an Indian hut, a palace for a princess, or even a tree house. Their imagination is unbridled.
Today I would like to tell you how to create children's games with your own hands and how to build a house from newspapers and magazines with your children.

DIY house made from newspaper tubes for children
This idea can be completely implemented by the child himself; this is very good for the development of his motor skills and spatial thinking. Parents can help with advice and show how and what to connect. Collaborative creativity brings its participants very close. Parents are often very interested in joining their children's games.
To implement our house we will need very few materials:
- newspapers or magazines (magazines have stronger paper);
- a roll of tape;
- stapler with staples.
So let's get started. To begin with, let's take several sheets of newspaper or magazine. You will only need to work with sheets of the same size to get identical parts. This will avoid problems during assembly.
Having folded several sheets together, you need to tightly roll them into a tube. Even a small child can easily cope with this task.
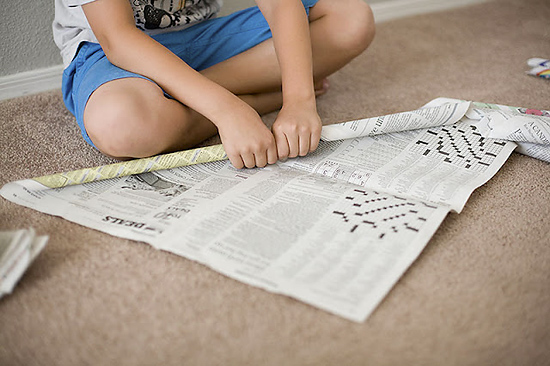
After the tube is rolled, the outer edge of the newspaper should be secured with tape.

The number of such rolls may vary, depending on the type of construction of our tent. So, since we will build a house from triangles, the number of such tubes should be a multiple of three. Using a stapler, we connect the newspaper tubes into triangles.

When we have a sufficient number of triangles, for such a design we will need about thirty of them, we can start assembling.

For the house bigger size and a different design, you can use a larger number of tubes.
Connecting the triangles with each other using a stapler and tape, we gradually build our house.

Parents' help will be useful during assembly. Especially for connecting parts of walls and roofs together. Since children cannot always imagine future view home and correctly connect the parts of the whole. For greater strength, the tubes can be wrapped and connected with tape.
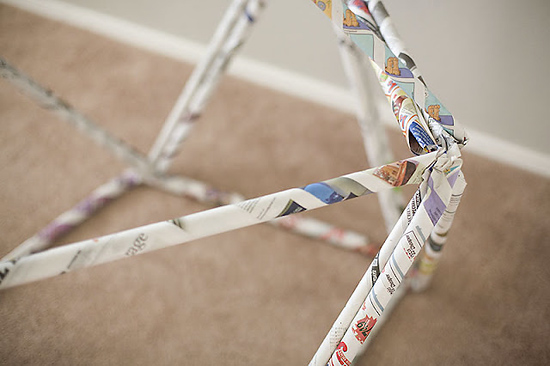
The result will be a fairly strong frame in which the child can already play and transform it in accordance with his fantasies.

Using the now popular weaving from newspapers, you can make a chest, a vase and many other crafts. In this article you will learn how to make a house using newspaper tubes.
Master class - house made from newspaper tubes
Would need:
- newspaper tubes;
- cardboard, thick paper;
- paper clips;
- clothespins;
- PVA glue;
- paint and varnish.
- Cut out two identical hexagons from cardboard.
- We glue the tubes to one of them along the edge at a distance of 1.5-2 cm. We glue the second hexagon on top. We received a bottom with vertical bases for weaving.
- We make the sides of the house from cardboard or thick sheets of magazine along the length of the side of the hexagon. We fasten them together with glue or paper clips.
- We place the wall blank on the bottom. We lift the tubes vertically and secure them with clothespins at the top edge.
- We begin to braid the walls from below with a regular rope of two tubes. We do this 4 rows around the entire perimeter of the house.
- In the center of each side of the sides we leave 5 tubes free, and work with the rest. We make “chintz” weaving separately on each corner group of vertical tubes, and we have six of them (according to the number of corners), stopping at a height of 2-3 cm from the top.
- At the top we make 4 rows of weaving a rope of two tubes along the entire contour of the house, weaving in all the remaining free tubes.
- We remove the base box and hide the upper ends. We cut the tubes left in the center of the sides in the openings in the middle and also hide them.
- Cut out a circle of thick paper with a diameter suitable for the roof. We cut from one side to the center and fasten it so that we get a wide cone.
- Take 4 tubes 4 times. We intertwine them as shown in the figure. This will be the base for the roof.
- We select the first tube from the base and use it to start weaving “chintz” in a circle, then continue with free tubes, repeating the shape of the roof. To work, we must have an odd number of base tubes.
- When we reach halfway, we retreat some distance and begin weaving again. After 6 rows, we attach additional tubes to the last two.
- Next, we continue to work until the roof extends beyond the walls. We fasten everything, and trim the ends along the edge at the same distance.
- You can paint everything or varnish it.
- We connect the roof to the walls, and our summer house is ready.


 |
 |


 |
 |


 |
 |
 |

Using this weaving pattern from newspaper tubes, you can make a tea house and various houses for dolls and animals.
If you think about it a little, you can make great things from the simplest and most ordinary materials that are often at hand. with my own hands.
One such example is a wooden house made of paper.
But as for the ideas that arise to create such a miracle, they appear for a variety of reasons. Sometimes inspiration just comes and that’s not bad at all.
For this we need
Cocktail straws
A4 paper
Multi-colored cardboard
Glue
Scissors
Step 1


The first thing you need to do is take paper, preferably A4 format, without cells or rulers. The paper should be white. Next, you need to twist it into tubes.
Step 2

For more convenient work, the paper should be divided into several equal parts, and only then twist it. First, do it on the sides, and only then in the middle.
You can never calculate how many of these tubes are needed in the exact quantity. That's why, do them as you go. It will be easier this way.
Step 3

As for the foundation, in order to build it, you need to select fairly thick cardboard. Remember, the “life” of your house will depend on it. You will need to glue paper tubes to the side parts. Several need to be made shorter.
Step 4

After you complete the process of laying out the tubes in three rows, make a small mark where the doors and windows will be. Remember, in order for your house to look more symmetrical, you need to place both windows and doors at the same height.

Step 5

For a bright effect, you can make curtains from colored paper in the middle of the windows. By the way, in order for all fastenings to be stronger, you can use transparent tape. But this is all optional, of course.
Step 6

Next, don’t forget about the roof. But initially, you need to build several supports so that it does not collapse. The roof can be cut from cardboard. Moreover, the shape of the cuts can be very different. It all depends on your own imagination.

It is advisable to glue the roof with a simple, colorless glue so that it all looks more realistic.
Step 7


After you complete all the steps listed, decorate the windows with the simplest self-adhesive. And in the same way, decorate the doors. As for stairs, you can make them out of them, or you can not make them out of them. And if you still prefer a house with stairs, then you can build them from the tubes that you made. If necessary, do more. It is advisable to cover the steps with “wooden” self-adhesive tape.


Step 8

And the final stage will be making the railings. And they are also made from tubes, having previously pasted them in Brown color. And now, your house is finished. All that remains is to decorate it. Here, you can dream up. For example, put up a variety of figures, animals, a fence, or even a vegetable garden, as if it were a real village. In any case, it will turn out just great!
You will need:
White cardboard
Sequins
Ruler
Latex primer (optional)
Glue stick
Scissors
Stationery knife
Decorations (tinsel, bells, balls).

1. To get started, download the template from THIS link or you can draw a house of similar dimensions yourself.
2. Cut out all the parts from paper and glue them to white cardboard using a glue stick or double-sided tape.
3. Cut out the pieces from cardboard. Use a utility knife to cut out doors, windows and other details.

4. Fold all the elements along the fold lines and glue everything together.
5. If desired, you can apply a primer to the paper house to prevent it from deforming.
6. Paint your house and after the paint has dried, start decorating it.
The house can be hung on the Christmas tree using a thread attached to the roof so that it hangs level, or you can simply place it on a flat surface to decorate the house.
DIY craft "House made of paper tubes"

You will need:
Thin paper (regular printed paper is fine)
Scissors
Pencil
Decorations.

1. Roll each sheet (or identical pieces of sheets) into a tube. It's better to use a pencil - it's easier to twist.
2. Draw windows and a door on paper or cardboard and cut them out.
3. Glue the tubes together as shown in the image (to make a hut).
4. Glue the windows and door to the hut.
5. Decorate the house to your liking.
Another option:


DIY Santa Claus house (master class)

You will need:
Cardboard box or
Scissors
Sandpaper
Stationery knife
Tassels
Polyurethane foam and gun (optional).
1. Prepare a cardboard box and make a house out of it. You will need to cut the pieces and glue them together.
2. Use a utility knife to cut out the windows and door. You can draw them in advance with a simple pencil.

3. Paint the house or you can decorate it polyurethane foam. To do this, you need to apply foam in strips so that each strip is 1.5 cm wide. As it dries, the foam will swell, so it is better to leave 3-4 mm between the strips.
4. After you have covered the house with foam, leave it for 30 minutes to allow the foam to dry.


Making a stand for the house.
Cut out a rectangle from cardboard that should be larger than the base of the house.
Glue the house to the stand and decorate the perimeter of the stand with foam.

*Use of foam is optional. To imitate snow, you can use cotton wool, which should be glued with PVA glue.
* You can also cut out snow slides, snowdrifts, a snowman or a Christmas tree from paper or white cardboard and glue them to the base, bending the bottom part and applying glue to it.

If you used foam, then after it dries, cut off the excess parts with a stationery knife and sand it with sandpaper.

Paint all the desired parts.

DIY cardboard house: gnome's home

You will need:
Cardboard cylinders from toilet paper
White paper
Colored paper
Black felt-tip pen
Glue stick
Hot glue or PVA glue
Sequins of different colors (including white).
1. Cut one toilet paper cardboard cylinder in half, and the second and third so that you have two long and two short pieces. This way you will have houses of different sizes.

2. Cut the white paper into strips 15 cm long and 2-3 cm wider than the height of the cylinder that you will wrap with this strip.

3. Cut out windows and doors from colored paper. Use a marker to draw door handles and window details.
4. Using a glue stick, glue the windows and doors to the white stripes.
5. Wrap the strips around the corresponding cylinders and secure them with glue. Fold the excess paper into the cylinder.

6. Make several cones from colored paper different color, glue the ends of the cones, and glue the cones themselves with PVA glue to the house cylinders.
*You can add a little glue to each roof of the house and sprinkle glitter on it to imitate fallen snow.


DIY paper house: paper New Year's village

You will need:
Corrugated cardboard (cardboard from regular packaging)
Stationery knife
Scissors
Ruler
Pencil
White acrylic paint and a brush
LED garland.

1. Prepare cardboard and use a pencil to draw several houses connected to each other on it. You can use a ruler. You will end up with a small village. Cut out a village from cardboard.


2. Bend the cut out piece like an accordion along the lines that connect the houses. To make even folds, place a ruler on the fold line and bend the cardboard.


3. Draw and cut out a Christmas tree on cardboard. Trace the tree onto another piece of cardboard and cut out a second tree. Make a cut on one tree from the top to halfway, and on the other from the bottom to halfway and connect both parts to get a 3-D tree.


4. Apply white paint to rooftops and Christmas trees to imitate snow.
5. Place the village and Christmas tree on white fabric or felt and place an LED garland next to it.
DIY house (photo)

Paper or white cardstock that you can print on.
*You can draw a similar drawing yourself and cut it out.
Scissors
Stationery knife
Glue stick
Battery operated candles.
1. Print and cut out the house drawing. Cut out windows and doors with a utility knife.
2. To make the roof, cut a rectangle measuring 15x9 cm. Bend it in the middle.
3. Assemble and glue the house and glue the roof to it.
* You can make several houses to make a small village.
* You can also cut out Christmas trees from green cardboard.
4. Place a candle with batteries inside the house.
*You can decorate the house to your liking. Use markers, glitter with glue, cotton wool (snow), etc.
DIY box house

You will need:
Box (of cereal, pasta, for example)
Ruler
Pencil
Scissors
PVA glue
Clothespin or masking tape (if necessary).

1. Open the box completely and place it on the table.

2. Draw a straight line along the unfolded box 2.5 cm below the middle.

3. Make cuts from the original fold lines of the box to the line you drew (see image). The white dots indicate the places where the cuts need to be made.

4. Cut off those parts of the box where the X is written.

5. Turn the box over and apply glue to a small bend (see image).

6. Fold the box with the pattern facing inward and secure with glue.


7. Fold the opposite narrow sides to form a roof. Each part needs to be bent in half (see image).

8. Cut the wide sides so that they can be glued to the part of the roof that was formed in step 7. You need to cut with a margin so that this margin can be bent and glued.


 What children can come up with")

