Beautiful vases with flowers serve as decoration for the interior of the room, adding bright colors and zest to it. You can buy a suitable vase ready-made in a store, or you can use all your creative potential and make a vase from a glass bottle yourself, guided by the ideas in this article. Handmade crafts are always especially precious and memorable. They will not only serve as an excellent element of interior decor, but also give warm positive emotions to the whole family every day.


In order to make a beautiful vase, you can use a glass bottle of any shape and color. The vase can be made with a narrow neck, intended for one small flower, or at the stage of preparing the bottle, the neck can be pre-cut. How to do this at home using improvised means will be discussed below.
How to cut the neck of a bottle at home
In order to carefully get rid of a bottleneck, you need to prepare the following materials and items:
Thick wool thread;
Solvent (you can also use acetone, kerosene, alcohol, gasoline);
Gloves and glasses for safety purposes;
Matches;
Basin with water;
Sandpaper or stone for sharpening knives.
Next, you need to mark a cut line on the bottle. The woolen thread is unwound to such a length that it is enough to wrap the bottle three times around its axis. Then you need to moisten the thread in a solvent, quickly wrap it around the bottle three times in the place where the cut is intended, set it on fire and wait until it burns out. The bottle should be held so that it is parallel to the ground. Next, the bottle is quickly lowered into a basin of cold water. Due to a sharp drop in temperature, the neck itself will break off in the intended place. The last stage is processing the sharp edge with sandpaper or a stone for sharpening knives. The second option is best done in water

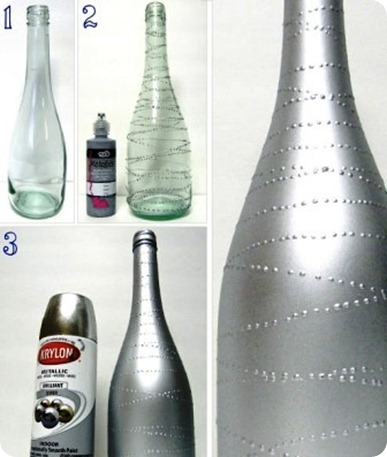
How to make an original silver vase from a glass bottle
First, you need to remove the neck from the bottle in the manner described above and prepare everything you need: a can of silver paint, wool thread, paper napkins, PVA glue, rhinestones and beads, scissors, cotton swabs, transparent glue, ribbon for decoration.
The napkins should be cut into 4 parts, apply PVA glue to the future vase and carefully glue all the napkins in turn, while on each napkin it is necessary to create special recesses where beads and rhinestones will subsequently be glued. This is done with a cotton swab. It must be placed in the center of the napkin and scrolled around its axis. When the bottle is completely covered in this way, it must be left to dry for 4 hours. Then you need to glue patterns from pieces of woolen thread using PVA glue. After drying, the vase is ready to apply paint from a can of the appropriate color. Finally, after 45 minutes, you can decorate the vase with rhinestones, beads and ribbon using Moment transparent glue.


Vases made of glass bottles with a knitted cover
This option will especially appeal to those who know how to knit beautifully. To implement this method, you need to knit a beautiful cover for the future vase that matches the style and interior design of the room. Such vases create a feeling of warmth and comfort in the home.


However, if you don't know how to knit, don't despair. You can create amazing vases using multi-colored knitting threads by winding from the base of the bottle to the neck. To create an even more beautiful effect, you can also attach a variety of beads to the threads.


How to make a glass bottle vase using crepe paper
In this case, you need to cut multi-colored corrugated paper into pieces and stick it on a transparent glass bottle, using PVA glue with water in proportions 1:1. The pieces are glued in several layers, the glue will not be noticeable after drying. The finished vase can be decorated with other elements to taste and varnished.
The easiest way to make an empty bottle useful is to turn it into a vase. And in the summer you will certainly find how to use the finished product.
But to like the vase, you need to decorate it. For this purpose, stickers, multi-colored threads, ropes, paper napkins, spray paint, polymer clay and ribbons are used. Let's look at the most beautiful and easy-to-implement transformation options.
Coloring: the easiest option
It is best to take a bottle of an original shape, then the vase will turn out to be spectacular.- Before applying the coloring composition, the container must be washed and dried. In this case, it is recommended to first apply white water-based paint, and then paint of any other color over it.
- If you want to make any design on the bottle, it is applied with a pencil and then painted with markers or gouache.
- It is not necessary to paint the bottom of the vase. After the drawing has dried, it is secured with a layer of colorless varnish.
Drawings transferred to a container using a stencil or leaf stamps on the surface of the product look great!

Decoupage transformation
You can turn a bottle into a vase using decoupage napkins. First, the product must be washed and degreased. Then a series of actions are performed sequentially:
- Apply 2 layers of primer to the bottle with a sponge.
- Then a napkin with a design you like is glued around the bottle. To make gluing easier, you can cut the image into 2 parts, and to separate the top layer from the rest, a napkin placed on polyethylene is moistened with water. You can remove the napkin layer from the stationery file, and transfer the motif with the design to the bottle again through the file, then the picture will definitely not be torn.
- Then all the folds of the napkin on the bottle are smoothed out with a brush, and excess glue is removed with a napkin.
- All that remains is to apply paint on top of the bottle with a sponge everywhere except the napkin.
- If you wish, you can make cracks using craquelure.
- The final stage is applying varnish to the product.

With these simple steps, you can turn an ordinary bottle into a luxurious vase!
Decorating with linen cord
A linen cord will help turn a bottle into an interesting vase. It is glued with PVA glue, and beads are used as additional decoration.
- Take a glass bottle. Remove the factory sticker and wipe with alcohol.
- PVA glue is diluted with water in a ratio of 1 to 1.
- Then napkins are glued onto the bottle.
- After this, the container is treated with PVA glue and placed to dry.
- Then you can decorate the bottle with linen cord. To do this, the selected sketch of the pattern is transferred to the product, and then the cord is glued according to it.
- You can place large beads in the central part of the vase, and then stick halves of peas onto the product in a chaotic manner.

After the bottle has dried, it can be coated with acrylic paint.
Application of polymer clay
Any bottle will become a wonderful vase if you decorate it with small flowers or other decorative shapes made of polymer clay. The option looks impressive when the bottom part and neck of the bottle are decorated in this way. Painting with stained glass paints looks great in combination with polymer clay.
Even an ordinary glass bottle can be turned into something very interesting with the help of simple and simple means at hand. Knowing the vase, you can create an original decoration for the interior or use it as a gift to your loved ones. Below are several creative and very easy to implement ideas for creating a vase from a bottle.
Vase from a bottle with yarn
You will need:
- a bottle (preferably some unusual shape);
- multi-colored threads of yarn;
- glue for decoupage.
Wash the bottle thoroughly, inside and out, and remove the label completely. Then apply decoupage glue to the dry object with a brush, exactly on the part on which you will apply the decor. Carefully first wind a thread of one color onto the glass base (make it not too long), then a thread of a different color, etc., thus wrapping the bottle completely.

Vase from a bottle with paints
You'll need:
- bottle;
- acrylic spray paint in various colors for decoration.
You can also use regular construction paint, but only outdoors and not indoors.
Wash and dry the bottle thoroughly. Apply beige and white acrylic paint to it. Let the first layer dry, and then use orange paint to paint a stripe in the center of the bottle, and yellow paint to the bottom. Now it’s time for an unusual pattern: wrap the vessel with a lace napkin and spray paint in some contrasting color.
Alternatively, paint the bottle one color and leave a couple of transparent stripes. To do this, before painting, you can use tape, wrapping it evenly around the product.
Another way to decorate: apply white paint to the entire surface of the bottle, dry it, and glue stencils on it - they are sold in specialized stores. Or you can simply cut out flowers, for example, from paper and glue them to the vessel using double-sided tape. Show a little patience and perseverance - and you will become the proud owner of an original vase!


Vase from a bottle with paper
Before that, prepare wrapping paper, a glass bottle (or a jar) and glue. The wrapping paper must be cut into long strips, which are then rolled into flagella.
By the way, the more careless they turn out, the better, this will definitely give some. Therefore, this can be entrusted to children without fear for the final result.
Then the resulting paper flagella need to be glued to your glass product. There is one nuance here: due to the small contact area of the bundles, it will not be easy to glue them to the can right away. Therefore, first cover the jar or bottle with thin, preferably matte, paper. You can also use wrapping paper. When the paper is already on the jar, spread it with glue and gradually begin to wrap the vessel with the prepared paper flagella. When the glue is completely dry, you can safely start using your homemade, and therefore very unusual, interesting and original, vase.

Useful tips
If you want to decorate the interior, then start with a simple craft, such as a vase, which can be made from old plastic or glass bottles using paper, twigs, tubes, newspapers and magazines, and many other materials.
There are a huge number of master classes on making vases with your own hands.
Some of the most interesting and at the same time quite simple vases you can find here.
DIY paper vase. Kaleidoscope of flowers.

An ordinary glass jar or bottle can be turned into a colorful vase. To do this, you just need to cover the container with small pieces of corrugated paper of different colors.
It is better to use a container made of transparent glass, and for gluing the paper you can use either a special glue for decoupage or regular PVA glue, which must be diluted with water in a 1:1 ratio.


We weave the bottom of the vase:
Make 4 bundles of 4 strands
Fold all the strands crosswise
In turn, “launch” each tourniquet in a circle so that it wraps around the rest of the tourniquets
The first 3 rows are woven in a similar way. After this, the four strands need to be divided in pairs and weave 3 more rows in the already familiar way - you should already have 6 rows of weaving
Wrap each strand separately to get a bottom like this:


3. Weave the walls of the floor vase:
Protruding paper tubes need to be folded up
Start braiding each tube - you should have a vase leg formed
Prepare a pan lid or any other disc-shaped object wider than the bottom of the vase
Insert the cap between the paper tube drains
* The lower the lid, the wider the vase will be.
Using the already familiar technique, you need to weave 10 more rows
Now you need to start bringing the edges of the strands-stands closer together - preparing the neck of the vase
The neck of the vase needs to be braided until you reach the stage when you will need to braid two stand strands instead of one
Now spread the strands apart again and start weaving the rim of the vase
Take turns bending one post after another.


Glass bottles of wine, cognac, champagne, milk, butter and even beer are excellent materials for making flower vases with your own hands. Painted and decorated vases and bowls can decorate not only the dining table and shelves in the house or country house, but also table settings at a wedding or party, and you can also make a wonderful gift from decorated bottles.
Master class No. 1: Stylish and simple
Bottles of any shape and glass color are suitable for this type of bottle painting; in this master class, transparent milk bottles are used.
Materials: for degreasing - acetone or alcohol, as well as cotton pads, for painting - acrylic paints in jars or spray cans (better for glass and ceramics), a nylon brush, as well as masking or regular tape of the required width. Instead of tape, you can use rubber rings. If you are using spray paint, you may need foil, cling film, or plain paper.
Instructions:
- We prepare the glass - remove the labels, wash off the glue, wipe the bottles dry, and then degrease the surface with nail polish remover or ethyl alcohol.
- We cover the future vase with tape, forming a pattern: stripes of different widths, zigzags or a spiral. The tape here plays the role of a stencil.

- We begin to paint the vase in the right places.

Tip: if the paint requires baking in the oven, then consider the position in which the painted bottle will dry. So, if you paint both the bottom and the neck, then drying the vase will be problematic, but you can make a structure from thick paper and buttons as shown in the photo below.

- The drying method depends on the paint you choose. The manufacturer, as a rule, indicates the required baking temperature (if required) and time. Baked acrylic paints dry for about half an hour in an oven at 170 degrees, and then it is advisable to leave the bottles to dry naturally for 1-2 days to make the coating as durable as possible. The spray paints used in this master class do not need to be baked, and they dry in 24 hours.

With this tutorial, you can come up with a variety of designs by playing with the color, width, and placement of tape or rubber bands.


For example, you can use unusual shades - bottles painted in soft pastel colors or gold or silver paint look very impressive. Take a look at the following selection of photos - these are the colors that are best suited for decorating glass bottles to decorate a wedding or party.


Here’s another original idea: by stretching a rubber band or sticking tape diagonally, you can paint only the bottom of the bottle.

Master class No. 2: Painting a bottle with contours
Now let’s move on to a more complex and time-consuming, but very beautiful way of decorating bottles with your own hands - painting with contour three-dimensional paints. With their help, you can draw patterns and ornaments in an ethnic style, apply complex and simple designs, or write beautiful inscriptions, monograms, initials (photo below).


You can also draw with contour paints using the dot painting technique as in the photo below.


And in combination with stained glass paints, contour painting will turn into stained glass.


Materials: any alcohol-containing degreaser, cotton pads and swabs, a needle and contour paints. If desired, the painting can be supplemented with sparkles, as well as acrylic and stained glass paints, as in this master class.

Tip: if you don’t have contour paints or drawing with them seems difficult to you, then you can paint with the help of improvised means: a toothpick, a needle, a cotton swab or a thin brush.
Technique:
- First we need to come up with an idea and prepare a supporting sketch. You can find it on the Internet and print it in a suitable size or draw it yourself. You can also use a homemade or ready-made template or stencil.
- If you are confident in your sight drawing skills, you can skip this step. If you are a beginner, then it is better to transfer the desired picture onto the glass, that is, outline the main details and lines of the picture/pattern. To do this, you need to: draw or print a picture, cut it out (you can roughly), then tightly paint over its reverse side with a soft pencil, and then attach the picture with the shaded reverse side to the glass and trace all or only the main parts of the drawing with the same pencil. There should be barely noticeable but useful lines on the bottle. If the image is not too complex, then it is enough to outline the main details directly on the bottle.
- Now you need to degrease the glass and wait until it dries.
- If you wish, you can cover the entire bottle with colored acrylic paint and wait for it to dry completely.
- Let's start painting: we trace all the contours, from time to time cleaning the tube spout with a needle and, if necessary, correcting flaws with a cotton swab moistened with water. It is better to start drawing with large details.

- If you draw with a contour using the stained glass technique, then the contours should be closed, and the stained glass paint should be in contact with them. Also make sure that all parts are painted completely without overpainting, otherwise the coating will not last long. Filling the contours with stained glass paints is possible only after 2 hours, but you can speed up their drying with a hairdryer;

- In the technique of dot painting with a contour, the main thing is to maintain the same and minimum spacing in one line of the drawing and maintain the same diameter/volume of dots (in one line).

Tip: Practice drawing outlines or dots on paper first. Remember that you need to press the tube with equal force.
- When the drawing is ready, all you have to do is dry or wait for the paints to dry, following the manufacturer's recommendations. Most often, painted glass is baked in the oven at a temperature of 170 degrees for about 30 minutes or left to dry naturally for a day.
We invite you to watch the following video tutorial, where you can see how to decorate a bottle with your own hands using contours using a chiseled technique.
Here are other interesting ideas for painting bottles with contours for your inspiration.


Master class No. 3: how to cut a bottle and make a vase, candlestick and other decorative items out of it
So, we've sorted out the painting and decor. Now let's talk about how to make a vase, pencil holder, glass or any interior decoration from an ordinary bottle, as in the photo below.


You can cut a glass bottle with your own hands in different ways. In this master class we use the simplest methods that can be easily repeated at home.
Method 1. How to cut a bottle using alcohol-preserved thread
This method is more suitable for cutting wine bottles and bottles with thin glass.

- First you need to wrap a thick cotton thread around the bottle and cut off the excess (top photo on the left).
- Now this thread needs to be moistened in any alcohol-containing solution - white spirit, ethyl alcohol or nail polish remover, as in this master class. After the thread is thoroughly wet, it needs to be wound around the bottle again in the right place.

- Now you need to carefully light the thread, quickly rotating the bottle until the flame goes out.

- Next, you need to lower the bottle into a pre-prepared container with boiling water for 3 minutes, and then quickly lower it into cold water - the sudden temperature change should cause the glass to crack in the right place.

Tip: if you want to make a vase from a champagne bottle, then steps 2-4 will most likely need to be repeated.
- Carefully break the bottle, and then sand the sharp edges with sandpaper - first coarse-grained and then fine-grained. Woo-ala, the bottle vase is ready!

Method 2. How to cut a bottle using a glass cutter
You can also cut the bottle using a glass cutter. To do this you need:
- Make a cut with a glass cutter. To make the edges even, you can wrap the bottle with an elastic band or tape before sharply. Instead of a glass cutter, you can use a glass drill;
- Then we burn the incision site, then lower the bottle into boiling water for three minutes, and then into a container with cold water;
- Carefully break the bottle;
- We sand the edges. (Rate the material! Already voted: 40
average rating: 4,60
out of 5)


