1. Christmas tree from plastic bottles
Prepare a Christmas tree like this green plastic bottle, scotch, scissors(such that they can easily cut a plastic bottle, Whatman tube. The only thing you can add to such a Christmas tree is to decorate it with beads, gluing them to the Christmas tree with glue. You can hang a rain ribbon. You can make this craft with your children. Next, we do everything as in the photo:
To make decorative New Year's craft: Christmas tree made from plastic bottles, you will need the following:
- Plastic bottles - 3 pcs;
- Scotch;
- A sheet of thick paper, ideally whatman paper (A4);
- Scissors;
So, cut the bottle as shown in the photo below. That is, it is necessary to cut off the bottom and neck so that a straight pipe from the bottle remains.

Cut each plastic bottle lengthwise into 3 equal parts and then adjust their sizes so that each subsequent tier is slightly smaller than the previous one. Then each workpiece must be “dissolved into needles.” The neck of one of the bottles will serve as a stand for our future New Year's craft.

The next step is to roll the Whatman paper into a tube. We insert it into the neck of the bottle and secure it with tape in a circle.

You can decorate the top of our New Year's tree with a homemade Christmas tree toy or complete the tree the way we did.
If you want to make a fluffier Christmas tree from PET bottles, like the one in the photo below, when making the Christmas tree, you need to cut the needles as thinly as possible (more often).


2. For Christmas trees made from plastic bottles you will need green bottles of various sizes and wooden stick, with a diameter slightly smaller than the neck. The length of the stick will determine the height of the tree and the number of bottles.
I guess it's ready)
4. Another very interesting option

For production we will need:
- scissors
- green bottle
- cork plug
- round glass of cottage cheese dessert
- candle
- glue.

Also find foam rubber. We cut a piece of a kitchen sponge for washing dishes.

First, cut the green bottle into squares or circles of different sizes. For the bottom of the Christmas tree, the width of the square should be at least 6-7 cm, for the middle - about 5 cm, for the top of the head 2-3 cm is enough.


Now, using scissors, we densely break through the edges of the stars. You can call your household for help. In fact, the work is painstaking and requires a lot of patience. Edging the edges takes approximately 30 minutes. To make the spruce paws look more natural, we bring the plastic to the flame of a candle. The tips of our coniferous branches will gracefully curl down. Here is the finished result.


It's time to apply glue and foam rubber. Cut the sponge into small pieces (1x1 cm).

Now we lubricate the largest spruce paw with glue, and put a cube of foam rubber on top. Add glue again and cover it with green plastic.

We continue working until we run out of parts. Don’t forget that we are “building a pyramid”, and therefore with each subsequent gluing we focus on the size of the plastic star.


All that remains is to design the trunk of the coniferous tree. Of course, its role will be played by a cork plug. However, to make the craft resistant to tipping over, we will place a small yellow bucket in the tree. Let's cut it out of a round cup.

Lubricate the bottom of the bucket with glue and place a cork barrel in the center. Set aside the part for 2-3 minutes, let it dry completely.

We connect the crown with the trunk. The result was a slender emerald Christmas tree made from plastic bottles. A real forest beauty.

Bottom line

5. By the way, the Christmas tree also looks quite creative with larger “branches”
We cut the bottle into 3 parts. Only make cuts in a circle towards the center, straight.
A puncture is made in the center with an awl and the needles are bent up and down in order. A puncture is made in the lid of the cream or mineral water into which a skewer of the required length is inserted.
The parts are strung in descending order, with a large bead placed on top of the glue. The Christmas tree can be decorated with polystyrene foam, rain, etc.
Glue the Christmas tree onto the disk stand.
The Christmas tree is ready
It would seem - how can we use the empty plastic bottles that we constantly encounter in everyday life? Yes, they are very different - large and small, from carbonated and drinking water, from ketchup, sauces, mustard, shampoo, cream...
Most of us throw plastic bottles into the trash without regret. But it turns out that it was completely in vain! Even such seemingly useless things can be put to very good use:
- Crafts from plastic bottles for the garden, cottage and vegetable garden;
- Ideas for a balcony;
- Children's crafts and toys made from plastic bottles;
- Flowers from plastic bottles;
- Useful for home;
- New Year's ideas;
- Bird feeders;
- Drinkers made from plastic bottles;
- Let's look at what can be made from caps and caps from plastic bottles;
- Flashlights
Animals made from plastic bottles,
So, let's look at all the points and find out what crafts can be made from plastic bottles using a little imagination.
Children's crafts and toys made from plastic bottles
Of course! Toys and more toys. Pigs, cows, cats, lions, penguins. Just look closely at the bottle: what does its shape remind you of? Grab your paints, brushes and spend time with joy and pleasure!
For inspiration, here are examples of what toys can be made from plastic bottles of different shapes:
Creative Frenchmen have created a whole world of robots from plastic bottles and caps!


The best children's books
A whole detailed step-by-step instruction on how to make an airplane from a plastic bottle

Show me at least one boy who will refuse such a jetpack made of plastic bottles!

Here's a great toy for the bath - ships made from shampoo bottles.

Such a colorful and cheerful elephant will help add variety to the interior of a children's room and will simply delight your children:

If children are afraid of the dark, make a funny night light for them and with them.

Source of idea: Fab
Or these “fireflies”.

You can also make bright and funny rattles from plastic for little ones.

And here are these “foam blowers” for older children - in the summer, outdoors they will be a big hit with kids.

It turns out that you can make not only toys from plastic bottles, but even an entire game! For example, how do you like this bowling alley?

And, of course, you can very simply make a traditional piggy bank! True, it will be difficult to break it. 🙂

Animals made from plastic bottles, birds
The main thing is to guess the animal hidden in each bottle shape!


Look how cute this jellyfish is from a plastic bottle to decorate a child's room!

Magic video Master Class on making a turtle
Funny birds made from plastic bottles.

Charming frog princess

New Year's crafts from plastic bottles
Christmas tree made from plastic bottles
It turns out that you can make a Christmas tree (for example, a tabletop) and even a Christmas tree from plastic bottles. Links to master classes are under each Christmas tree.

And in this video, a girl makes a tall New Year tree with a star on the top of her head!

And another video Master Class on making a New Year's beauty
New Year's toys made from plastic bottles
New Year's toys V holidays We need them to decorate the Christmas tree or the entire room. Here are a few ideas that will help you make unexpected and funny New Year's toys and decorations from practically nothing - from plastic bottles and a minimum of available materials.
The Christmas tree can be decorated using these original balls (the basis of these balls are rings cut from a plastic bottle, and you can come up with any decor):

You can make simple Christmas tree decorations with your own hands - and depending on how you decorate them or what you fill them with, you can get many options:

If your Christmas tree is large, you can make golden bells for it:


Or you can use pine cones from brown plastic bottles:

New Year's decorations for the home made from plastic bottles
Snowflakes most different types They look especially good if you can paint them with gold paint:

Such a ball can become a room decoration, and several balls hung at the entrance to the house will create an unforgettable festive atmosphere:

Making New Year's candlesticks from plastic bottles is very, very simple:


Useful crafts from plastic bottles for home
Comfortable pouf for the living room

Step-by-step instructions for making an adorable cat pot

We all know how delicious cupcakes are and how difficult it can sometimes be to bring them to guests without ruining all their beauty. Regular cake boxes are too big for them, and for some reason no one has come up with mini boxes yet. So make them yourself! All you need is a plastic bottle, cardboard and colored tape.

By the way, you can pack macaroons in the same way!

Here are some more ideas for creating a variety of containers from plastic bottles to store various items:


Source of idea and MK: duitang

We don’t know about you, but for us it’s always a big problem to find a place for a charging phone. With a shower gel bottle you can easily solve this issue. Just cut out a holder from it that will fit both the phone itself and the charging cable. You can decorate it using fabric or napkins using the decoupage technique.

Plastic bottles can even be used to create unusual designs for napkin rings. We offer step by step instructions for the manufacture of.


Bird feeders made from plastic bottles
Maybe a bird feeder is not the most creative craft, but it is very useful for our little brothers, and it also deserves attention, especially as spring approaches.
Make two through holes in the bottle and insert a wooden spatula. And, of course, don’t forget to sprinkle some grains!


Crafts from plastic bottles for the garden, vegetable garden and cottage
Now let's see how plastic bottles can help us in growing flowers and other plants.
This idea will save a lot of space, because a previously empty wall is used to place these bottle pots.


Perhaps the simplest, but most important craft is a watering can for home or garden plants! It doesn’t matter whether you are preparing to grow seedlings for your garden at home, or you just have aromatic herbs growing in pots - such a watering can can be very useful.
And you can make it with just a bottle, a match and a thick needle!

Having fun with water in the form of a whole system of iridescent vessels is ideal for summer pastime with children in the garden and at the dacha.

Who wants fly agarics from plastic bottles?
Or a whole bouquet of daisies!
Jewelry made from plastic bottles
The imagination of the designers is amazing! You look and can’t believe your eyes that such beautiful things are created from ordinary plastic bottles!
You can create jewelry for girls:

Step-by-step instructions on how to make a very delicate bracelet
A wonderful one is coming winter holiday — New Year 2019. It's time to decorate your house for his arrival, so that Santa Claus on his magic sleigh does not pass by and leaves good gifts under our tree. It is very interesting to decorate the Christmas tree and rooms with homemade toys for the holiday. The process of making them is fascinating, as is any creativity. Such crafts can be made from the most simple materials, for example, from plastic bottles. From ordinary plastic bottles you can make a lot of interesting and beautiful things that can successfully replace store-bought analogues. Our story today is dedicated to the 7 best and original crafts made from plastic bottles for the New Year 2019, which will be held under the sign of Yellow Earth Pig. Let's look at them in detail in our article.
Christmas tree
An unusual Christmas tree can be made from simple plastic bottles. It is important to collect necessary materials for this craft and follow the master class step by step.
To do this you will need:
- Plastic bottles;
- Scotch;
- Sandpaper (cardboard);
- Scissors.
Progress:
- The bottom and neck of the bottle should be removed, and then you will get a straight pipe. Then you should prepare blanks from twigs. They must be of different sizes so that the Christmas tree turns out to be cone-shaped.
- Then the plastic bottles need to be cut lengthwise into 3 parts so that subsequent tiers are smaller than the previous ones. You need to make needles on each workpiece, and to do this they are cut into thin strips, but not completely. To make the Christmas tree stand stable, it is advisable to use the bottom of one of the bottles as a stand.
- A sheet of cardboard needs to be rolled into a tube and placed in the neck of the bottle. You can secure it with tape. Now each tier of branches needs to be secured to the tree. You can install a toy on the top or come up with something else. To make the Christmas tree fluffy, the needles should be cut thinner. Usually blue or transparent bottles are used for this. That's all, our craft is ready!
Christmas balls
You can decorate your Christmas tree with handmade toys. In your work, it is important to follow all the steps step by step, and then you will get wonderful products.
To do this you will need:
- Plastic bottle;
- Glue;
- Rain;
- Any shiny jewelry.

Progress:
- The paper needs to be wrapped around the bottle: this will help mark the workpieces on it. It is necessary to cut 4 rings 1 cm wide. Then the rings must be fastened together using the “crosswise” principle and secured with glue. The result should be a ball of plastic strips. You need to choose beautiful threads or rain so that the toy can be used for the Christmas tree.
- To decorate the resulting blanks, it is better to use foil, beads, seed beads, etc. You can place inside such a ball small ball. You can use as much imagination as you like with this craft. This will be a very interesting activity for children.
Snowflakes from plastic bottles

To expand the range of crafts made from plastic bottles for the New Year 2019, you can also make snowflakes from the bottoms of bottles as a Christmas tree decoration. This process will also be possible for beginners in this creative endeavor.
To work you will need:
- Scissors;
- Acrylic paints of white, blue, gold, silver - to choose from;
- Plastic bottles, preferably blue;
- Paint brush;
- Wire;
- Pliers.
Progress:
- We take plastic bottles and, using a utility knife or scissors, cut the bottom as low as possible to the base, leaving only the corrugated part.
- After the bottoms are ready, we begin painting our future snowflakes. Depending on the desired design, select the thickness of the brush, and then start painting. As drawings, you can use various ornaments that come to your mind. This also applies to the choice of paint color with which you will decorate your New Year's product.
- When your snowflake has turned into a beautifully painted masterpiece, give it time to dry while you use wire and pliers to make small ear for thread. Attach it to the snowflake and thread the thread into this ring.
Well, our New Year's toy for Christmas tree decoration is ready, which you now have the right to be proud of. A DIY snowflake can serve as a worthy decoration not only for your home, but also kindergarten if you have Small child, and also act as an exhibit at an exhibition at the school of New Year's products.
Penguins made from plastic bottles

Original New Year's decoration Your home for the New Year 2019 may include penguins made from plastic bottles, which should be placed in the rooms and under the tree as decoration. This craft will delight all your family and guests, and especially children. Without spending a lot of time, you will create with your own hands a real masterpiece of art that will cause a lot of positive emotions and sincere smiles in your household.
To work you will need:
- Plastic bottles (one toy takes two bottles);
- Scissors;
- Acrylic paints - white, black, red and others;
- Brushes;
- Small colored scraps for a scarf;
- Buboes or bows for hats;
- Glue.
Progress:
- We take the bottle and cut off the top part almost completely or half to get the body of a penguin. The head is made from another bottle and also from the lower part, but the workpiece should be slightly smaller.
- We connect both blanks by inserting the upper part, which is smaller, into the lower part, which is larger.
- After you have built the penguin's body, start painting it. Take acrylic paints and carefully apply them to a plastic product, imitating the color of a penguin, as shown in the photo. Use more bright colors, because the brighter your New Year's penguin turns out, the warmer and more cheerful the smiles of your family will be.
- When your penguin takes on a realistic look, you can tie a small scarf around its neck and attach a bubo or bow to its cap using glue.
What a cartoonish miracle you have created!
Video tutorial on making penguins from plastic bottles
Golden bells

Golden bells will look original on the New Year tree. This work is done very quickly and is suitable for kindergarten.
To do this you will need:
- Plastic bottles;
- Acrylic paint, if desired instead acrylic paint you can use fabrics, ribbons and accessories.
Progress:
- For work, you should take 0.5 liter bottles, but more is possible if the tree is very large. The bottom of the bottle should be cut off. To make bell petals, you need to cut the edge of the bottle in a zigzag shape. Because the resulting edges will be sharp, care must be taken.
- The petals of our craft need to be made pointed, and you can use a knife to give them shape. To make holes for the rope, you need to heat the knitting needle and make holes. You can do this work with scissors, but be very careful. At the end of the work, the bells should be painted, and they will dry within an hour. To give the products a New Year's look, they need to be decorated with tinsel, garlands or sparkles. The instructions are simple, and you can do the work in your own sequence.
Candlesticks made from plastic bottles

To do this you will need:
- Plastic bottles;
- Scissors;
- Glue gun;
- Universal glue.
Progress:
- You can make a wonderful candlestick for the holiday with your own hands. You can use bottles different colors. The containers need to be cut in half. The edges of the part that remains with the bottom should be cut into strips, not reaching 4 cm. The strips can be of different widths. The resulting container will be a candle stand.
- Strips of plastic should be melted over a candle. Then use a glue gun to attach the candle to the foil. The space around the candle can be decorated with beads or stones. This way the candlestick will have little weight, and our craft is ready.
Video master class on making candlesticks
Cone
You can make original cones with your own hands; this craft from a plastic bottle will perfectly decorate your Christmas tree and home for the New Year 2019.
To do this you will need:
- Plastic bottles;
- Scissors;

Progress:
- You need to create squares from a plastic bottle, after which their corners should be rounded. The result will be products like chamomile. After this, you need to treat the edges of the petals with a candle so that they fall down.
- All parts must be strung on a thread in descending order. A bead must be inserted between them. Then you need to make a spruce branch and secure it to the pine cone. The product is ready to create a festive atmosphere.
Just recently I was visiting my friend. Elena has been doing needlework for a very long time, and it is from her that I often borrow amazing ideas for creativity. Whatever the girl comes up with, she tries to implement immediately.
So this Saturday she showed me several of her finds, which can be a wonderful help in preparation for the New Year and Christmas. After all, it is not at all necessary to spend a lot of money on purchased decor, when it is quite possible to make it yourself from scrap materials.
New Year's crafts from plastic bottles
Editorial "So simple!" I have prepared an unusual master class for you about how to make a christmas bell from a cola bottle. Easier than ever and without extra costs!

You will need
- PVA glue
- linen thread
- packing tape
- plastic bottle

Manufacturing

I also suggest you check out a few more ideas New Year's decor , which can be made from unwanted plastic bottles.

We also have a wonderful master class for you on how to create caramel using plastic bottles, colored packaging garland and LED flashlights. On the eve of the New Year, don’t be lazy to make such a decoration. It will come in handy more than once, tested from my own experience!
As you can see, even ordinary plastic bottles can become an excellent material for creativity. Moreover, the New Year is just around the corner, which means that you need to create something new and get rid of the old. And these ideas will just help you get rid of the old, while creating an original and beautiful holiday decor.
Hello, dear subscribers!
The magical time has come. When you go to a store, and there is such beauty, everything is dressed up and decorated. The soul rejoices and the eyes rejoice. The most amazing thing in all this is when you meet her, and there are toys hanging on her, and they are so different. Just like in that song, there are balloons and firecrackers.
Now there are a lot of all kinds of products on sale, artificial snow, rain, tinsel - all this gives us a fairy tale and gets us going. And of course it lifts your spirits. But, besides all this, we all eagerly begin to create for the New Year and do it with the children, which we happily hang on the forest beauty.
You can make New Year's toys with your own hands from anything, waste material or improvised means. And if you still don’t know what to make them from, then you did the right thing by looking at me in this article. Now you will be shocked and quickly run to make something.
And the main thing is that all these ideas are so simple and unique that they will charm anyone. All the crafts that you conjure can be given to friends and colleagues, as well as to please your favorite teachers or... anyone. Friends, create together with your children, because they certainly won’t wait for it.
So, choose the job you like and get to work, because there is very little time left, before you know it, bam and the holiday has arrived! Get ready today. Good luck.
It seemed that nothing could be easier than taking something unnecessary and creating some wonder. But to accomplish this you need inspiration, so that you have something to start from. To do this, I have collected a lot of ideas for you, so that from all the diversity you can find something that suits your soul.

I want to offer you one interesting option that you will be absolutely delighted with. Let's make toys from plywood. You think it’s impossible to do this, I thought so too, until I saw it step by step instructions. Afterwards, I gave my husband a task, and the children enthusiastically glued napkins onto the cut out figures and used the decoupage technique. In addition, you can paint with paints. In general, let's take it in order and you, too, will become wizards))).
First, find suitable layouts for which you will make blanks. And of course, find a sheet of plywood or thin scraps of lumber, they will also be suitable for this purpose.
Such homemade things can be made in any size, and unlike glass souvenirs, they do not break, and there is no need to worry about them.

The plywood sheet should be no more than 4-5 mm thick, without knots and without any kind of veneer defects. You should use a jigsaw and an electric drill. Perhaps a hand drill, PVA glue and a heat gun may come in handy.

It is preferable to use acrylic paints and you will also need aerosol varnish. To make the figures shine and sparkle, decorate them with sparkles, tinsel or artificial snow.
On a sheet of plywood, draw all the blanks you have chosen; you can also draw any decor yourself.

Then carefully and slowly cut them out with an electric jigsaw.
Advice! When cutting, guide the file along the outer line (contour) of the depicted templates.
Then you need to make a hole into which you will insert a thread or satin ribbon.


The first layer of paint should be exclusively white; after it dries, apply any other colors and decorate the craft.

And finally, another option that is amazing is decoupage. You can decorate the cut out figures with regular paper or cloth napkins, can you imagine?

For this purpose, take PVA glue and dilute it with water in a ratio of 1 to 1. Cut out the plot you need and glue it to a piece of wood.

Don’t forget to add brightness to this miracle after drying.


Or from paper strips, fold them like an accordion, and then glue them together like this:


Among other things, you are the same as last time, when we created New Year symbols from threads, remember? You can take the idea as a basis, and in the same way balloon glue with silicate glue or PVA thread. And after drying, pierce the ball and you will get a light New Year's souvenir.

In the same way, you can make a big snowman and put him under the Christmas tree.


The next job is wow, interesting. It will especially appeal to kids who can’t wait for their moms and dads to want to build everything together, a snowman from cotton pads. Well, did it really turn out lovely?

If you have an old CD lying around, then an ordinary plastic ball will shine from it. How to do it? Yes, from disk fragments, and insert a shiny cloth inside.


In addition, you can decorate ordinary glass or transparent balls in completely different ways. For example, by pushing a photo or your family photo into it.


Another work that is made of tinsel or confetti will make an impression.


Another option is to take a foam sphere and glue or stick sequins onto it.

The next work will be bright and green, this is a charming Christmas tree, which will not be difficult to complete, the trunk will be made from an ice cream stick or take wooden skewers. Follow this masterclass:


Such a forest beauty can become a great gift or decorating any interior in a room or hall.
And here is another craft, which is also in the form, but it is made from cinnamon sticks and artificial tinsel. Instead of decorations, multi-colored buttons are perfect.
We will need:
- tinsel
- glue gun
- buttons
- cinnamon sticks
- rope
Stages:
Cut three strips from tinsel different lengths and attach them to the stick.
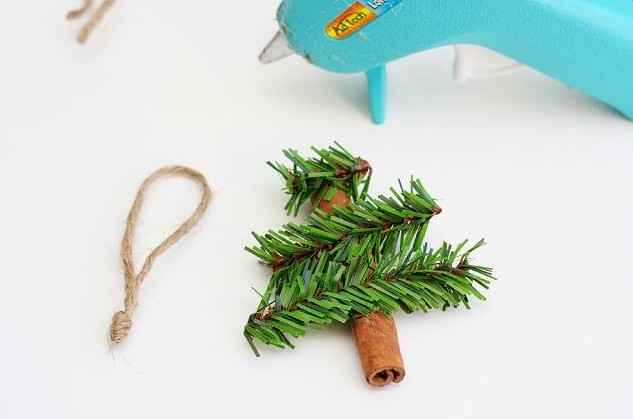
Make a loop out of the string and glue it and the tinsel to the cinnamon stick. And then arrange the buttons in a chaotic order.

Some small masterpieces in the form of houses or snowflakes are also created from ice cream sticks.

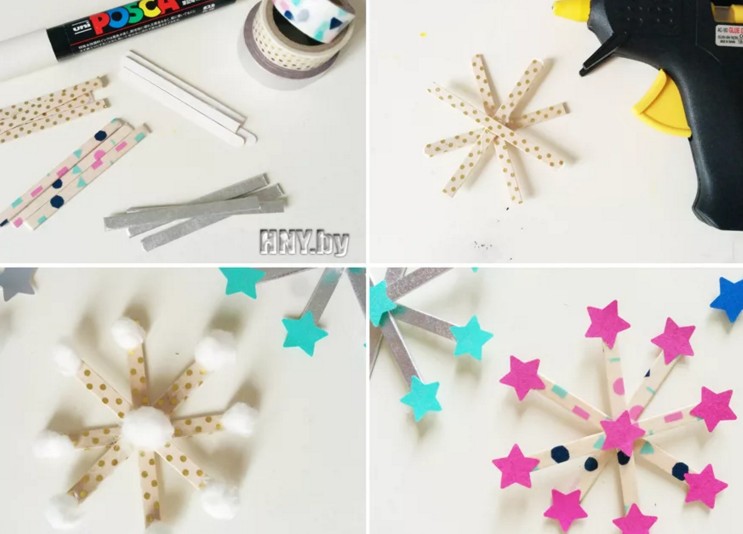


And also from tubes:

Or from wooden clothespins, the main thing is to decorate with sparkles.

You can find a lot of interesting things, even pasta souvenirs. It was necessary to think of such a thing, crazy hands do not know boredom).

The kids will love another craft option: take a pine cone and turn it into an animal.

Shape the head and ears, and all other parts of the body. You will get the face of a bunny.

Now glue it onto the pine cone.

This is the kind of animal you will get))).

Using the same scheme, you can also make a hedgehog or a squirrel.


Or decorate the cones with soft balls and glue them using a heat gun.

A very unexpected option made from nuts, but look what wonderful animals the author created. Such beauty will also decorate any holiday tree.

Using the classics, you can easily decorate an ordinary pear-shaped light bulb with acrylic paints.

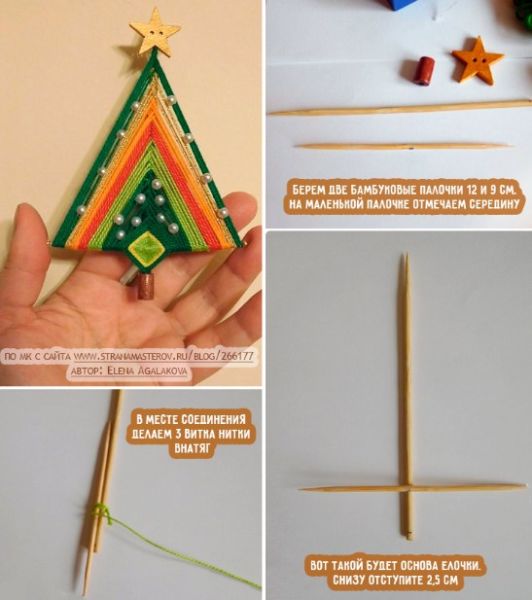
A cool option is to make a Christmas tree-mandala out of threads; you wouldn’t even be ashamed to give one like that. Such a creation looks quite impressive, no one will refuse such work.


From scraps of fabric, create a magnificent souvenir that will please anyone, such as mom or grandpa.


It’s also not difficult to make all kinds of creations from ordinary fabric:


Enough original crafts is a beaded Christmas tree, which is made in the form of a spiral using wire.


New Year's toys for the Christmas tree 2020 made of felt (patterns and templates inside)
I think that many came to this article to find exactly the right felt toys, and take the necessary stencils from the site and go to cutting and sewing. Among other things, I have one wonderful post on my blog that contains many other schemes and developments, so don’t be shy, go ahead and choose.
I propose to consider a Christmas star, which is made of ordinary white fabric, and the cap is made of felt.

First, take a blank, print it out and apply the outline to the fabric.


Then fill the toy with cotton wool or padding polyester. And then the fun begins, color the star with instant coffee, brew this drink in a glass, and then decorate it.

Sew the cap to the star. Glue the eyes and embroider the nose and mouth with thread.


Now take the following sample as a basis. Who does he remind you of? Yeah, of course a snowman.


It would also be an excellent solution if you cut and sew such a house. Catch his sketches.


I also came across very beautiful toys in a blue shade, and they were decorated with snowflakes and beads. Great, I thought, and decided to show them to you. Make a printout of the Christmas tree, star and circle.

Cut out the necessary parts from felt.

Then attach the snowflake and bead like this, as shown in this photo.

Carefully glue or sew on the decor, and do the same with the beads.


Another job, take note.


And here are a couple more ideas, I really liked the cedar cones and the boot that Americans give on this holiday, January 31st.


Master classes on stylish crochet toys for the New Year
Well, let's move on. And be sure to first of all knit the symbol of the New Year, which must be present in every home. Choose a scheme and go ahead. In fact, on my blog, there is a separate topic in which it is collected, so if you are interested, come visit.


A cute pig that any boy or girl will have if you suddenly decide to knit such a miracle.



These are such funny little pigs or pigs.


Take this video as a basis, it shows everything from A to Z and you will also get the same souvenir:
And if you want to knit New Year's balls, then here's another story for you.
Now another pattern, take it as a basis, because everyone also likes a knitted Christmas tree, no one doubts it.


It will turn out very cool and attractive.

Or this simple work from lace, which is knitted from posts.

The next work is a bell.

I liked the idea of a snowflake, look how painted it is.

It turns out that even such a winter masterpiece as a Christmas tree is knitted from threads. Cool.


Funny and perky snowmen. Do you want the same? Voila, they are already yours).

Where would we be without Santa Claus, tie him up too.

And a few more diagrams and descriptions.


Making Santa Claus with your own hands: 8 best ideas
You can make a grandfather out of different materials, for example, from ordinary cotton pads and ordinary red yarn. You will also need another disposable spoon. Step-by-step pictures will help you understand everything.


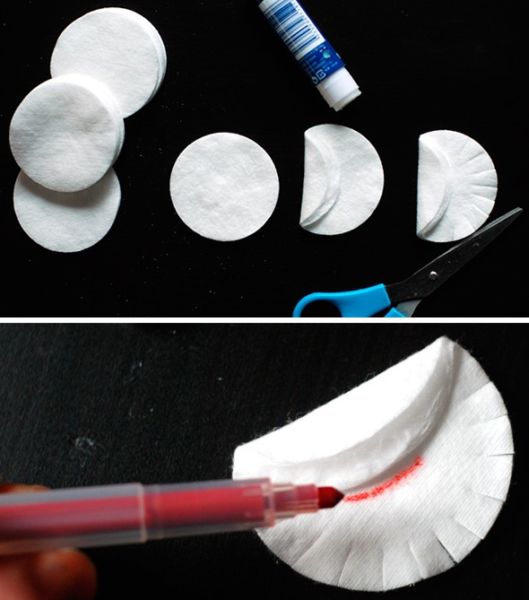
The spoon will need to be glued between cotton pads.


Now we make Frost out of paper, or perhaps he will remind you of Santa.


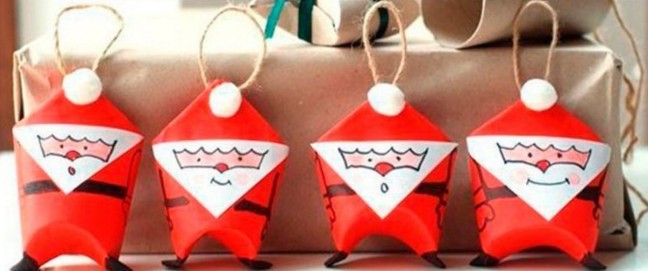
It’s also easy to make a figurine of your favorite character from a regular cone.

You can make a craft using the origami technique.


In addition, there are already ready-made stencils using which you can easily glue such a craft together.

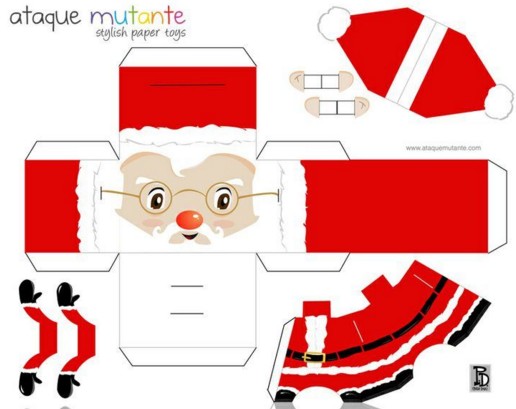
Step-by-step instructions on how to make Christmas tree decorations from cotton wool
I recently came across a video that amazed me. I didn't even imagine that this was possible. It turns out that I’m sharing them with you. Create such wonderful souvenirs and decorate the forest beauty with them.
Souvenirs from plastic bottles
What a beauty, I took a soda bottle, spotted the idea right there and now the craft is almost ready. Take into account all the ideas and choose the one that is suitable or the one that will be easier to do. Involve your children in this activity. Well, let's see.


Craft Christmas tree made from salt dough
Now let's look at another popular option. After all, many needlewomen love to make handmade using regular dough. And what comes of it, you can see right now:
We will need:
- Flour – 3 tbsp. l
- Water – 10 ml
- Dough cutter - herringbone
- Gouache
- Thin brush
- Table salt – 6 tbsp. l

Stages:
Mix all the ingredients according to the list, you should get an elastic dough.

Let the bun lie for 5-10 minutes and rest.
Then roll out the cake and use a Christmas tree mold to squeeze out the shape.
Roll out the dough to a thickness of no more than 5 mm.
This is how the preparation will turn out.
Let it dry for about 24 hours. And then take gouache and paint.
Volumetric star on the top of the Christmas tree
Well, how can a Christmas tree be without a tip; usually it has a five-pointed star or a spire. Let's learn how to make a star yourself so that you don't have to run to the store and buy it. How do you like this idea?
All you need is flexible wire and beads, see the master class:

There is another option, it is paper. Although the star looks gorgeous. And the whole point is that scrap paper is used, but it will also shine from ordinary colored paper.

Prepare everything you need for work. These are sheets, glue, scissors and a pencil.

Fold the square in half, and then in half again.

Then fold the leaf diagonally.

With all the folding you get this, shown in the figure:

Now turn the piece over to the reverse side, inside out, and make the cuts. Use a ruler to measure and mark a dot. This is done like this, in the photo you can see that there are 4 squares, and those sides that are located towards the center of the sheet, measure them and divide them in half. Cut it.

Connect each cut to a line to create a triangle on each side.

Apply glue to one side of each triangle.

And attach the opposite one and glue it together.

Thus, you must complete two blanks. It is from them that the star is assembled.

And then glue them together.

Here’s another idea that will attract children’s attention: a craft made from threads that are well moistened with glue.


Don't forget to let the toy lie down and dry completely. Enjoy the holiday you created!

The simplest star, like this one with decorative little things in the form of buttons.


Or something like this nice option, which is made of cardboard, and then rewound with threads and decorated with felt leaves and berries.


