The child’s learning process must be inextricably linked with everyday life. That is why kindergartens select the most suitable topics for creative activities. So, in the first days of spring, do-it-yourself crafts for March 8th become popular in kindergarten, and children are actively preparing for the women’s holiday. They not only learn poems about grandmothers and mothers, rehearse a concert together with the teacher, but also do handicrafts.
Postcards, paintings, paper flowers and decorative little things for the home created by the hands of children carry a piece of a child’s soul, which is what is actually dear to close women. In this collection you will find interesting crafts for kindergarten by March 8, which children can make with their own hands.
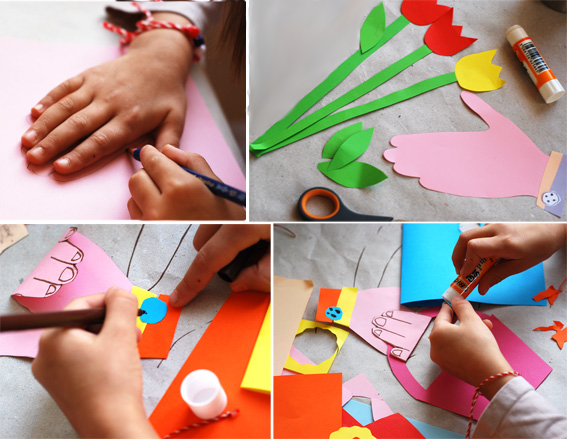
Postcard “Funny Palms”
Children aged 3–4 years old do not paint well enough with a brush, but they can easily create wonderful pictures with the help of their fingers and palms. Invite your child to literally make a holiday card with my own hands. Undoubtedly, mother will also be pleased to receive such a creation, because a sheet with a child’s palm print is another valuable relic associated with the childhood of her beloved child.
To make a postcard you will need:
sheet of colored cardboard in A-4 format;
white paper measuring 13x18 cm;
blanks made of colored paper (leaves, vase);
bow made of narrow satin ribbon;
PVA glue;
Finger paint;
2 brushes (for paint and glue);
a clean cloth to remove excess PVA;
green marker.

Sequencing:
1. Bend a sheet of cardboard in half, clearly marking the fold line.
2. Glue a white sheet onto one of the colored sides so that there is a frame around it. Gently blot off excess glue.

4. Using a brush, apply paint thickly onto the child’s palm. Place your well-painted hand on a white background.

5. The resulting print will be a “flower”. Draw a line to it from the vase with a felt-tip pen - “stem”.

For children older task You can make it more complicated: invite them to draw not one, but several flowers, using both the left and right palms. Instead of blanks, the children can be given templates, which they will have to independently attach to colored paper, trace along the outline with a simple pencil and cut out.
Difficulty level: for younger groups.
Many people associate touchingly delicate mimosa with its fluffy yellow balls and warm aroma with spring and the holiday of March 8th. Unfortunately, flowers tend to fade, but a picture with their image will always please the eye, especially if it was made by a child with his own hands.
For the craft you need the following materials:
a sheet of brown cardboard in A-4 format;
white sheet measuring 19x27 cm;
a tube of PVA and a cloth for glue;
a little millet or corn grits;
green paint and thin brush;
a small piece of narrow tape.
Instructions on how to make a picture:
1. Before starting the lesson, the cereal must be washed and dried.
2. Glue a white sheet onto the cardboard so that it is in the center. The resulting brown fields will serve as a frame for the picture.
3. Using your finger, apply glue pointwise in 10–12 places in one corner, as if forming a mimosa inflorescence.
4. Sprinkle the leaf thickly with millet (corn). When the painting dries, shake off the remaining grain.

5. Make two more inflorescences in the same way.
6. Finally, use a brush to draw stems and leaves. Decorate the picture with a bow made of satin ribbon.

Working with cereals promotes development fine motor skills in a child, it has a calming effect. If children are still poorly oriented on a sheet of paper, in those places where glue will need to be applied, you can first put marks with a simple pencil. During classes with children of the younger group, the teacher finishes the greenery. The older guys design the picture themselves.
Difficulty level: for younger groups.
In the first days of spring, I really want to please my beloved mother with flowers, for example, “Tulips in an envelope.” In order for the children to be able to successfully make a craft by March 8th with their own hands, the kindergarten teacher needs to prepare properly: make shaped envelopes from sheets of colored cardboard, blanks of tulip heads from pink, orange, yellow and red paper (3 for each craft), blanks leaves (2 pcs.) and stems (1 pc.) from green paper. For this activity you will also need glue, a brush and a cloth.

Progress:
1. First, children fold the right and left edges of the envelope along the marked lines.
2. In the middle part (top) they glue tulip flowers.
3. Then, focusing on the flower heads, glue the stem to the central tulip, and place the leaves on the sides of the stem.


Difficulty level: for younger groups.
Every mother is pleased to receive a bouquet of daisies from her son or daughter as a gift. And even if they only vaguely resemble real wildflowers, the child made them himself, with his own hands, with love and gave them from the bottom of his heart. You can beautifully decorate your home with such fantasy daisies, and for a child who is just beginning to master the art of modeling, this will be a sign that you appreciate his attention and work.

To make daisies, a child will need:
3 green cocktail straws;
20–25 dry pumpkin seeds;
plasticine, modeling board, glass.
Sequencing:
1. Take a small piece of yellow, pink, red or blue plasticine.
2. Warm it up in your hands and roll it into a ball, which you then slightly flatten.
3. Place the resulting disk on a cocktail straw.
4. This is the core of the flower, around the entire perimeter of which you need to insert 7-8 seeds.
5. Make two more daisies in the same way.

If desired, the teacher can supplement the resulting flowers with leaves cut from green sheet felt. Instead of plastic straws, you can use tree branches as stems for flowers, but before starting, they must be washed in a soapy solution and dried well. Otherwise, the plasticine will not stick to the branches due to dust and moisture.
To make the house feel like a holiday, it needs to be decorated. Both real and paper flowers are perfect for this purpose. Amazingly beautiful tulips, lilies and lotuses are collected from colored paper using the origami technique. Children, of course, cannot make such complex designs, but even a 4-year-old child can make a flower bud.

For origami “blooming tulip” you will need:
a square sheet (preferably double-sided) of red, pink or yellow paper;
square sheet of green paper for the stem.
Perform origami according to the following scheme:
1. First, the sheet intended for the bud is folded diagonally. Then lightly mark the middle of the bottom side of the resulting triangle. Now, focusing on the middle, bend the right corner to get a petal tooth on the left.

2. Do the same with the left corner of the triangle. The acute angle at the base of the bud is bent back. Having outlined the bottom line, the flower is unfolded to hide the corner.

3. As a result, a “pocket” is obtained at the base of the bud, into which the stem is subsequently inserted.

4. The next stage is creating the lower part of the tulip. The green sheet is folded diagonally, a line is marked and unfolded. Then the side edges of the tulip are bent so that they coincide with the center line. The resulting workpiece is folded in half lengthwise and finally a transverse fold is made.


You can make a bouquet from paper tulips or create a postcard composition. In general, origami classes develop children's accuracy and precision in performing actions. Thanks to this technique, kids become familiar with geometric shapes, the concepts of “left”, “right”, “top”, “bottom”, “middle” and so on.
On our website you can see how to make one for schoolchildren.
By March 8, children in the middle group will be able to make such a craft with their own hands in kindergarten.
Variation on the origami theme – voluminous postcard"Flower Fan" To make it you will need white sheets of A-4 format, colored double-sided paper, felt-tip pens, scissors, PVA and a brush for applying glue.

Instructions on how to make a postcard:
1. To get the base, fold a sheet of green paper like an accordion, making fold lines every 1.5–2 cm.


5. Flowers are cut out and, lightly smeared with PVA, glued to the base. The postcard is ready.
Difficulty level: for intermediate group.
Any little fashionista will appreciate a bright, lightweight cardboard handbag. To make it, you need to take a sheet of multi-colored cardboard in A-4 format and two sheets of orange paper of the same size. In addition, you will need cardboard for handles and PVA glue.

First of all, the handles are glued to the base. Then the inside of the multi-colored cardboard is covered with orange paper so that the inside of the bag looks beautiful. The remaining orange leaf is cut in half and each part is folded like an accordion. These are the sides of the bag. Their edges need to be coated with glue and connected to the base. That's all - the bag is ready!

Beautiful beads made from pasta
Difficulty level: for intermediate group.
Both women and girls love to wear jewelry, especially those made with love by loved ones. Exactly like this a nice gift For mom or sister, beads and bracelets made from painted pasta will be made. During the lesson, in addition to pasta, you will need wool threads, gouache, and nail polishes.
Instructions on how to make jewelry with your own hands:
1. First, gouache is diluted in containers with water. Pasta is immersed there for a short time. There is no need to overcook them, otherwise they will get soggy.
2. Then take out the pasta and place it on paper. When the products are dry, they are varnished for shine.

3. Next, you need to secure the pasta on a thread. To do this, the “tubes” are strung, and the “bows” in the center are wrapped several times with thread and tied. In the “wheels” the thread is pulled through two opposite holes.

4. To make the beads bright and unusual, it is advisable to alternate the pasta in color and shape. The ends of the thread of the finished decoration are tied together.

5. If desired, you can decorate headbands and hairpins with multi-colored pasta. It turns out very original! 

Difficulty level: for intermediate group.
A charming paper basket in white and pink tones will undoubtedly find a place in the ladies' room. You can fold the same delicate paper flowers from napkins into it and, as a result, get an interesting spring composition.

What materials and tools are needed to make such a basket?
A large square of thick sheet of white paper.
Scissors.
PVA or glue stick.
: a handle made of white paper (its length should be the same as the side of the square), a pink strip for finishing the handle (slightly narrower and shorter than the handle itself), two side elements made of pink paper (pentahedrons with smaller sides than the basket), pink flower and white core.


Step-by-step instruction:
1. Preparatory stage. A square white sheet needs to be divided into 9 equal parts. To do this, each side is divided into three equal segments. Through the marked points draw barely noticeable lines with a pencil.

2. During the lesson, children first fold the sheet along the top horizontal line. Then you need to bend the bottom of the square and make cuts at the top and bottom to the resulting fold lines.


4. It turns out to be a box. To fix it, carefully glue the sides.


Using non-standard materials when creating crafts develops creative and imaginative thinking in children. During class non-traditional techniques Appliques include scraps of fabric, torn pieces of paper, napkins, dried plants, pasta, and cereals. You can make an original painting from cotton wool, foil, thread and coffee. It's hard to imagine, but from cotton pads and the sticks turn out beautiful, similar to real calla lilies.

To create a painting with flowers you need:
paper plate;
a sheet of double-sided green paper;
glue, brush and cloth;
scissors;
3 green cocktail straws;
felt-tip pen or marker yellow color;
3 cotton pads and the same number of ear buds;
narrow ribbon.
To make an applique with calla lilies, you need:
1. Use a marker to color the edge of a cotton swab.
2. Then insert it into the straw so as to hide the uncolored part.
3. Place the tube with the edge where the stick is inserted on the cotton pad.
4. Lightly coat the edges of the disk with glue and connect them, forming a flower bud. Carefully remove excess glue with a cloth.
5. Make two more calla lilies in the same way.
6. Cut out a leaf for a flower from colored paper and wrap it around the callas. Secure the bouquet with a ribbon.
7. Glue the composition to the plate.

These calla lilies can not only decorate a plate, but also complement a postcard in the form of a vase or basket. Another option is to arrange flowers in a bouquet using decorative paper or mesh. Not only calla lilies are made from cotton pads, but also roses, daisies, dandelions, and carnations.
Difficulty level: for older group.
The originality of the card lies in the fact that it looks like a cup, inside of which there are words of congratulations and paper flowers. There are a lot of ideas for decorating such a craft: colored cardboard can be decorated with ribbons, buttons, pieces of lace and fabric, voluminous flowers and ready-made felt elements. The cup postcard can open in different directions. Inside there can be both flowers and a folding book.

To make such a craft for March 8, you need to print (or draw) a template, take a sheet of white paper, colored cardboard, glue, a brush and scissors.

1. First of all, you need to cut out all the elements necessary for the applique: a folding base in the form of a cup, a piece of white paper that will decorate the front side of the card, buds, petals, cores, stems and leaves.

2. First, glue all the details of the flowers.

3. While the products are drying, decorate the cup itself: carefully glue a white paper cutout to the front. Excess glue is removed with a cloth.

4. Now the blank cup is opened. Flowers are glued to the left side, making a bouquet of them.

5. When the card is completely dry, you can move on to the last step - write your congratulations.

Difficulty level: for older group.
Preschool children like to work with different materials: foam chips, matches, shells and, of course, fabric. Working with colorful scraps develops children's color skills. Creative activities with soft and hard textiles are also needed for the development of tactile perception. Since it is too early to pick up a needle at the age of 5–6 years, you can start creating with fabric using the papier-mâché technique.

A bright bowl made from pieces of fabric will not only be pleasant, but also a useful gift by March 8th. You can store threads, sweets, business cards and other small items in it. To make a gift for your mother or grandmother, you will need the following materials:
pieces of cotton fabric left over after sewing;
disposable deep plate;
hard brush;
PVA glue.
At the stage of preparation for the lesson, you need to cut all the existing fabric into strips 2-3 cm wide. It is advisable to cut strips that are too long into pieces. The result should be small scraps that will be convenient and easy for children to work with. The glue is pre-diluted with water in a ratio of 1:2 or 1:3.
Already during the work, strips of fabric are immersed in an adhesive solution, taken out, slightly wrung out and glued to the upside down disposable plate in a chaotic manner. After the bowl is completely covered from the outside, you need to apply two more such layers. Next, the product is left to dry on the windowsill. After a day, when the fabric becomes dry, carefully remove the plastic plate from it. The resulting bowl is trimmed and, if desired, pasted around the edge with a textile strip.
Bouquet “Spring”
Difficulty level: for older group.
Bright flowers, lush greenery and fluttering butterflies - this paper bouquet definitely puts you in a spring mood and lifts your spirits. To create a holiday craft, you will need scissors, a sheet of green double-sided paper in A-4 format, colored paper, PVA glue, a simple pencil, a ruler, felt-tip pens and a stapler.

How to make a bouquet - instructions:
1. Fold a sheet of paper in half lengthwise. Place a ruler along the fold line and mark points with a pencil every two centimeters. Do the same on the opposite side. Use a pencil (barely noticeable) to line the sheet, not reaching 2 cm to the edge.

2. Make cuts along the marked lines. Then roll the sheet into a tube so that there are a couple of turns. Secure the edge with a stapler.

3. Fold sheets of colored paper in half. From the wrong side, draw flowers, butterflies, and core circles with a pencil. This must be done on the fold so that the resulting elements are symmetrical.

4. Cut out the parts. Glue the cores to the petals, and use a felt-tip pen to draw small details on the butterflies.


And finally, advice to parents. Remember that your grade is of the highest importance to your child. When he sees that close people show interest and care for his crafts, his desire to create even more beauty with his own hands, both in kindergarten and at home, strengthens. In order not to kill your child’s faith in his own abilities, do not ridicule or criticize him under any circumstances for the flaws inherent in his age.
March 8 is just around the corner and we with kids We have already started preparing for the holidays crafts and applications. Plasticine, colored paper, newspapers, and leaflets are used. I will post the results of our work in about 1-2 days.
You should have seen with what zeal and interest children(my nieces and son) are getting ready for March 8! All you can hear is: “I’m making this craft for my grandmother,” “And I’m doing it for my mom,” “And I’m doing it for my sister” :) In this atmosphere of bright crafts, you can already feel the approach of spring and warmth! I think your children too, doing crafts for March 8, will fill the house with warmth, joy and celebration! Happy upcoming year everyone!
1. Postcard for March 8 “Flowers in a pot” (3-6 years)
How to do:
With your child, cut out a pot and flowers from white paper and decorate them with cutouts from a magazine. Trace the outlines of the flowers with felt-tip pens. Let the child glue the resulting pot onto a second sheet of paper and draw stems for the flowers. Now you can glue the flowers.

You can sign the postcard in an original way: Attach it to the refrigerator with magnetic letters.
2. Craft from plasticine balls “Festive dress” (1-3 years)
The little ones will also be able to congratulate their mothers on March 8th! Varechka made this craft for her mother, sometimes asking me: “Yulia, should I sculpt here? Julia, right?”
Material: colored paper; plasticine; cardboard (ours is from a marshmallow box).
How to do:
Cut out a dress from colored paper: fold the sheet in half, draw only one half of the dress at the fold, cut out and unfold the sheet, you get a dress. Glue it onto cardboard.


Draw circles on the dress. Roll it up balls from plasticine, and let the child stick them into circles on the dress. By the way, I wrote about activities with plasticine balls and their benefits in the game.
P.S. Using plasticine balls, Varechka decorated the cardboard itself. Since she is still small and does not know how to write herself, we cut out the inscription “March 8” from the newspaper and glued it next to the dress.
3. Craft “Mimosa” (3-5 years)
Do you know why mimosa? It symbolizes the sun, warmth and the beginning of spring. When Slavik was making this craft, there was a feeling that everything around was beginning to bloom, although there was still slush and snow in places outside the window.
This under the tree I suggest making it for children over 3 years old, because it takes a long time to sculpt balls and not every two-year-old child can withstand 10-15 minutes of sculpting.
Material: yellow plasticine; cardboard (ours is from a candy box); colored paper (green).
How to do:
Draw the stems of the mimosa with a green marker.


Cut out leaves from green paper, slightly cut their edges - this way they will look more like real mimosa leaves. Roll balls out of yellow plasticine with your child and let him mold them onto the stems.
4. Craft “Talking Flowers for Mom” (5-10 years)
This craft was made by my older nieces Arisha and Vikusha. In a day March 8 their mother will receive a gift that will say it all! like this under the tree You can give it to your mother or grandmother not only on March 8, but also on your birthday.
Material: colored paper and colored cardboard
How to do:
Let the child trace his palm on 5 multi-colored sheets and cut out traces along the contours. These will be flowers.


Then you need to cut out the stems and the vase and glue everything onto the cardboard. The child can write on the vase “I love my mother (or grandmother) because...” and on the flower palms are the answers.
5. Craft “Bouquet for March 8” (3-8 years)
When we made this bouquet, we didn’t think it would turn out so... real!
Material:
- colored paper; 2 sheets of cardboard (I used a filter box);
- round white paper napkin(if you don’t have such a napkin, cut out a large circle of white paper, make the edges wavy);
- ribbon.
How to do:
Cut out flowers and leaves from colored paper. Have your child glue them onto a round napkin.


To prevent the napkin from becoming wavy from the glue and to be more durable, glue a circle of cardboard on its back side.


From the second sheet of cardboard, cut out the base of the bouquet and glue it, as in the photo. Draw the stems with a green marker.
Finally, decorate the bouquet with a ribbon.
6. Craft “March 8” (1-3 years)
And again a craft for kids! We have already prepared a gift for mom (craft 2). Now we will make our grandmothers and sisters happy!
Material: colored cardboard (1 sheet); flowers cut out from magazines, newspapers and leaflets; plasticine.
How to do:
Cut out the number 8 from colored cardboard. For this I needed 2 bowls of different sizes and nail scissors.


Roll balls from plasticine and prepare cut out flowers. Let the child sculpt and glue everything onto the figure eight.
International Women's Day March 8th is the day when everyone congratulates our lovely ladies: mothers, girls, sisters, grandmothers, wives and everyone else. It is time to recognize the strides and achievements made by women throughout history and in all countries. Every woman in your life deserves kindness and recognition, no matter who she is: a working woman chasing success or a stay-at-home mom. And you can show your love by making beautiful crafts for March 8th with your own hands, so we have collected 20 cool ideas that are easy and quick to make at home or in kindergarten.
New crafts for March 8, 2019
Looking for a unique, thoughtful gift to DIY for the special woman in your life? We've rounded up some of our favorite ideas, many of which can be implemented with minimal time and effort. limited budget. These gifts are amazing for mothers, daughters, teachers, wives and any other female member who will thank you.
Paper carnations
- Muffin tins of different sizes (small, medium and large);
- Wire;
- Toothpick;
- Sponge;
- Red paint;
- Stack the muffin tins - 3 small ones on the inside, 3 medium ones in the middle and 3 large ones on the outside. Secure the molds in the middle and use a toothpick to poke two holes near the center, about 3 centimeters apart.
- Pass the wire through the holes and tighten from the bottom to compress the shapes slightly.
- Fold the entire flower into a crescent shape.
- Separate the layers to allow the flowers to “bloom.”
- To finish making the flowers, dip a sponge in red paint and blot the edges of the shapes.

To make a gift you need:
- Glue;
- Finished drawing;
- Cardboard;
- Pencil;
- Glue;
- Clear nail polish;
Step-by-step instructions for production:
- Take a profile photo of yourself or your pet.
- On your computer, enlarge the photo so it fills the entire screen, then tape a piece of cardboard to the monitor.
- Trace the image with a soft pencil.
- Remove the paper from the monitor and cut out the silhouette with scissors.
- Use glue to glue the silhouette to the back of any colored design, then carefully trim around the silhouette.
- Flip the silhouette over, then glue it to the white paper.
- Let the painting dry and then apply a final coat of clear varnish.
Paper ball

To make a gift you need:
- Ready pictures;
- Buttons;
- Needle and thread;
- Beads;
Step-by-step instructions for production:
- Cut the paintings into 12 strips 18 x 1.5 centimeters wide.
- Use a pushpin to make a hole at the end of each strip.
- Thread the needle with 45 cm thread. Tie a few knots at the end and add a bead.
- Fold the strips over, then pass the needle through all the holes on one end.
- Bend the strips into a C shape. Pass the needle through the other end.
- Place another bead and tie a knot.
- To create a hanging loop, bring the end of the thread back onto the bead, then tie a few knots in the thread to secure the bead.
- Branch the strips evenly to form a ball.

To make a gift you need:
- Pencils;
- Scotch tape or glue;
- Paper;
- Notebook;
Step-by-step instructions for production:
- Place the open notebook on the reverse side.
- Using a pencil, trace the notebook onto the patterned paper, leaving a 1.5cm border. Cut out this silhouette.
- Cover the outside of the notebook with glue.
- Hold the notebook open by pressing down on the back of the cover. Smooth out any uneven areas.
- Cut a notch at the top and bottom of the cover curve and trim a diagonal line at the four corners.
- Glue each corner, then fold and glue each edge along the inside of the book.

To make a gift you need:
- White mug;
- Acrylic paint for enamel;
- Brush;
Step-by-step instructions for production:
- Wash and dry the mug completely.
- Using a brush, apply your design to the cup.
- Leave to dry for one hour.
- Place the cup in a cold oven, heat to 150 degrees, and “bake” for 30 minutes.
Remove from the oven and let it cool completely.
Greeting cards for kindergarten
A cute card made by little children's hands is the most desired and expensive gift for any mother. To receive such a beautiful masterpiece is a great joy and happiness.

- colored cardboard;
- colored paper;
- comfortable scissors;
- PVA glue;
- a simple pencil;
- stencils of flowers of different sizes, hearts and cores of a lily.
Progress:
- Take the heart template and trace it on green cardstock, then cut it out.
- Take a template of flowers of different sizes, we have three of them, outline and cut out three flowers.
- Draw a circle template for the heart of a lily from yellow paper.
- Glue a large flower in the center of the heart, then glue a medium one on it and finish with the smallest flower.
- Centered smallest flower stick on the yellow core. Our holiday craft card is ready.

For production we will need:
- cardboard sheet;
- pasta of various shapes;
- gouache;
- PVA glue;
- water;
- apron;
- napkins.
Progress:
- Start by processing the pasta. Take a large amount of paint, add a little PVA glue, and dilute with water if necessary.
- Take a cardboard sheet, cut a circle out of it and decorate the frame using pasta horns, spreading glue on each of them. Let it dry.
- Using pasta shells of red and Pink colour We form a flower in the middle of the leaf. Glue the first layer of petals with the convex side down, the second layer with the convex side up.
- Next, glue on the green stems and leaves. To do this, use feather pasta (stem) and shell pasta with the convex side up (leaves).
- To decorate the craft, you can also glue scallop pasta and spiral pasta in blue and pink. Here you can dream up. Our bright pasta craft card is ready.
DIY flowers for mom
March 8 - spring holiday, which is associated primarily with huge bouquets of flowers. In kindergarten, one of the most common types of crafts is flower-themed crafts.
Application “Flower for Mom”

To make the application we will need:
- cardboard;
- a simple pencil;
- comfortable scissors;
- PVA glue;
- paper napkins or colored corrugated paper;
- template of a large flower in a pot.
Manufacturing process:
- Draw the finished template of a flower in a pot onto cardboard.
- Cut napkins or corrugated paper of the required colors into 2x2 cm squares, then roll them into balls.
- Take glue and dip each ball of the desired color into it and glue it onto the cardboard.
- Fill the drawn area of cardboard with circles of the desired color. Our beautiful DIY craft is ready.
Snowdrops made from plastic spoons for mom

To make this craft you will need:
- plastic spoons;
- plasticine;
- old unnecessary plasticine;
- small flower pot;
- green cocktail straws;
- green plastic bottle;
- green napkins.
Progress:
- Roll a large ball from old unnecessary plasticine and place it on the bottom of the pot.
- Roll seven small carrots from green plasticine; perform the same steps from yellow plasticine, only smaller in size.
- Connect green carrots with yellow carrots with large sides.
- Place the resulting plasticine on the cocktail tube, yellow side up, and secure well.
- Repeat this procedure with all seven tubes.
- Cut off the handles of disposable spoons and insert each spoon into the stem into a plasticine carrot. Thus, we insert three spoons, we get a snowdrop with three petals.
- As a result, we get seven snowdrops.
- Cut a 15-20 cm leaf from a green plastic bottle. Make seven pieces of leaves of different lengths.
- Insert one snowdrop at a time inside the plasticine that is in the pot. Next, insert the flower leaves into the plasticine.
- The bottom of the pot must be covered with green napkins to make it look beautiful. Our beautiful DIY snowdrops are ready for mom, all we have to do is hand them over.
Paper rose for mom

To make a flower you will need:
- multi-colored double-sided paper;
- green corrugated paper;
- aluminum wire;
- comfortable scissors;
- PVA glue.
Progress:
- Take a pink or red sheet of colored double-sided paper and trace a large circle.
- In the circle, draw a spiral towards the center up to the loop.
- Cut out a circle, then cut in a spiral also to the loop.
- Twist in a spiral to the same loop.
- Spread PVA glue on the loop and place our rolled rose on the glue, holding it a little to secure it. Let dry.
- Take double-sided green paper and cut out a circle and leaves like a rose.
- Glue each leaf to the center of the circle, four leaves in total. Let dry.
- Glue the rose bud to the leaves.
- Take aluminum wire and wrap it in green corrugated paper. At the end, secure with glue. Let dry.
- Take a rose and pierce it in the center with something sharp, maybe with a knitting needle. Insert the flower stem there and secure it. Our charming rose for mom is ready.
Craft “Daisies from cotton pads”

For production we will need:
- double cotton pads;
- white threads;
- watercolor paints;
- PVA glue;
- comfortable scissors;
- colored cardboard;
- plasticine;
- colored paper.
Manufacturing process:
- First you need to learn how to make a chamomile. To do this, you need to take a cotton pad and bend it on both sides towards the center in the form of a ball and wrap it well with thread at the bottom so that it does not unravel. We have a chamomile petal. In the same way, make 7-8 petals.
- Take all the petals with the curved edges up and connect them together with a thread.
- To prepare the chamomile center, you need to take a disk and dip it in yellow paint on both sides. Dry thoroughly.
- Spread the center with glue and form a daisy. Make three daisies in the same way.
- Make a cardboard base for the craft, cut out a rectangle, and form an oval from it.
- Cut stems and three or four leaves for daisies from green paper.
- Place daisies with stems and leaves on a cardboard base, and glue them one by one.
- For greater effect, you can create a frame. Our cute daisies for mom are ready.
Craft “Vase with flowers for mom”

For production we will need:
- White list;
- watercolor paints;
- brushes for painting and glue;
- comfortable scissors;
- colored strips for quilling.
Manufacturing progress:
- Paint a sheet of paper with bright paint. Let it dry.
- Glue on a vase cut out of white paper.
- Take colored quilling strips and stick them on the vase one by one. The result is a cheerful multi-colored vase.
- Take strips of three colors and glue them at the ends, forming flower petals.
- Twist green stripes onto a pencil; these will be flower stems.
- Cut out the centers for each flower and form a flower from the petals and the center, which is glued on top of the petals.
- Now you need to place the flowers on the leaf. If they go beyond the contours, it will even be very interesting.
- Glue the stems of the flowers that were twisted onto the pencil onto the base.
- To hide the end of the stems, glue another colored strip for the vase. Our fun and festive craft is ready. Mom will be delighted.

To make this craft we will need:
- plasticine;
- cotton buds;
- comfortable scissors;
- felt-tip pen;
- colored cardboard.
Manufacturing process:
- Take a sheet of colored cardboard, this is our basis.
- Cut the cotton swabs in half using scissors.
- Make the center of a daisy from yellow plasticine.
- Cotton swabs must be inserted into the plasticine in a circle, forming a flower.
- Press the resulting flower onto the cardboard and secure it.
- Using a felt-tip pen, draw the stem and leaves of the flower.
- Take green plasticine and fill in the drawn leaves and stem. It turned out to be a wonderful DIY flower for your beloved mother.
Original gifts for March 8th with your own hands
Children's imagination is very rich, so kids are happy to make gifts for their mother, grandmother or girlfriend, and more. greater joy they will be handed over.

To make a frame we will need:
- cardboard;
- PVA glue;
- paper for decoration of your choice;
- comfortable scissors;
- a simple pencil;
- multi-colored beads, bright buttons, rhinestones for decoration.
Frame manufacturing progress:
- First you need to prepare the frame itself. To do this, you need to cut out the front and back of the frame from cardboard. In the front part, you need to cut out a place for the photo, and also leave stripes for decoration. If it is difficult for the children to cope with this work, the teacher can give each child a ready-made frame, which only needs to be decorated.
- Trace the front part of the frame on colored paper with a pencil and cut it out, then glue it to the cardboard. Glue two pieces of cardboard together, do not smear the top with glue, you can then insert a photograph through it.
- You must also glue a stand to the back of the frame on which the frame will rest.
- Next, the finished frame needs to be decorated. Here, each child can show his imagination, the teacher shows possible options, and the child is given the right to choose. Each frame turns out bright and unique.
- With the help of multi-colored beads, bright buttons, and rhinestones for decoration, each child creates his own individual masterpiece, which he will give to his mother on March 8th. Decorative elements must be soaked in glue and decorated with a frame. Let the work dry thoroughly. A unique DIY craft for photographs is ready.

To prepare you will need:
- salty dough;
- magnet;
- PVA glue;
- corn grits.
Manufacturing process:
- First you need to prepare salted dough, for which you need to take two parts flour and part salt, for example 400 grams of flour and 200 grams of salt. Add water and pink egg dye. The result was pink dough. Mix well and cut off a piece.
- Roll out a flat cake and squeeze out a heart with a mold. The finished product should dry thoroughly.
- Spread the dry heart with glue and sprinkle with corn flour, let it dry.
- Lubricate the other side of the heart with glue and glue the magnet. Our holiday magnet craft is ready.
Beads for mom

For production we will need:
- salted dough of three colors;
- beautiful ribbons or fishing line.
Manufacturing progress:
- First, prepare the salt dough by taking flour and salt in proportions of two to one. Dilute with water and add food coloring. We need to make dough of three different colors.
- Make beads and holes in them so that later you can thread a ribbon or fishing line.
- Leave the beads to harden. Small beads need at least a day for this, large beads need several days.
- After the beads have dried, all that remains is to thread ribbons or fishing line through them.
Candy bouquet craft for mom

For the product you will need:
- lollipops;
- multi-colored foil;
- scissors;
- scotch;
- colored paper;
- cup;
- pencil.
Preparation method:
We take colored paper, you can take a wide variety. Attach a glass to the sheet and circle it. The outline of the circle needs to be cut out. There are a lot of similar preparations that need to be made. Preferably multi-colored. Next, each candy needs to be wrapped in foil. After this, we stack the circles of colored paper in a stack of 4-5 pieces. It can be one color, or you can alternate several shades. You need to make a small cut in the center and insert a stick with candy. We bend the ends of the circles upward. Secure with tape. You should get a “flower” on a stick, and in the middle there is a candy in foil. We do the same with the rest of the candies. We collect them in a bouquet. We fix the “legs” together with tape. We wrap our “bouquet” with beautiful decorative paper and tie it with a ribbon. A wonderful DIY gift for mom on March 8th is ready.
Vase with mimosa crafts in kindergarten

We have to:
- colored paper;
- glue;
- yellow napkins;
- ruler;
- a simple pencil;
- paints;
- White paper;
- scissors;
- plastic cup.
Manufacturing process:
You need to take a sheet of green paper and fold it in half. From the place where the “little book” opens, step back one and a half centimeters and draw horizontal line. From it, draw stripes 1–1.5 centimeters wide. They need to be cut. Do not cut all the way, just to the line. When you unfold a sheet of paper, it should only be cut in the middle. After this, the green paper must be glued together, but this must be done in such a way that one half is a little longer. It is on this that you need to apply glue. After this, you need to twist the workpiece into a tube. The result will be a product similar to a bush. Strengthen the base with tape or a stapler. Next, we move on to the design of the cup. It is better if it is completely white without additional decorations or relief. When suddenly you don’t find one, cover the multi-colored glass with white paper. After this you can start making art. What to depict on paper depends on your desire and skill. Maybe something in the theme of a women's holiday, for example, some spring flowers. When the paint dries, place a green bush in the glass. Next, cut or tear the yellow napkin into small pieces and crumple them. The resulting balls must be carefully glued onto green leaves.
You will greatly please your mother and grandmother if you make a gift for them with your own hands. You may need the help of an adult, but try to do the work yourself so that the gift remains a secret.
We offer simple crafts that can be done at school during labor lessons. Therefore, our article will be useful for labor education teachers. Crafts have different levels of difficulty, so it’s easy to choose a job that suits the child’s age. Before you begin the creative process, prepare the necessary material, then the work will go faster.
For children primary classes We suggest making an original postcard. It can be simple or voluminous. The card is decorated with flowers or made in the form of a cup, clothing, purse or bag.

From the picture you can see that the craft is simple to do. To make it you only need pencils, glue, scissors and paper.
But my mother will be happy with such a postcard. After all, it is made in the shape of your palm. In this work you can show all your imagination. We offer several ideas for making such cards.

It is enough to trace the palm, cut it out and make a postcard from the blank, decorating it to your liking. Look at the execution diagram.
Step one. Trace the palm and then cut out the resulting shape.
Step two. Make an applique of spring flowers on a separate sheet and cut it out. Glue your palm on one side of the card, leaving your fingers unglued. Insert flowers there and bend your fingers, then glue them. The postcard is ready.


You can make a craft with a warm hug.


Three-dimensional postcards look original, let’s look at one of them. “Vase with flowers” is easy to make.

It is made from multi-colored circles of various diameters.
Step one. Fold the sheet, it will serve as the base for the card.
Step two. Glue the cut out circles on top of each other in decreasing order. First a circle with a large diameter, then a smaller one, and so on.
Step three. Make a stem by folding the paper into a rectangular shape. Glue it to the main circle.
Step four. Glue a small rectangle to one side; it will act as a vase. Insert a bouquet of flowers there.
You can make an impressive card using a hole punch.

See what crafts you can make for Women's Day. Mom and grandmother will love this voluminous card. To work you need to prepare:
- chenille wire;
- corrugated paper;
- glue.


You can make a bouquet for mom with your own hands. We showed how to make flowers from paper, now we offer to make crafts from other materials.

Try to make a bouquet from plastic bottles. A high school child could do this kind of work. This craft is good because its production does not require material costs. A plastic bottle can be found in every home.


For work, prepare:
- heat gun;
- candle;
- plastic bottles.
Watch the master class on creating a bouquet.
And these flowers are made from the bottom of a bottle.

You can make this original craft from bottle caps.

Step one. Use an awl to make holes in all the lids.
Step two. Twist the wire, thread it through the hole in the lid and secure it.
The bouquet is ready.
Do you love kinder surprise? Surely yes. If you still have plastic containers from kinders at home, make flowers for your mother or grandmother from waste material. It turns out to be a very beautiful craft.

For work, prepare:
- cocktail straws;
- awl;
- Kinder surprise containers;
- scissors.
Instructions.
Step one. Divide the containers into two halves.
Step two. Give the edges a stepped zigzag shape. The container will resemble a tulip.
Step three. Make a hole with an awl and insert a tube there.
Do you love yogurt but throw away the cups? In vain. They will make an original bouquet for mom on March 8th.

For work, prepare:
- 3 cups;
- bamboo skewers.
Step one. Cut the cups into a flower shape and place them inside each other.
Step two. Insert a skewer after making a hole in the glasses. Skewers can be replaced with cocktail straws.


Whatever gift you give your mother, she will accept it with joy, because it was made by your hands. In fact, there are many ideas for creativity, the main thing is to come up with what you want to please your loved one. And by showing your imagination and spending a little time, you can make something original for your mother, grandmother, friend and sister. Look at these photos, perhaps you will choose for yourself what craft to make for the International women's day March 8. So, a photo selection for your attention.


We offer a selection of DIY gift ideas for March 8th. In this article we have collected for you original crafts for children and adults, detailed master classes and the most useful tips. If you want to please a loved one with something simple and at the same time very beautiful and made from the heart, these easy lessons will definitely come in handy.
Any child wants to give his mother a gift on March 8th - you will certainly find great ideas in this collection. In addition, you can easily find crafts for school (for classmates and teachers), something for your beloved grandmother and just family friends of any age. Flowers, candles, candy gifts - all this and something else for your inspiration!
All the materials that we will use to create gifts for March 8 are very simple. Most likely, you already have everything you need. If this is not the case, you will not have any difficulty finding it in the craft departments or hypermarkets.
We have collected the most popular, but not trivial gifts. Choose what you like best and feel free to get down to business. A gift for International Women's Day can be made even in 15-20 minutes!
Paper flowers
Paper crafts for March 8 are very popular. We invite you to make a beautiful and very delicate bouquet of flowers using the quilling technique. Such a gift will not leave anyone indifferent, because it is difficult to find a woman who does not appreciate flowers. This simple craft - great gift for mom, grandma or teacher.

We will need:
- wire;
- colored paper;
- decorative branches;
- decorative butterflies (or cardboard and stencil);
- Styrofoam;
- flower pot or basket;
- Super glue;
- glue stick;
- quilling needle.
Please note that a flower pot or basket can easily be replaced with wrapping paper.
We have previously told you what it is. In the article at the link you will find useful tips on choosing paper for crafts using this technique, as well as information on what you can use to replace a quilling needle if you do not have a ready-made option.
Let's start creating flowers. To do this, cut all the paper into strips 0.5 centimeters wide. It is desirable that the length of each strip is at least 50 centimeters. However, to create petals that are not too large, A4 sheets will be sufficient, which we will divide into strips (cut along, not across).
Take a strip white and tightly wind it onto the needle, forming a very tight “bobbin”. Then we pull out the needle and, using our fingers, give the untwisted part the shape of a petal. Press the end well. The tip can be glued to a glue stick. Make at least 10 petals per flower. Determine the number of petals by the number of flowers in the craft by March 8th.

Fold the yellow strip in half, and then in half again. Leaving 1-2 mm on top, make a fringe along the entire length of the resulting part. Coat the uncut strip with glue and twist the part into a flower - this is the middle of the flower.

We connect the yellow center with the petals using superglue; this must be done from the “wrong” side. The petals should point slightly upward. Make the required number of daisies.

Now let's take care of the legs. To do this, cut a small piece of wire (the length depends on the desired size of the flowers). We entangle the entire wire with a green strip of paper. On top we make the same dense bobbin as on the petal blanks. Raise it up a little and add a drop of superglue. Connect with the flower itself.


You can wrap the resulting gift in wrapping paper. A bouquet placed in a pot will look even more interesting. To do this, glue a piece of foam plastic to the bottom of the basket or flowerpot and simply stick the wire legs all the way to the base. We pass decorative leaves between the flowers, and plant a beautiful butterfly on top.
This craft will be perfectly complemented by vintage paper butterflies. If you like homemade paper flowers, you can see how to make your own dahlias for the holiday. This is no longer quilling, but the technique is also interesting.
Beaded roses
This March 8 gift master class will not be difficult even for children: we will make a beautiful festive rose from beads with our own hands. This is another option for presenting flowers to your beloved women, which the recipient will definitely like. A craft like this is a great holiday gift for your mother, sister, grandmother or friend. The main value of such flowers is amazing appearance and durability; Such gifts are kept for years.

We will need:
- beading wire;
- green beads;
- beads for the base.
IN in this case you don't need complicated beading patterns. The flower is assembled from several petals, and this greatly simplifies the task. This means that even beginners can master the master class.
We start with weaving greenery. To do this, bite off a few pieces of wire and prepare green beads. We will need 13 beads for one leaf. Take a look at the photo to see how the rows are built.

At the end of each petal we make a small knot. For one beaded rose we will need at least 5 green leaves. It will be nice to place 1-2 extra leaves on the flower stem, but this is not necessary.


Then we weave one row at a time, constantly increasing the number of beads by 2. That is, in the third row there are four beads, in the fourth there are six, etc. In total you need to make 8 rows.

After this, pass a row of beads along the edges of each petal to the very base to complete the leaf beautifully and round the edges.

To diversify the composition, you can add several larger green petals. It is better to weave them right away - before assembling the flower.

We round the petals a little towards the center and insert them into each other. We weave the wire together - just twist it.

We place green leaves under the base of the bud. Place a couple of green leaves in the center of the stem. We braid the stem itself with an additional piece of wire to make the craft look neat.

The original gift for March 8 is ready! You can give one rose, making it large - with a long stem. If you wish, you can weave a few more flowers and arrange them into a beautiful homemade holiday bouquet.
Candy heart
What woman would refuse sweets in her main holiday? But giving candy just like that is a little boring, let's decorate it nicely! We will get a very beautiful present for March 8th, which will appeal to girls and women of any age. You can make it yourself for a friend or offer such a craft to your child ( Primary School, kindergarten) as a gift for a teacher or educator.

We will need:
- hacksaw;
- skin;
- corrugated paper (white and colored);
- acrylic or spray paints;
- safety pins;
- any decor.
Expanded polystyrene is the same material that can be found at the bottom of the boxes in which household appliances were packaged. Take a careful look to see if you still have this material that will be useful for you to create crafts for March 8th. If there is nothing suitable, replace it with foam. However, keep in mind that the foam will rustle unpleasantly when cutting and crumble.
Draw a big heart on a piece of polystyrene foam. This can be done using a stencil or by hand. A great idea is to cut out a heart from paper and then simply trace its outline; so you can't go wrong.

We cut out the heart using a hacksaw and sand the edges to make the craft smooth.

In the center of the future gift, draw another heart, and then carefully hollow out the middle part. We do this using a hacksaw and a hammer. It is also better to sand the edges so that the recipient does not notice the flaw in your holiday gift.

We cover the side parts of the craft with white corrugated cardboard; its remains can be secured to the bottom (meaning the recess). Use superglue to securely fix the decor. Line the inside of the box with pink corrugated paper. Drape the edges of the product beautifully, trim off the excess. The bottom can be processed acrylic paint or spray paint. If there is nothing suitable, cover it with corrugated paper.

The gift for March 8 is almost ready! We need to place the recipient's favorite candies in the center. Safety pins will be required for secure fixation. We attach one candy at a time - just stick the needle into the candy wrapper (you can do it on both sides). We complement the festive craft with decorative flowers.
You did great sweet gift, which the recipient will definitely like. Complete the composition with a bouquet of flowers - and the recipient will be amazed! Flowers and sweets are a standard gift for March 8th for mothers, grandmothers, and girls, but all this can be presented in a very unusual and soulful way.
Beautiful rose candles
Candles are one of the best gifts for women. It's romantic, beautiful and very cute. Especially if the gift is made with your own hands and looks like buds of beautiful roses. Candles will be an excellent present for mother (children of primary and high school can do this under the supervision of adults), friends of any age and their beloved mother-in-law or sister.
Of course, you can find beautiful candles in any hypermarket, but in reality they cannot be compared with homemade ones. Just imagine how nice it will be for the person who receives as a gift a unique item that you worked so hard on.

We will need:
- several white candles (the simplest ones);
- candles with a metal base (“floating” candles);
- dry food coloring or red (pink) pencil lead;
- wooden skewer;
- metal plate or saucepan.
If you have crayons or pencil leads, all you have to do is take one of them and crumble or grate one of them. However, for richness it will be better to add dry food coloring. If you don’t have pink or red dyes, use others - no problem (modern roses come in yellow, blue, and any others).
Mix the dyes in a metal bowl and rub paraffin from old candles into it. Save the wick strings - we will need them later. Don’t throw away the metal candlesticks either – we will place our roses in them.

Place the plate in a water bath or over very low heat and melt the mixture. It should resemble jelly in consistency and be evenly colored.

Next, we need an old cutting board or any other surface that you don’t mind scraping with a knife. Using a brush, make a few blurry drops: they should be slightly narrower at the bottom and wider at the top. Do not remove the remaining paraffin from the water bath yet.

When the mass applied to the surface has cooled slightly, carefully scrape it off with a knife and roll it into a tube around the wick. Form a petal by pressing the bottom part with your fingers.

Gradually build up the mass of petals around the wick. Press each new petal slightly in the center and bend it back, giving the shape of a bud.

Please note that the petals do not have to be the same shape. It's okay if the outer part of the petals is wider. It's even more convenient.

Distribute the paraffin that you did not remove from the bath over metal candlesticks. Stick the formed bud into this mass and wait until the mass sets. Ready!

If you want to make scented candles, add 10-12 drops to the mixture essential oil roses. This way, when the candle burns, the room will be filled with a wonderful aroma. Additionally, the festive craft can be decorated with dry glitter. They do not smell when in contact with fire, and make candles elegant.
Another great idea is colored petals. If you have several food colors and the ability to place several plates in a water bath at once, then the petals can be made in two or more colors, and then combined in random order or alternately.
This gift is appropriate to give even to a stranger. For example, such candles would be good as a gift for female colleagues. It’s absolutely okay if your gifts for March 8th are homemade, because this is always highly appreciated.
If you don't have floating candles or want to "plant" a rose in a jar, take a look at these instructions. However, please note that you don’t need an ordinary jar, but one with a wide neck so that the paraffin does not drip onto the table when burning.
Topiary for the holiday
Another great gift for March 8th is homemade topiary. This craft seems difficult, but even children can handle it. Topiary is a wonderful DIY gift for mom. In addition, it can be given as a gift to a teacher or grandmother. The craft can become the central decoration of the holiday and will last for a very long time.
In this video tutorial, crepe paper serves as the basis for a festive topiary. However, there is nothing wrong with replacing it with something. For crafts for March 8, ready-made decorative flowers, roses made of satin ribbons, kanzashi flowers, paper flowers on skewers, tulips and roses made of beads (instructions can be seen above), buds made of felt or foamiran are suitable.
In a word, choose any material and make holiday flowers, and then simply stick them into a ball and decorate them, as shown in the video master class. A girl of any age will love this gift. If you have a child and are going to do crafts for school on March 8, take these instructions into account.
Choose any of the presented master classes and delight your beloved women with pleasant homemade gifts! Don't forget to add sweets or flowers to the gift to make it even more enjoyable. Your work will definitely be appreciated. All the instructions presented will help you make win-win gifts with your own hands, which are always popular with women and girls of any age.
Views: 13,939


