Necessary materials:
Scissors
- a set of colored paper
- box
- PVA glue
Stages of work:
Prepare boxes of various sizes. Cut off the part that covers the box from the box, make cuts along the fold lines (they should be ½ the height of the box itself). Bend the parts of the box along the cuts. The two opposite parts will be the wings, and the rest will be the tail and head. Round the wings. Cut the tail down to the very base. Cut the head, moving from the top to the very base, to create a triangle shape. Decorate the craft: make earrings and a comb.
DIY cockerel craft
You will need:Plastic bottle – 3 pcs.
- ball yellow color from a dry pool
- red and yellow plates
- red and yellow disposable cups
- black marker
- stapler
- simple tape
- double sided tape
Work process:
Cut off the top parts of 3 bottles and fasten them together with tape. Cut disposable cups along the edge. They must be attached to the rooster's neck using tape. Colors must be alternated. Cut off the edge of disposable plates and make cuts on the inside. As a result, you have feathers. Gather the tail and feathers with a stapler. Insert the tail into the cut. Cover the connection area with wrapping paper. The wings also need to be cut from disposable plates. Attach the head with double-sided tape. Cut out the comb, beak and beard from red disposable plates. Insert the cut pieces into the cuts on the head. Eyes are also created from disposable plates.
DIY Cockerel 2017
You will need:Beads for eyes
- hot glue
- egg cartons
- primer
- acrylic paints
- balloon
- old newspapers
- scissors
- 2 beads
- PVA glue
How to do:
Cut two cones from the egg tray and cut one side of each cone. Connect the cut cones with the cuts facing down. You will end up with one large cone with 4 petals. To create the neck and head, connect 5 cones together. Towards the top they will expand and become larger in size. Cut a comb from the side of the tray. Cut out a beak from the lid, which will consist of two parts. Feathers are also created from cones. They are fixed on top of the cardboard with hot glue. The length of one wing is 15 cm. Make blanks for the tail in a similar way.
The next stage is creating the paws. Bend the shape of the legs from copper wire. In order to give the desired effect, twist the corrugated tube. Insert the remaining tail between the corrugated and metal tube. For strength, fill the lower part with glue. Cut the claws from the bottom. They should be long and narrow. They need to be secured with glue. Paint the legs and torso with spray paint.

Prepare a utility knife and construction foam. All cuts should be neat and even. You can cut out the parts separately. Finally, glue them together with glue. You can bring it to the desired shape with sandpaper. Additionally, treat with acrylic putty, wait until it dries completely, plaster again and treat with PVA glue. This will allow the paint to adhere better.
Start coloring from the head. Glue the eyes on the head. To create a beautiful scallop, make a pattern on paper, transfer it to polystyrene foam, cut it out, and glue it to a suitable place. Start preparing the mold for the wings. Leave the back open. Cover the upper part of the wings with feathers made from corrugated bottles. Fold the last row inside the wing. Paint over it, leave to dry, attach with perforated tape and a self-tapping screw. Make a tail. Take the mesh and bend it. Cut feathers from bottles. Paint them separately on both sides. Apply black first, and then a little blue. Attach the feathers with wire to the mesh. Once the paint has dried, cut the feathers into two more pieces to make the tail appear even fuller.

You will like it too.
For the back, cut feathers from a clear bottle. The width of one feather should be approximately 2-2.5 cm. Attach them to the back, 3-4 pieces at a time. Use self-tapping screws for fastening. When you fix the feathers on the neck, cut off the top part. Glue the last row feathers to hide the screw heads. Glue smaller feathers in the back of the head and on the side of the crest. Cover all parts that you painted with construction tape and bags. First apply the yellow paint and let it dry. Add some stripes orange color.
The finishing touch is blinders. Cut 2 strips, make a cut with a stationery knife. Insert them between the metal-plastic and corrugated pipe. Paint the craft with yacht varnish.
How to sew a cockerel with your own hands
You will need:Cardboard
- threads, scissors
- orange, blue-green, black and white fabric
- tweezers
- cotton wool
- scotch
- glue
- colored paper

Draw a sample of the toy on a piece of cardboard and cut it out. Draw the wing separately, cut it out, and see how they look. Cut the sample into separate parts so that it is more convenient for you to work further. Match each piece of the sample with a separate piece of fabric, cut out each piece in turn from the fabric. There should be 2 of each part. Cut the head from white fabric, the upper part of the wing and body from blue-green fabric, and the lower part of the wing and tail from black fabric. Make the beard, paw, beak, comb and eyes from colored paper. Sew all the details for the head. Sewing the comb can be a little difficult. The fact is that it is wider than the head. It is better to sew it on the outside. Glue the eyes from colored paper.
DIY cockerel costume:
For the body, make allowances of 1.5 cm. Connect the parts from the inside. Sew the tip of the foot inside. Sew the wings on the outside, put soft filling inside. If you don't have it on hand, regular cardboard will do. Sew the bottom half from the outside, sew it to the body, and connect it through the cardboard with a seam. Try the torso to the head. Sew the neck to the body. Fill the connected parts with cotton wool. You need to fill it through the hole in the tail. The hole is very small, so you need to fill the craft with cotton wool in small portions. You may need to use tweezers. Sew the tail parts using an outer seam and fill it with cotton wool.
The paws can be made from cardboard or a piece of fabric. Select the fabric of the desired size and color, and make several square pieces. Trim the ends and sew the oblong legs. Fill with cotton wool. Sew the legs, wings, and tail to the body. Cut without touching the seams. The do-it-yourself cockerel toy is ready.


This is the easiest way to create crafts. There are several ways. You can use the techniques of origami, quilling, cutting with scissors, etc. Paper crafts can be placed or hung on a Christmas tree, glued to a window, or decorated festive table. An excellent solution is the decor of napkins. It will look quite restrained and at the same time original. If you use origami, then the napkin can be immediately folded into the shape of a cockerel. We will provide you with the diagrams.
DIY cockerel patterns.
In order for the symbol of the New Year 2017 to be favorable to you, and for the Fire Rooster to protect you all your days, it is best to appease the cockerel with a craft made with your own hands. Such a unique handmade will not only a great gift for relatives, acquaintances or friends on New Year's Eve, but decorating your room will give it a special flavor.
The rooster is a difficult symbol; this poultry loves only everything natural, so that there is coziness and comfort everywhere, but at the same time it does not tolerate dullness. To make a craft with your own hands for the New Year 2017, you need to use your imagination and Creative skills. Below we have selected detailed master classes, about how to make a craft with your own hands, dedicated to the symbol of the coming 2017 - the Rooster. To do this, you can use pieces of multi-colored fabric or paper, threads and other materials. The ideas we offer are easy to implement and do not require specific skills, you only need desire and imagination. You can bring your ideas to life together with your children; creativity is great for development fine motor skills, A joint activities with a child will bring you even closer to each other.
If you are planning to make a craft with your own hands for the New Year 2017 with your children, then most of all they will like the rooster made from plasticine mass. To do this, you only need multi-colored plasticine or modeling dough.
First you need to make three balls of small, medium and large sizes from yellow plasticine - the head, neck and body itself, now they need to be connected to each other, carefully smoothing out the boundaries. It is necessary to make two cuts on the sides of the body into which the wings of the rooster will be attached. A comb is formed from red plasticine, a beak is formed from orange, and eyes are formed from black plasticine.
To make a tail for a craft with your own hands, you can choose several colors at once, roll several sausages and flatten them, build a fan out of them and attach them to the body. Now the symbol of the new year 2017 needs to make wings; for this, red plasticine is suitable; from it you need to make two triangular or teardrop-shaped wings. Feathers can be formed with a modeling knife or a piece of plexiglass. It’s better to use the feathers themselves as wings; cut them out of colored paper.
Pillow as a gift
A wonderful gift for family and friends for the New Year 2017 will be a pillow with the image of the New Year's symbol - the Rooster. This DIY craft will not leave anyone indifferent, and if you decide to make a pillow for yourself, it will give comfort and coziness to any room. A cute accessory will enliven the interior of a nursery, bedroom or kitchen; hens and cockerels will be able to fit into your favorite style. It is very easy to create such a New Year's miracle. The idea is to appliqué the image of a cockerel onto a ready-made pillow, however, if you have sewing skills, you can design the pillow or thought yourself.
First, you need to make a pattern of body parts from sheets of paper, then you need to attach the patterns to pieces of fabric and cut out the parts. Then all the parts are sewn onto the pillow base. Flowers, insects and any other decor that will help revive the finished picture will become a wonderful decoration for the symbol of 2017. In addition to the owner of the year, you can make several cute chickens with your own hands, making them from fabric, choosing bright color combinations. Relatives and friends will appreciate such an unusual craft.
Paper cockerel
An excellent gift for the New Year can be a rooster or chicken made from paper. It's very easy to do and doesn't require any special creative skills.

The main thing is to prepare the necessary materials:
- scissors;
- several sheets of colored paper;
- glue;
- several paper boxes of various sizes.
First you need to cut off the top part of the box, make cuts along the fold lines up to half the height of the box itself. To form the wings, tail and head, you need to bend the cut points. The wings must be rounded using scissors. For the tail, make several cuts to the very end, give the head a triangle shape. To make the cockerel bright, you need to cover it with multi-colored paper.
Postcard with a cockerel
It’s so nice to congratulate your family and friends on the New Year 2017 with a beautiful New Year’s card with a picture of a rooster, made by yourself. For this craft you need very little:
- scissors;
- paper;
- Double-sided tape.
And of course, a little imagination and desire.
Templates for the background and figures of the New Year symbol can be found on the Internet, printed on a color printer, and then cut out. If you have the skill of an artist, you can draw it yourself.
The color blue is suitable as a background for the craft; it’s good to add a few snowflakes to it; scrap paper with a New Year’s image already applied is also ideal for the background.
Next, we glue double-sided tape onto the inside of the cockerel figurine and attach it to the postcard to make a three-dimensional drawing; you need to cut out the same figurine from paper two more times and stick it on top of each other, clearly aligning the contours.


Then you can make an inscription wishing everyone a Happy New Year 2017! And inside the card you can write a poetic congratulation. We think everyone who receives one original craft, it will be very nice. The ideas that you embody in your creativity always delight the soul and heart of a loved one!
Knitted gift
For those who know how to knit, an excellent solution would be to make a knitted potholder, which is also perfect as a hot stand. This DIY craft for the New Year 2017 will be an excellent decor for any kitchen and will add a special flavor to the interior.

For a knitted symbol you will need:
- remnants of thread in four colors (yellow, red, brown and white), both wool and cotton are suitable;
- four black buttons;
- medium thickness hook.
The tack is performed as follows:
- first you need to make a pattern of the future rooster on paper or fabric, draw its outline;
- then the body and head of the bird are knitted from brown threads;
- The shirtfront is knitted with white threads;
- red threads are suitable for the comb, and yellow threads for the beak.
You can knit a cockerel either as a whole or separately in parts, and then sew them together. Next, steam the new potholder well. The gift is ready!

Anti-stress cockerel toy
It would be a great idea to make a funny New Year's anti-stress toy with your own hands; many people simply adore things of this kind. Such a cockerel can not only be crushed, but placed on a shelf as a decoration, and it will delight the eye all day with its unusual appearance.

To do this, you will only need pieces of multi-colored fabric, it is better to take cheerful colors, a thread with a needle, and a special filler for anti-stress toys (you can also take regular cotton wool).
- cut a square out of fabric;
- from a red piece we make a comb and beak;
- sew the details onto the corner of the square;
- We place cotton wool or other material inside the resulting cavity;
- Next you need to sew the edges together so that you end up with a pyramid.
New and original toy ready, we are sure that all family and friends will like it.
Mother hens
Instead of a rooster, you can make chickens; children will definitely like such unusual New Year's toys. First, you need to cut out patterns for future birds from paper. Next, apply the parts to the fabric and cut out the finished parts, then sew them together, filling the inner cavity with cotton wool.
The beak, comb and eyes are made separately, then they are sewn to the finished toy.
You can decorate the chickens with different colored beads, rhinestones, or cut out flowers from colored paper and glue them to the body.
Heart shaped cockerel
A great idea would be a New Year's gift to your loved one in the form of a heart-rooster. To make a toy, you will need a piece of felt, from which you need to cut two parts in the shape of a heart. Next, the figurine is filled with cotton wool, a tail, comb and beak are cut out of multi-colored fabric and sewn to the heart.

So that such an original cockerel can be hung, you can sew colored braid along the middle of the body. You can make colorful Christmas tree decorations in a similar way; for this you need to cut out small hearts. Such original jewelry They will always cheer you up and will be an excellent decoration for any home interior.
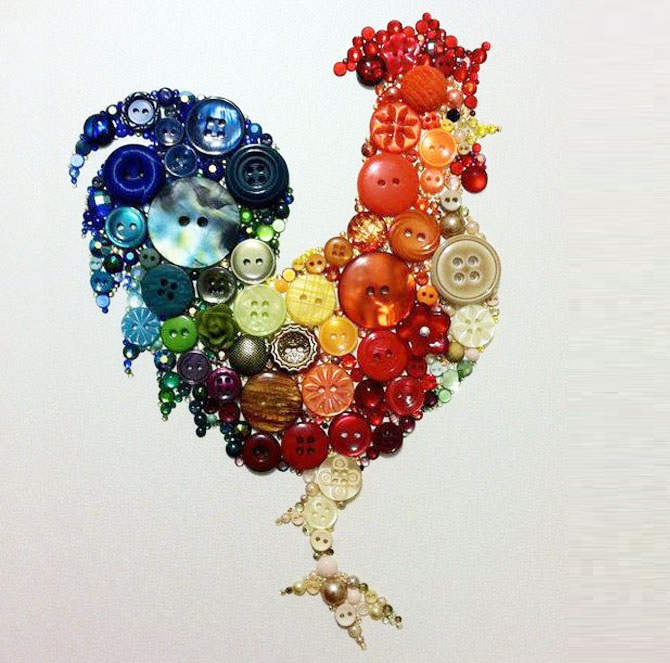
Button figures
Well, probably the most unusual thing will be a cockerel made of multi-colored buttons. You will need bright buttons of different sizes, rhinestones, glue and a thick sheet of cardboard. First you need to make a sketch of the future rooster on cardboard. Next, the image is made with buttons, and the gaps are filled with rhinestones. The finished painting can be placed in a frame.

Now you know that making a symbol for the coming year is very easy. The main thing you need for this is time, patience and a little imagination.
We all know from childhood that New Year conceals many secrets and magic. It attracts us with its unknown and unpredictability. With the onset of winter, each of us awaits the arrival of this fabulous time with trepidation and bated breath. After all, literally all our hardships and sorrows, which sometimes haunt us, can one day dissipate and bring with them only joy, good luck in all matters and prosperity. In order to finally say goodbye to the old year and successfully cross the threshold of the new one, we strive to be fully armed. For this purpose, we festively decorate our home with our own hands, skillfully decorate the table, and, finally, we dress ourselves and our family, devoting Special attention. But we shouldn’t forget about such things as New Year’s gifts, which are customary to give to your family and friends as the chimes strike. After all, without beautiful souvenirs, this holiday will lose its shine of solemnity, mystery and enigma, which is not particularly desirable. When racking your brains when choosing surprises, you shouldn’t limit yourself only to the store assortment of goods; an excellent idea would be to make presents yourself at home, for example, from sweets. But in order to achieve creativity in this creative endeavor, you need to read our article. She is the one who will provide you with 68 photo ideas best gifts from candies for the New Year 2020 with your own hands, the production of which will not seem difficult to you, thanks to our detailed master classes that are accessible to each of you. Don't delay Dear friends, this is an important activity for you on the last day. Since masterpieces of art are not born in a hurry, and you still have to surprise and delight your loved ones with them.
If you want to receive the desired gift, write !
Cool New Year's gifts made from candy
When we choose New Year's gifts for our loved ones, sometimes we have to work hard. After all, it’s not always possible to quickly find something that will instantly catch your eye and claim to be the perfect souvenir. Knowing clearly the characters and tastes of your family, you strive to match them as much as possible. Presenting a gift is an important moment for the New Year 2020 for each of us, since our festive mood entirely depends on it. We want the recipient’s eyes to sparkle with joy, his smile to radiate warmth, and the person himself to be filled with enthusiasm from the unexpected surprise. Through this, New year's night turns into a fairy tale, shrouded in magic. And everyone must certainly believe it. To do this, we begin to create our own gifts from sweets, which are sure to appeal not only to children, but also to all adults. If you do not have the talent to invent and create something individual, then you can visit the Internet, where you will definitely choose among wide range sweet souvenirs - nice presents for men, women and, of course, children. We invite you to view our cool selection photos of ideas on what it would be worth creating to make those around you literally jump with happiness.


All these New Year's gifts will seem simply chic and perky to your dear people, as in the photo. As for creating them with your own hands for the New Year 2020, it couldn’t be easier. Once you start this creativity at home, you will be convinced of this right away. We invite you to watch our educational video, which will inspire you with a new idea.
Christmas tree made of candies

If you don’t know what you can make from candies for the New Year 2020, try creating a Christmas tree. This will be an unusual New Year's gift, made by yourself. It is simple to perform and, accordingly, will not take much of your time and effort. With a little imagination, you will get the same beauty as in our photo. Get started with this work quickly.
To work you will need:
- adhesive tape (scotch tape);
- scissors;
- an empty champagne bottle or paper cone;
- top for the future Christmas tree;
- candies.
Progress:
- We measure the circumference of our cone or bottle and prepare the same piece of adhesive tape (this will need to be done along the height of the entire cone). Now we glue our candies to it by the tails.
- Attach the resulting strip of tape with sweets to the bottle. Please note that the elements of the bottom layer should hang down a little.
- Similarly, we make the next row with our own hands, and attach it a little higher so that the lower tails of these sweets are located between the sweets of the lower row.
- Thus, we need to stick around the entire cone. If you use a bottle as the base of the product, then place the top of the head in the place of the former cork.
- If desired, you can decorate the Christmas tree with tinsel.
Such a beautiful and, at the same time, delicious New Year's gift will not leave anyone standing on the sidelines. For New Year 2020, do not be lazy to create such gifts, because they will so touch and amuse your loved ones that the holiday will turn into a real celebration in such a positive mood.
Before you begin such a skillful task, it is worth enriching your imagination with the help of our photo ideas, presented in a varied and colorful way.


Watch our training video with step-by-step instructions on this topic and it will be easier for you to complete the planned independent work.
Master class on making a Christmas tree from sweets and champagne with your own hands
New Year's topiary made from candies

Winter holidays are simply unthinkable without New Year's sweet gifts - sweets, fragrant Christmas pastries, tangerines and other goodies. And this is a fact, because not only children, but also adults adore such delicacies. If among your friends or relatives there are those who cannot remain indifferent at the sight of sweets, then, taking this point into account, it will be easier for you to decide on the choice of gifts for them. A do-it-yourself gift of sweets for the New Year 2020 in the form of topiary will cause a storm of positive emotions. It looks quite appetizing and at the same time beautiful, just like in the photo. Believe me, this is a win-win for those with a sweet tooth. So let's get started.
To work you will need:
- candies;
- foam ball;
- scissors or knife;
- foam glue;
- trunk in the form of a stick or even branch;
- flower pot;
- gypsum;
- decorative elements: beautiful paper, beads, satin ribbons, rhinestones, cones, christmas balls, bows, artificial greenery.
Progress:
- For the base we will need a foam ball, but if you don’t have one, then you can freely purchase a floral ball at a flower shop. It also makes excellent use in this work. Let's start decorating our ball. To do this, take candies in a beautiful shiny wrapper and, using special foam glue, tightly attach them to each other, covering the entire circumference.
- Next, we need to prepare the gypsum solution as indicated on its packaging.
- Having made the fixing base, we transfer it to the flower pot of your choice.
- We insert our trunk from a branch or just a flat wooden stick into a decorated foam ball, which we previously prepared by making a small hole in it with a knife for future fasteners. We secure the whole thing with special glue for polystyrene foam.
- We insert the finished tree into the gypsum solution located in the flower pot. If your topiary container is quite heavy, then instead of plaster, you can use polyurethane foam.
- Let's start decorating our New Year's gift. To do this, we take out everything we have from our secret drawers. These are bows, beads, rhinestones, satin ribbons, tulle nets, Christmas tree accessories, the whole range natural materials, for example, cones, spruce branches, pine trees and much more. We transform our topiary according to personal tastes using glue. By the way, don’t forget to decorate the top with your own hands. flower pot, hiding the plaster base. To do this, it is recommended to use artificial floral greenery, rain, tinsel, colored pebbles, beads of various diameters or other materials available to you. And instead of ordinary candies, multi-colored tasty marshmallows, colorful chewy sweets of various shapes and even marmalade will look interesting in a shiny candy wrapper. Fantasize, find a creative approach and you will certainly succeed in this creative activity.
Admire our photo ideas on this topic, and it will be easier for you to decide on the style of your future holiday souvenir for the New Year 2020.


We hope you find our video tutorial useful.
Master class on making New Year's topiary from candies
Sleigh with candies

An excellent New Year's gift would be a sleigh with candies, which, of course, is more suitable for children. Just imagine how much delight the kids will have from these little handmade gifts for the New Year 2020. With a little digging in the confectionery store on the eve of the holidays, you can find some pretty interesting and colorful sweets various forms. They will become our main available material, which must also be supplemented for full effect with some New Year's accessories. This could be rain, Christmas tree decorations, tinsel, serpentine, confetti, gift bows and satin ribbons. Taking advantage of all this decor, you will get a real fabulous surprise, the same as shown in our photo and even better.
To work you will need:
- small chocolate;
- 2 candy canes;
- 10 pieces of flat candies;
- double-sided tape or glue gun;
- bow for decoration.
Manufacturing:
- Take candy canes and glue a chocolate bar to them using double-sided tape. If it’s more convenient for you, you can use a gun, but don’t overuse glue, otherwise you’ll ruin the chocolate.
- Now we attach 4 flat candies in one row to the top of the chocolate bar.
- After this, we place the next layer on them, consisting of 3 confectionery elements.
- The next step will be to attach 2 types of sweets to our pyramid, and then another one - the last one.
- The resulting edible New Year's gift, made with your own hands for the New Year 2020, can be decorated with a bow and ribbon. Sweet sleigh is ready!
If you decide to approach New Year's presents from a creative point of view, then our selection of photo ideas will come in handy. In it you will get acquainted with other decorative options for holiday souvenirs prepared for children.


There are little athletes in your family, then the New Year's gift should correspond to their rank. Watch our video and you may find quite original approach in this situation.
Master class on making weights from a foam ball and candies
New Year's candy clock

To find an interesting and unusual approach to creating New Year's gifts, you should think carefully and review a number of third-party ideas on this topic. However, we decided to help you save your precious time on the eve of the New Year 2020 and provide you with an excellent idea for making your own present in the form of a watch made using corrugated paper and candies, decorated with rain, rhinestones, beads and complemented with entire New Year’s compositions. After studying our photo, immediately begin creative work in order to have time to produce everything as expected and on time.
To work you will need:
- corrugated paper;
- white or gold cardboard;
- glue gun;
- foil;
- New Year's decor (of your choice);
- chocolate or caramel candies in the form of a long stick, for example, “Conafetto” from Roshen.
Manufacturing process:
- In order to make a beautiful watch, like in the photo, you must first make all the parts that make it up. And to do this, you need to take white cardboard, or you can use golden cardboard, and use a compass to display on it two circles of the desired size, corresponding to your future New Year's gift. This will be our dial and the back wall of the clock.
- Next, cut them out with scissors and wrap them in gold crepe paper. If you have colored cardboard, then you shouldn’t waste your time on this, leave everything as it is.
- Having set aside the two formed cardboard parts, we begin to create the side parts of our mechanism. To do this, we again take cardboard and cut out a rectangular strip from it, the size of the circle we made earlier. Wrap it in gold foil.
- Our next step is to assemble our manufactured parts. We take one circle and, having smeared its edges along the entire circumference with glue, immediately attach a rectangular strip to it, closing it into a kind of ring. Then we complete our design with the help of a second circle, which is also placed on top of the resulting ring with hot glue.
- After our product has dried, we begin to decorate it, turning it into a fabulous souvenir made with our own hands for the New Year 2020. Here our long-shaped candies will be used, which must be attached with hot glue to the side of the clock, covering its entire circumference. After completing this stage, you should tie the side of our product satin ribbon for an aesthetic appearance, fixing it with glue.
- Let's start designing the dial. We take out all kinds of beads, rhinestones and start creating.
- We decorate the finished watch New Year's composition, consisting of rain, spruce branches, artificial berries variegated colors, small Christmas balls And so on. Your New Year's gift should look perfect, neat and unique. To do this, we advise you to look through our selection of photo ideas, and you will discover a lot of interesting and original things.


Check out our tutorial video to get the hang of the decorative work.
Master class on making New Year's watches from candies
Horseshoe made of candies

When you come to visit your family or friends for the New Year 2020, you should definitely take a souvenir with you. With such a gesture you will show your good-natured disposition towards these people, respect and love. But what New Year's gifts should you consider? Many of you have repeatedly asked this question. The most important thing is to convey all your positive emotions with the help of a gift. Store-bought products are unlikely to be able to do this. Therefore, we take the initiative into our hands and move forward to creating holiday souvenirs from sweets with our own hands. We will make a horseshoe for good luck, as in the photo.
To work you will need:
- candies in the form of medals;
- corrugated cardboard;
- corrugated paper of golden or silver color;
- elegant ribbon;
- regular and double-sided tape;
- glue gun
Manufacturing process:
- To make our New Year's gift dense, you need to take three sheets of corrugated cardboard and, drawing a horseshoe on them, cut out three figures.
- After that, we connect them together using hot glue.
- Now we make a covering from corrugated paper golden color. To do this, you must first draw the desired shape and cut it out, and then secure it on both sides of our horseshoe with double-sided tape.
- We decorate the side part of the horseshoe, made by ourselves, with an elegant ribbon so that the joints of the corrugation are not visible. We use the same glue as a fixer.
- Let's start decorating our souvenir. We take candies in the form of gold medals and attach a small piece of double-sided tape to their back side so that we can easily and firmly attach them to our horseshoe in the future. You can decorate to your taste by using various methods decor. Our present for the New Year 2020 is basically ready!
The variety of New Year's horseshoes amazes with its beauty and individuality. If you don't believe me, look at our photo ideas.


 Created by PhotoWatermark Professional


Pay attention to our video, which will help you avoid any difficulties in your work.
Master class on making a New Year's horseshoe from sweets with your own hands
New Year's set of candies

If you have small boxes lying around your house that you can’t find a use for, then select the neatest one among all and bring it to life by creating a do-it-yourself gift from candies for the New Year 2020, which will look like a beautiful holiday set. You have the right to decorate it the way you want: with rain, fir branches, New Year's toys, cones and other accessories. Such a New Year's gift can be made very quickly, even a few hours before the holiday. The main thing is to buy tasty and beautiful candies. This is a great option for those who don’t have any time to make gifts. Having examined our souvenir shown in the photo, we begin immediate work.
For production you will need:
- round box (other shapes are also acceptable);
- corrugated paper of blue color;
- satin ribbons;
- foam glue;
- hot glue;
- artificial or live spruce branches;
- Christmas balls different sizes;
- foil;
- gift paper;
- delicious and beautiful sweets (round and oblong);
- corrugated cardboard;
- gift ribbon;
- Styrofoam;
- toothpicks;
- double-sided tape.
Manufacturing process:
- First, let's put our box in a proper elegant look. For this we need blue corrugated paper. Having measured our box, we cut off the required amount of material and paste it over our cardboard box, also capturing its bottom. For a better effect, we decorate our product with a satin ribbon and, if desired, a bow.
- Now it's time to start collecting content. Place foam on the bottom of the box round shape, which will serve as the basis for us to secure decorative elements in it. To keep it firmly in place, place it on hot glue.
- Having prepared the spruce branches, we begin to carefully insert them around the entire perimeter of the foam, in which we previously made small holes for this. In order for the branches to hold securely, they must also be fixed with a special glue for polystyrene foam.
- Having taken out the necessary decorative accessories, such as Christmas balls, large beads, gift and satin bows, we proceed to arranging them on the foam base in the order you like. We secure everything with foam glue.
- It is advisable to wrap the candies that are part of our New Year's gift in gold or silver foil, making peculiar tails that need to be decorated with gift ribbons. And only after that, place it on a toothpick and insert it into the overall composition.
- Small souvenir boxes that you should make yourself from corrugated cardboard will also look interesting in our craft. Look carefully at our photo and you will understand how to do this.
- Ready-made gift boxes should be attached to the base using double-sided tape. Our New Year's set should be voluminous, without voids or flaws. Only in such an ideal form will all our relatives and friends like it.
There are other options for similar New Year's sets made for the New Year 2020, which you can see in our photo ideas.


New Year 2017 is the year of the Red (Fire) Rooster, and the most popular gift will be its figurine or image. The Krestik needlewomen have a good tradition: to New Year's holiday prepare thoroughly. And this year will be no exception. Many of us will make or are already making a rooster with our own hands, or even not one, but several at once! After all, you must definitely please your family and friends with a handmade symbol of the year, and yourself with the fascinating process of creating this very symbol in various techniques handmade.
Creating a kind of GUIDE TO MASTER CLASSES from the Internet is also a tradition of our handicraft site, which was born a year ago. For you, dear craftswomen, we have selected only the best master classes online. Admire, look closely, discuss and choose the most colorful rooster! And then sew/knit/draw/blind/weave it. So, what technology can you use on the eve of the New Year holiday?
If you don’t have time to work, it doesn’t matter. The article contains links to craftswomen who sell finished works.
Cockerels made of paper and on paper
Making cards with the kids
If you are not a professional cardmaker, then before you start creating cards, be sure to read our article “Learning to make New Year cards with your own hands using the Scrapbooking technique.” In it you will not only find many ideas, but also get acquainted with the basic rules for creating postcards.
Any cockerel drawn by your child can be placed on a postcard. If it’s difficult for your child to figure out how to draw a rooster with his own hands, then show him this step-by-step instructions:

And then, it’s a matter of technology. Cut out the cockerel and make it the centerpiece of the composition. For example, your card can be this simple but cute. Use in your work New Year's paper and a bright red ribbon, add snowflakes, twigs and other holiday paraphernalia. Once you have a basic idea, the process of creating a card becomes much easier!

Photo from the site http://itsapatchworklife.blogspot.ru
If your child likes to color black and white pictures, give him this opportunity. Print the card template with a cockerel on thick cardboard and let your child get to work. Next, by cutting out the ball blank, you can add to the card voluminous snowflakes, glue half-beads imitating New Year's balls, etc., etc. Give free rein to your imagination with your baby))

YOU WILL NEED IT
You will find 8 more templates for coloring, as well as 2 step-by-step instructions for drawing more realistic roosters in the archive, which you can download quickly and for free!
Take note of the idea with a cockerel on a stick, like on Elena Yurchenko’s postcard. Her cockerels are cut out of felt, or you can cut them out of paper.

Roosters made of colored paper
An applique made of colored paper can also be placed on greeting card. But such an application can itself act as a postcard. To draw and carefully cut out all the details, children will need the help of their parents, but they can glue them themselves.

Olga-15 suggests making funny cockerels out of paper in her master class.

The Rooster blank is a rectangular sheet of flexible paper or thin cardboard, folded in half lengthwise. Its size is 13.5x10 cm. We make 7-10 inclined slits along the fold line (approximately every 1 cm). Their angle of inclination is 50-70 degrees, and their depth is ¾ of the height of the folded sheet.
Ekaterina Ivanova in her video tutorial shows how to make a red rooster using the Origami technique:
Roosters using Quilling technique
A very interesting idea is to lay out only a luxurious rooster tail from quilling paper. It's not as hassle as laying out a whole rooster, and it can turn out very impressive! Here is a rooster without a tail as a basis (see the photo below for how it looked in the original).

Print it on a color printer, and then fantasize about the tail. As an example, here is one such work (although the tail here is modest, but you will try, right?))

And if you are not afraid to make a whole rooster using the Quilling technique, then you can use this ready-made postcard as a basis:

Or this template:

A cheat sheet on the basic elements of Quilling to help you:

Button applique
And here are absolutely stunning handsome roosters, made of multi-colored buttons, half-beads, rhinestones and beads! You can take the contours of the cockerels from our archive as a basis (link just above).


Crochet cockerels
Many needlewomen are familiar with the crochet hook and will be happy to knit a cockerel from multi-colored threads. And Krestik will help you decide on a model and offer several master classes on this type of needlework.

You can also buy knitted cockerels from Svetlana.


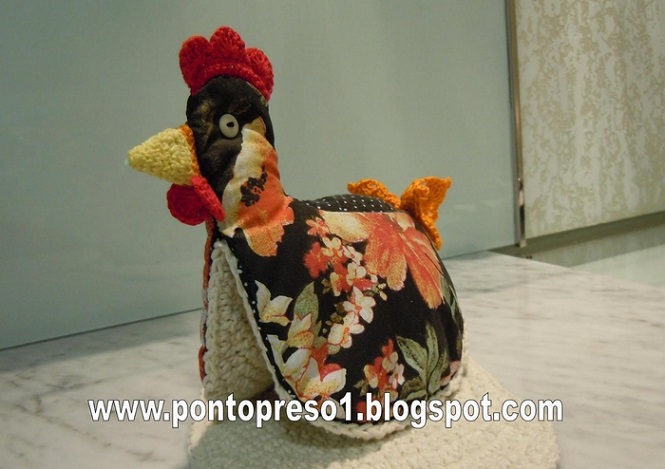
Felt roosters
The fastest and not complex options creation of the symbol of 2017 - felt roosters. The material is easy to process, holds the shape of the toy well, and does not require processing of seams. On the contrary, hand stitches along the face of the product give it a special flavor and charm.


Photo from the site https://madeheart.com


Photo from the site http://ktototam.ru/
A rooster figurine carefully cut from thick felt will Christmas tree toy, and pendant.

Photo from the site http://ktototam.ru
And if you decorate the felt cockerels with embroidery, flowers and other decorative elements, it will turn out incredibly beautiful!

Photo from the site http://mmmcrafts.blogspot.ru

Roosters in Tilda style
Well, how can we manage now in our lives without the tilde-Rooster? On the ToySew website there is a master class on sewing this popular toy.

Master Vetic on her blog posted patterns for the Rooster and Chicken Peas based on the tilde pattern. An interesting couple will turn out if you put in the effort and patience!

And for inspiration:

Cockerel Yurik from Orange Toys

Maria Fedorova made a funny video about her tilda roosters (the link to the patterns is in the description of the video!):
Coffee cock toys
Aromatic, or coffee, toys compete with tildes in popularity. There are roosters using this technique.

A coffee cockerel can be like this:

Photo from the site http://zabavochka.com
You can easily sew it yourself using one of the patterns suggested above. “Cross” talked about all the intricacies of creating coffee toys in this master class.
If you think that you cannot cope with such work yourself, contact a specialist. Yulia Charikova made enough branded toys with the smell of coffee and put them up for sale at this address.

Fur interior toys
Oksana Svyatkovskaya will show her vision of a rooster and show how to sew it correctly using ready-made patterns. Her Rooster is made of faux fur, but who’s to say that it doesn’t happen or that it’s not good?)


In the workshop Everything for creativity (dljatvorchestva) there are a lot of blanks for painting and decoupage. Choose and create!

This is the beauty you can get:


If you don’t want to make a souvenir in the shape of a rooster, then you can decorate any wooden surface with an image of a rooster. The scope for creativity here is simply limitless!!! Here are just a few examples for inspiration:


Roosters felted from wool
Some craftswomen make wool toys that look like real ones! Let's admire and be inspired! And if you really want to buy one of these beauties, then look for them at the Masters Fair (the link is on each photo).


Elenia collected in one place many different Roosters felted from wool and suggested to MK how to create one of them. It turns out very cute!
Roosters embroidered with cross stitch, beads and ribbons
Perhaps you love embroidery more than other types of needlework. Then you can place the symbol of the year on a pillowcase, decorate it in the form of a panel, a picture in a frame or a brooch. The main thing is that the image of the Rooster warms your soul. And if you give away your work, find out the preferences of the recipient.
You will find more than 50 different patterns for embroidering roosters and cockerels in a special album
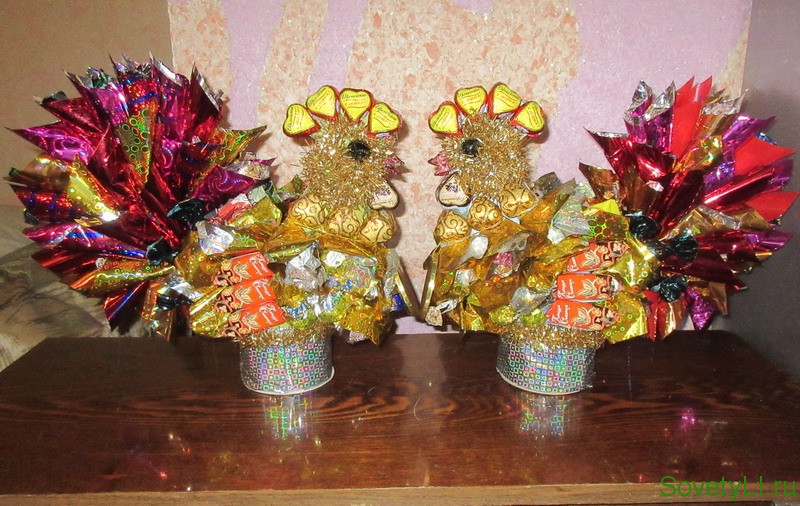
I made these candy cockerels as a gift for my grandchildren for the New Year. I had to struggle with the first one, but I did the second one quickly. I want to lay out the order of work, maybe someone will find it useful. By the way, I found the rooster template on the Internet. The template was small, I enlarged it. This was the Easter Cockerel template. So you can make such a rooster for Easter. But it’s better to have smaller ones and not necessarily all of them made from candy. You can come up with several options for this template. I am posting a version of roosters made from candies and foil.
For work we will need:
- 4 sheets of A4 paper
- cardboard
- colored foil
- toothpicks
- scotch
- PVA glue
- hot gun
- candies
It took me a lot of candy, about a kilogram. You can of course use a template based on A4 sheet size, 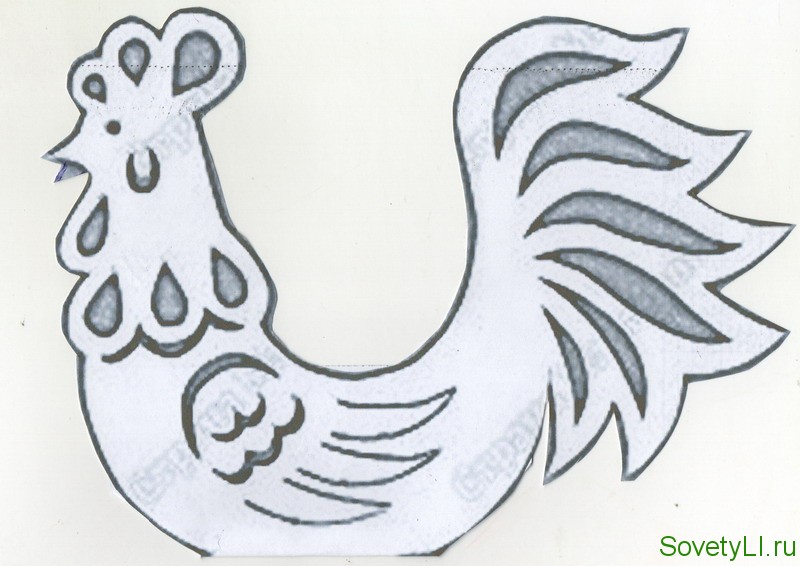
It seemed small to me, so I made it on two sheets, then glued it together. 

Glue both halves onto cardboard and cut out. The template I got was this size. The finished rooster will be even larger.
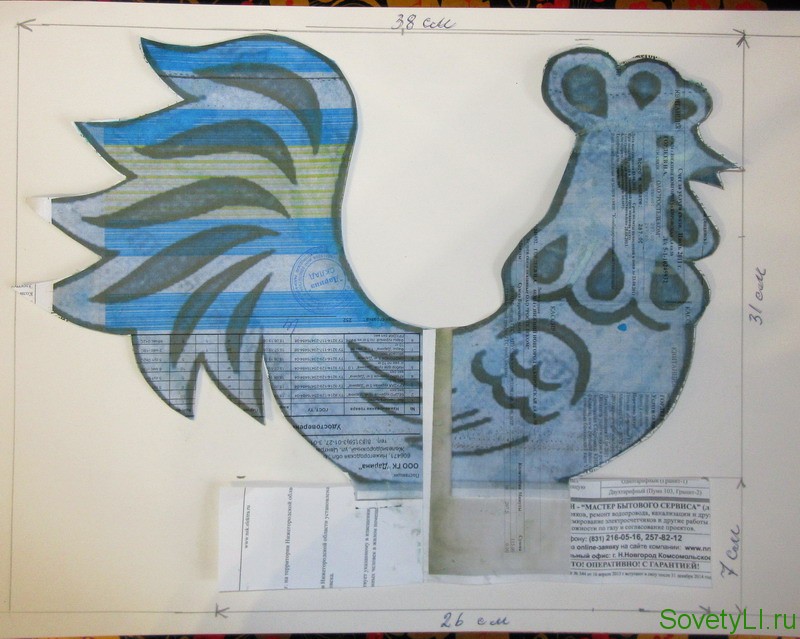
We make two such templates. The second one is a mirror image. Before connecting both halves, carefully knead the cardboard so that it does not break when bent.

You will get two such cockerels. (My printer malfunctioned, so they turned out striped. But it’s okay, nothing will be visible). There is no need to glue the templates yet. Use a stapler to connect the tail and head. 
And then connect the base. There should be empty space inside the rooster.
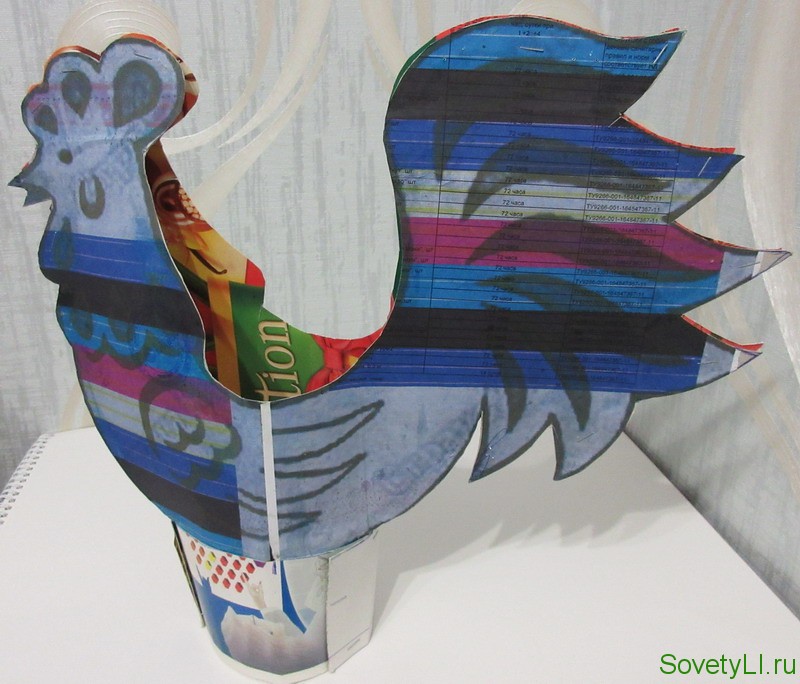
This is how the rooster will look from the front. Now you can glue it where you think it is necessary. For example, it is better to glue the beak with glue. There is no need to fasten at the base. If you want, you can seal the inside with tape, or you can leave it like that. Then everything will be covered with foil.

Make a bottom along the base and glue it inside. Without a bottom, the rooster will not be stable. 
Now you can start gluing the rooster. We start gluing from the base. Choose colors to suit your taste. I decided to cover it with silver foil. Cut a strip 7 cm wide and glue it on. 
Inside the rooster I placed a milk bottle with water. This way it won’t fall under the weight of the candy and it will be easier to work with it.
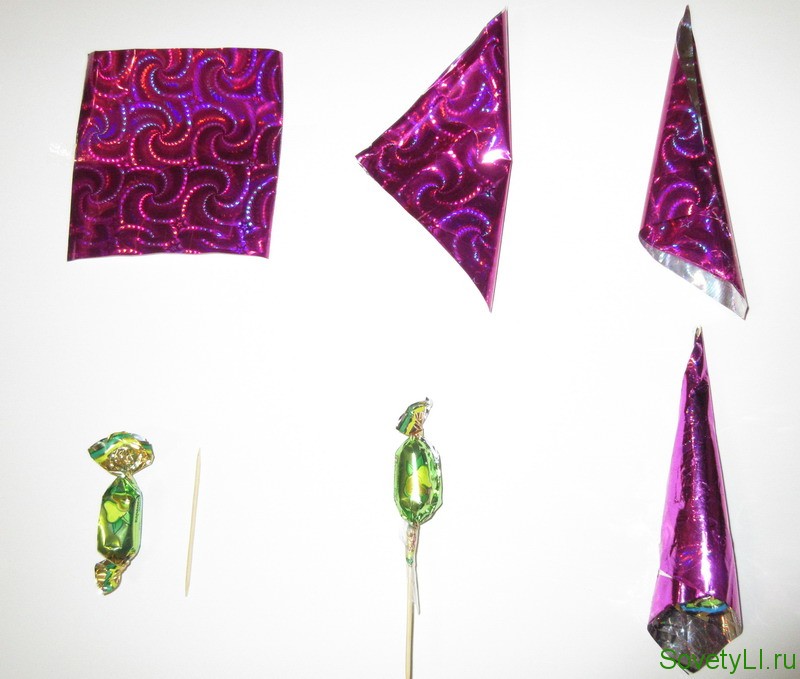
The cockerel is ready, now it’s time to start preparing the pounds. It is better to start gluing from the tail. I have different pounders for the tail and for the body. For the tail I cut 10x10 foil. I used foil different colors. Here is the procedure for making blanks for the tail. We fold the foil so that we get a cone-shaped “feather”. We secure the candy to the toothpick with tape. Apply glue to the tip of the toothpick with a hot gun and insert the candy with the toothpick inside the “feather”.
When the blanks are ready, we begin to attach the rooster to the tail. Glue with hot glue. 
So we glue the tail completely, in several rows. To prevent the tail from being too tight, try to use lighter candies. 
When the tail is ready, it is better to shape the comb and secure the eyes. I fixed the eyes on both sides at once. I made a hole where the eye should be and stuck the candy tails inside. You didn't even need glue. And for the comb I selected candies according to the shape, but I couldn’t find completely red ones. But the result was a cockerel - a golden comb. After that, I returned to the torso again. 
For the body I made other blanks. The foil was yellow 12x12 and I folded it the same way as for the Christmas tree when I made it. I glued the candies, but without toothpicks, I glued them right by the tail.
The body can be decorated in any way you like. I got a mix of candies and pounds. Instead of wings, I also glued candies, 3 on both sides.  In general, you can paste it over as your imagination dictates. We paste it up to the head, do not touch the head yet.
It is pasted on one side, now we unfold it and also paste it on the other side. 
For the second side, I already made blanks one by one, exactly as much as it took for the first side. When I covered the other side, I started decorating the head. I covered the beak with foil and the head with tinsel. I decided that there would be extra sweets here. As a result, this is what happened. 
The rooster is ready, the water bottle can be removed, now he should not drag it. The empty space inside the cockerel can be filled with additional gifts. Toys or leftover candy. I have chocolate figures in a glass inside. I made the second cockerel faster. I also hung a large medal on both roosters.