Often noticing knitted items on children, you always admire the skill of mothers or grandmothers. Crochet headbands look especially interesting. If you know how to crochet even a little, we suggest knitting a headband with Pussy ears. A knitted headband with crocheted ears is a great accessory for little fashionistas. Knitting consists of a pattern and a description of the work.

Isn’t this crochet headband with ears so cute! A charming knitted headband for a baby is good because you can choose any pattern yourself: starting with the simplest pattern - single crochets, and ending with a pattern - closed scallops.

Crocheted headband for girls, suitable for size 48-49 cm, for ages three/four years. For it we will take SEAM Alpaca Baby Lux yarn (alpaca wool, 50 g. 400 m), 2 skeins for a warm headband in two threads or 1 skein in 1 thread. A little different yarn for binding (finishing) and eyelet. Hook 2 mm thick.
Abbreviations: VP - air loop, RLS - single crochet. Loop - p.
For the main headband, crochet a chain of Air Loops. Cast on the hook 130 VP. Next, we knit 20 rows of sc in the round.

The diagram shows 2 options for knitting RLS. If you want the pattern to be more embossed, then knit the RLS behind the back arc of the loop (option 2). If, on the contrary, you need a flatter pattern, then grab two loop arcs (option 1). Next, you need to tie the top and bottom “crawfish step”.

“Rachy step” is a beautiful design of the product. We knit in the opposite direction from left to right. To do this: insert the hook into the last left loop of your knitting, make 1 VP rise, insert the hook counterclockwise into the next one. loop of the previous row, pull out the thread (2 sts on the hook), knit VP through the received 2 sts and again insert the hook (counterclockwise) into the next st. of the previous row. Continue this way until the last stitch in the row.
So, we have already knitted the main warm headband, all that remains is to knit the ears and sew them on.
Ears for bandages Pussy - master class
There are many options for ear patterns for girls. To make the ears, this diagram is suitable for us:

Please note that the T at the bottom of the eye is a sc.
Abbreviations: Loop - p., VP - aerial p., SSN - a column with a nak., SBN - a column without a nak.
We need to make 2 smaller ears and 2 more slightly larger ones. The width of the parts is 8 cm, the length is 6 cm. The thickness of the hook used is 3 mm.

First we make a small ear. We start working with the dark circle in the middle of the diagram - this is a sliding loop.

1st row: 3 VP lifting, yo, 9 SSN.


then, we continue this row in a mirror way - Dc, Dc, Dc, and 3 Dc in one stitch.
3rd row: 3 VP, turn the work over, 2 dc in the first st, and again 1 dc in each st until you reach the top point, knit 5 dc in the center, then mirror 1 dc, and 3 dc in one st.

4th row: 1 VP and tie the bottom with RLS.
Knit the second ear in exactly the same way as the first (in the photo the color is the same, in reality the color of the second ear is different), but after the 4th row knit another 5th row (without the pattern).

5th row: 2 sc, 1 sc to the central corner, in the central column of the previous row. – (1 RLS, double crochet and half-column, 1 RLS), 1 RLS in each. p. to the end of the river, in the last. p. – 3 RLS.


In the upper corner, in order to give the ear a sharp edge, we again knit 1 sc, yarn over and half-stitch. And further to the end again sc, capturing 2 parts.

Now the ears are ready. We place them at the desired point and sew them to the product.
The photo shows children knitting ears for headbands, hats, and so on.
A headband with a hook is an original and extremely versatile wardrobe item. It can be made of cotton and worn in the summer as a decoration, or you can take woolen material, then you won’t be afraid to go to the skating rink in not very severe frosts. The headband will look magical on both newborn babies and older girls, and will perfectly complete the romantic image of a modern woman.
How to properly crochet a headband for a girl

This style of headband for a girl can be made either casually from acrylic or wool yarn depending on the season of the year, or formally, for example, from cotton (and it is better to take light shades).
Prepare the necessary materials: a needle and thread, a centimeter, decorative elements (rhinestones, sequins, buttons, beads), a ruler, a hook (select the number according to the thickness of the threads used) and, of course, skeins of yarn.
Let's move on to the master class:
- Take measurements. Use a centimeter to calculate your head circumference. This will be the length of the product. The width is according to your wishes. For example, in children under one year old it is usually 33-35 cm.
- Make a test sample to see if the pattern and dimensions are suitable.
- Next, you can use one of two common methods. The first one is almost simple and is well suited for beginners. It is called longitudinal knitting and is advantageous in that the item is seamless.
- Longitudinal knitting: cast on a chain of air loops, making its length according to the just measured circumference of the head. You can also calculate it using a sample. To do this, multiply the number of loops by 1 cm by the size of the head circumference. Remember that the chain must be a multiple of the repeat of 9 loops. Loop the chain and continue knitting until the 5th row. And the next 5 need to be mirrored.
Warm headband for women made of lush columns.

Materials:
Hook No. 3, 5; 50–60 grams of Alize Cashmere Batik yarn (100% wool, 100 g/300 m).
Make the upper and lower parts in lush columns according to the scheme:

The middle will consist of five rows of relief columns. You do the tying with a “crawfish step”.
Lush columns:
- You dial the chain and close it. The first row is made of single crochets.
- Second row: three lifting stitches, skip the base loop, make one double crochet, 1 double crochet, knit over the skipped stitch, repeat everything except the first 3 stitches.
- The third is the same, but in the opposite direction.
- From the 4th to the 8th row, perform relief columns.
- The 9th is similar to the second.
- The 10th row is like the third.
You can, of course, knit it entirely from lush ones, but this will increase consumables. And if you alternate in a circle with turning rows, you will get all kinds of patterns.
Let's look at a master class on a bandage for a newborn girl
A headband for a newborn will make her look as tender, fragile and innocent as possible. It is so beautiful!
You will need: white and pink yarn; a bead to decorate a rosette; hook number 1.
First you need to measure the circumference of your head; it will be equal to the length of the chain of air loops. The first row is knitted using single crochets. At the end of it, make three lifting air loops.
Second: one double crochet in the third loop from the hook, two chain crochets, a double crochet in the third loop from the original. Repeat until the end, and then add an air loop.
Third row: in the same way with single crochets. You break away from the pink thread and start working with the white one.
Fourth: three chain loops, one half-stitch in the second loop from the hook, three chain stitches again, a half-stitch in the second loop from the original one. Repeat until the end.
Fifth row: knit five single crochets into the first arch in the previous row, one single crochet into the next arch in the fourth. Do this until the end, and then attach the thread to the second edge of the bandage. The opposite one is knitted as the first one (from the 4th to the 5th row). You should get something like this:

Now you need to connect both ends of the bandage with half-columns or just fasten it with a seam.
Now the rose.
First row: thirty chain stitches, then turn the chain inside out.
Second: three air lifting loops, one double crochet in the fourth loop from the hook, chain crochet, one double crochet in the same stitch as the first stitch, one double crochet in the third loop from the hook, chain crochet, one double crochet in the same loop. The result is a chain with V-shaped patterns.
Third row: three chain stitches, place 8 double crochets between the posts of the V-shaped pattern. Do all of the above to the end.
Twist the finished chain in a spiral and secure the ends with threads. Sew a pink or white bead into the middle.
Attach a rosette to the seam of the ends of the headband. Insert an elastic band into the free spaces between the second and fourth rows. Ready!

Video on the topic of the article
Especially for you, we have collected interesting and creative videos that will definitely help you quickly decide on your future creation. Knit and wear with pleasure!
A knitted headband is a beautiful women's accessory. It can not only complement the image, but also warm you up in cold weather. Headbands can be worn at any time of the year: openwork, cotton in summer, and tightly knitted wool in winter. It’s easy to knit this beauty with your own hands. In this article we will show that even beginners can cope with this task.
Spring openwork knitted headband for beginners
Winter is already behind us and I don’t want to wear a warm hat. But it’s somehow not comfortable without her. In this case, a crocheted bandage will come to the rescue. It will only take one evening to make, but you will wear it much longer.
For work needs to be prepared: 30g fine yarn (e.g. mohair or machine yarn, plyed into 4 strands) and a matching crochet hook.
We start knitting, as usual, with air loops and then perform them as shown in the diagram.
DIY summer headband for a young lady
This model of headdress is made of cotton thread and is used in warm or hot seasons. If desired, you can knit another dress in the same style to make an elegant set.
The finished product will fit a head circumference of 46-48 cm.
We will need: 10g of white yarn with a composition of 50% cotton, 50% viscose, the remains of blue thread, a hook and 3 beads.
We start crocheting with a chain of air loops and close it into a ring. The length of the chain is equal to the circumference of the head + 2 cm for a loose fit. Next we continue knitting as shown in the diagram
We make a large flower and 2 small flowers according to the following schemes
Then we sew the beads to the flowers, and the flowers to the headband. At the end of the work we stretch the tape.
Bandage with a “bump” pattern for beginners: video master class
Warm crochet headband
Now let’s knit a warm bandage with our own hands, which you can wear until winter or even wear in a little frost. The model is simple - just what beginners need.
We will need: 50-60 g of warm yarn, hook No. 3.5.
We knit in the round. At the top and bottom there is a pattern of lush columns. We tie the edges using the “crawfish step” technique.
Description of the pattern
We collect air loops into a chain and close it into a ring. We knit the 1st row with a single crochet. 2nd row – 3 lifting loops * skip 1 base loop, 1 double crochet, 1 puffy stitch, knit over the skipped base loop*. Repeat pattern from * to *. 3rd r. we knit in the opposite direction - 3 lifting loops, * skip a loop, 1 double crochet, 1 puffy crochet at the top of the puffy stitch of the previous row*. From the 4th to the 8th row we knit with relief stitches. You can choose any pattern, the main thing is that the knitting is tight. 9th r. We perform the same as the second, and the 10th - like the third.
Headband pattern diagram
Openwork crochet headband with elastic fastening
A beautiful and delicate headband for a little princess. Thanks to the elastic fastening, it will sit tightly on the head, but at the same time it will not put pressure. It’s not at all difficult to knit it with your own hands, but you need to spend 3-5 hours on it.
For work needs to be prepared: thin cotton yarn, hook No. 1.5, 80 cm wide satin ribbon 0.5 cm, a thin hair elastic and a needle with a large eye.
The finished product is suitable for a head circumference of 46-50 cm.
First you need to tie the elastic band with single crochets. The binding should be tight so that when the fastening is stretched the elastic band itself is not visible. At the end of the binding, the last loop must be tightened.
Cut the thread, but be sure to leave a long tail. We will need this tail to sew the elastic to one of the edges of the bandage.
Then we knit 126 single crochets, starting from the second loop from the hook. In the 2nd row we continue to crochet 4 chain stitches and 126 double crochets. We will stretch a satin ribbon through this row.
The third row is performed as the 1st. We tie the finished openwork ribbon with a border, as the diagram shows
When the last row is finished, the thread must be secured and cut, but at the same time leaving a long tail. We will use this thread to sew the second side of the bandage to the elastic band.
When the elastic fastener is sewn to the bandage, carefully hide the ends of the threads with a needle.
In the row that we knitted in a double crochet stitch, pass a satin ribbon and tie with a bow. Also, the finished product can be decorated with a knitted flower or brooch.
Bandana headband with a three-dimensional flower: video master class
Chic snow-white crocheted headband with red poppy
This headband will be a real decoration for any outfit. It smells like spring warmth. Knitting this headdress with your own hands is not difficult.
For this we need to cook: 100g of white yarn (92% microfiber, 8% elastic), for tying white yarn microfiber acrylic, for poppy – black, red and light green thread, as well as a red ribbon and a button for attaching a flower. We will do all the work with crochet number 2.
The headband is suitable for a head circumference of 48-52.
First we knit a bandage. We cast on 10 air loops and 3 loops for lifting. We make 68 rows, as shown in the diagram
Then you need to sew the bandage and start tying it according to the pattern.
We do the second side of the bandage in the same way.
Now let's start knitting a poppy. Take red yarn and knit 10 single crochets into a slip ring. Tighten the ring and then make a connecting loop to the first post.
We continue knitting in circular rows with 1 double crochet stitches, 3 stitches in each loop of the previous row. We start each row with three chain stitches and end with a connecting stitch. Thus, the first row will consist of 30 columns, the second - of 90 columns, and the third - of 270.
We perform the center of the poppy using the Irish berry technique. We wrap the pencil with light green thread 8-10 times, then carefully remove it, and tie the resulting ring with single crochets.
The hook should be inserted into the middle of the ring. Finish the row of connections. column. We continue to tie the ring until the entire middle is filled. To do this, insert the hook not into the loops of the previous row, but into the middle of the ring.
We make stamens. First, we cover the middle with black thread, as shown in the picture, then we attach the thread to the last row of the light green middle.
We cast on 7 air loops and fasten the chain with a connecting loop to the next loop of the previous row. We repeat this knitting until the end of the row.

This is how you can knit the most beautiful headbands with your own hands without much difficulty. Even loops for you!
A headband with a hook is an original and extremely versatile wardrobe item. It can be made of cotton and worn in the summer as a decoration, or you can take woolen material, then you won’t be afraid to go to the skating rink in not very severe frosts. The headband will look magical on both newborn babies and older girls, and will perfectly complete the romantic image of a modern woman.
How to properly crochet a headband for a girl

This style of headband for a girl can be made either casually from acrylic or wool yarn depending on the season of the year, or formally, for example, from cotton (and it is better to take light shades).
Prepare the necessary materials: a needle and thread, a centimeter, decorative elements (rhinestones, sequins, buttons, beads), a ruler, a hook (select the number according to the thickness of the threads used) and, of course, skeins of yarn.
Let's move on to the master class:
- Take measurements. Use a centimeter to calculate your head circumference. This will be the length of the product. The width is according to your wishes. For example, in children under one year old it is usually 33-35 cm.
- Make a test sample to see if the pattern and dimensions are suitable.
- Next, you can use one of two common methods. The first one is almost simple and is well suited for beginners. It is called longitudinal knitting and is advantageous in that the item is seamless.
- Longitudinal knitting: cast on a chain of air loops, making its length according to the just measured circumference of the head. You can also calculate it using a sample. To do this, multiply the number of loops by 1 cm by the size of the head circumference. Remember that the chain must be a multiple of the repeat of 9 loops. Loop the chain and continue knitting until the 5th row. And the next 5 need to be mirrored.
Warm headband for women made of lush columns.

Materials:
Hook No. 3, 5; 50–60 grams of Alize Cashmere Batik yarn (100% wool, 100 g/300 m).
Make the upper and lower parts in lush columns according to the scheme:

The middle will consist of five rows of relief columns. You do the tying with a “crawfish step”.
Lush columns:
- You dial the chain and close it. The first row is made of single crochets.
- Second row: three lifting stitches, skip the base loop, make one double crochet, 1 double crochet, knit over the skipped stitch, repeat everything except the first 3 stitches.
- The third is the same, but in the opposite direction.
- From the 4th to the 8th row, perform relief columns.
- The 9th is similar to the second.
- The 10th row is like the third.
You can, of course, knit it entirely from lush ones, but this will increase consumables. And if you alternate in a circle with turning rows, you will get all kinds of patterns.
Let's look at a master class on a bandage for a newborn girl
A headband for a newborn will make her look as tender, fragile and innocent as possible. It is so beautiful!
You will need: white and pink yarn; a bead to decorate a rosette; hook number 1.
First you need to measure the circumference of your head; it will be equal to the length of the chain of air loops. The first row is knitted using single crochets. At the end of it, make three lifting air loops.
Second: one double crochet in the third loop from the hook, two chain crochets, a double crochet in the third loop from the original. Repeat until the end, and then add an air loop.
Third row: in the same way with single crochets. You break away from the pink thread and start working with the white one.
Fourth: three chain loops, one half-stitch in the second loop from the hook, three chain stitches again, a half-stitch in the second loop from the original one. Repeat until the end.
Fifth row: knit five single crochets into the first arch in the previous row, one single crochet into the next arch in the fourth. Do this until the end, and then attach the thread to the second edge of the bandage. The opposite one is knitted as the first one (from the 4th to the 5th row). You should get something like this:

Now you need to connect both ends of the bandage with half-columns or just fasten it with a seam.
Now the rose.
First row: thirty chain stitches, then turn the chain inside out.
Second: three air lifting loops, one double crochet in the fourth loop from the hook, chain crochet, one double crochet in the same stitch as the first stitch, one double crochet in the third loop from the hook, chain crochet, one double crochet in the same loop. The result is a chain with V-shaped patterns.
Third row: three chain stitches, place 8 double crochets between the posts of the V-shaped pattern. Do all of the above to the end.
Twist the finished chain in a spiral and secure the ends with threads. Sew a pink or white bead into the middle.
Attach a rosette to the seam of the ends of the headband. Insert an elastic band into the free spaces between the second and fourth rows. Ready!

Video on the topic of the article
Especially for you, we have collected interesting and creative videos that will definitely help you quickly decide on your future creation. Knit and wear with pleasure!
Dear needlewomen, today we will crochet women’s headbands. And so that you have a choice, we’ll go through the patterns and descriptions of knitting various patterns: winter, openwork, with a bow and others.
Warm winter crochet headband
Warm winter set from Drops
For those who like to not cover their heads too much during the cold season, we offer a bright set of a knitted winter warm headband and a crocheted neck warmer. You will need to knit it from wool yarn so that your ears do not freeze.
For sizes: 54/56cm; 56/58cm
Clamp size: 58-62 cm, height 24 cm.
Prepare:
- yarn with characteristics 50m/50g, consumption for a headband is 50 grams, for a collar - 150 grams;
- hook No. 9 and No. 10
Density: 4-4.5 stars = 10 cm
How to crochet a headband?
We will knit the model in rows “back and forth”, cast on 45/47 chain stitches.
Star pattern for headband and collar:
1p. LS: cast on 5 stitches. on the hook, starting with the 2nd air. sts from hook (= 6 sts on hook). Thread the thread and pull through all 6 stitches, then 1 chain stitch. for a 6 stitch hole, * cast on 1 stitch. in the hole, then 1 stitch in the last of six stitches, one stitch. into the air p., in which the last of the six p. was typed, one pet at a time. in the next two air p. (= 6 p. on the hook), put the thread on the hook and pull it through six loops, 1 chain stitch. * - repeat until the final st. On the last ch. make p.st/n. Turn the bandage over.
2p.IS: 2 air.p. (= 1 p.st/n), tie 2 p.st/n into the holes of all stars, finish p. p.st/n in last p. In total, there are 20-21 stars in the rows and one p.st./n in each.
3p.: 3 chain stitches, make 1 stitch each. in the 2nd and 3rd air.p. from hook, then 1 st. in the first three sts (=6 sts), place the thread on the hook and pull through 6 sts, ch 1. *, cast on 1 stitch. in the hole, 1 pet. in the last of six sts, 1 st. in the same loop into which the sixth stitch was cast, one loop each in the next two chain stitches (= 6 stitches), pull the thread through all six stitches, 1 ch* - repeat until the last stitch. In the last v.p. - 1 p.st./n. Turn it over.
Repeat the second and third rows. again and again the second r. (3 stars).
Trim the yarn, leaving an end for stitching, and pull through the last stitch. Sew along the short side and secure the tip.
Knit the neck warmer in the same way with a star pattern at the rate of 47/51 stitches using crochet number 10.
European style model

New cute crochet headband model for women, made in European style from the designers of the Drops studio. This headdress is more suitable for spring or autumn, despite the fact that it is made of wool yarn. It’s not difficult to knit; even a beginner can do it, because the only pattern is based on single crochets. Once you master it, you can easily tie a headband.
Sizes: 54-56; 56-58; 58-60 cm
For a knitted women's headband you will need 50 grams of Drops Big Delight yarn, 100% wool 100gr/190met and hook number 5.
Start with a chain of 69/72/74 chain stitches and knit 9 rows with single crochets, sewing the product along the short side. Next, you need to knit a rectangle from a chain of 7 ch. 10 cm long for stretching the strip. Wrap the bandage around the bandage and carefully sew along the short side.
Chic openwork

For an openwork headband for a girl you will need a hook No. 3.5 and 50 grams of Cotton Extra yarn, 60% cotton, 40% acrylic, 180m/50g or similar.
Knitting pattern:
1st: 8 columns s/n enclose in a circle.
2nd row: turn the workpiece over, we will knit the strip in rows “back and forth”, in all columns of the previous row. knit 1 column b/n and 1 air loop (VP).
3p.: in all columns b/n (STBN) - 1 column s/n (STSN) and 3 VP.
4p.: 1 STBN, 1 half-column (PST), 2 STSN, 1 PST, 1 STBN - in each arch.
5th row: 8 VP, 1 STBN in the sixth p. of the previous row. (in the last STBN, knitted in the 1st arch of the third row)
Repeat from the 1st to the 5th rows 10 times, then move on to the straight part of the strip: starting from the ninth stitch of the previous row. (the first STBN, knitted into the second arch of the third motif) knit 14 STBN, turn the product over and knit in rows “back and forth” STBN. When you knit 40 cm from the beginning, sew the first row to the last.
Cute bows

And it doesn’t blow into your ears, and your hands are warm
The following description of crocheting a headband is a white and blue pattern with a constriction. The set includes original mittens with bows. To make it, prepare Olga yarn (50% wool, 50% acrylic, 392m/100g) - 100 grams of cornflower blue and 30 grams of white, hook No. 2.
Knit a bandage according to the pattern:

Knitting pattern for pattern with bows
Operating procedure:
- Start the bandage with a chain of balloons. using a blue thread according to pattern 1 and knit 40 rows.
- Then knit 12 rows with white yarn.
- Sew the first and last rows of the column.
- According to scheme 2, make a jumper and drag the strip with it, as shown in the photo.
- Start the mitts with a chain of 56 chain stitches, connect them in a circle and knit according to the pattern 1 - 12 rows.
- Skip two repeats for the finger and continue further in rows “back and forth”, 3 rows in total.
- Then make 5 chain stitches over the skipped stitches. and combine the product into a ring again.
- Make 6 more repeats in height.
- Bow: use white yarn to make a chain chain. equal to 8 cm and knit 3 repeats according to the pattern (= 7p). Tie the piece with yarn, forming a bow, and sew it to the mitt. Tie the second one symmetrically.
Spring openwork headband

There are a lot of different balls - put them to work!
This style of strip is crocheted with No. 2 crochet, so a beginning craftswoman can use it. You will need leftover mohair yarn in sky blue, soft pink and blue shades.
How to knit a headband? Start with a chain of chain stitches. soft blue tone, the length of the head circumference, and knit according to the pattern. Knit all rows and join the back seam with dc. Start mitts with 43 air points. plus three sts for lifting, knit 15 r. st.s/n, then alternate colors according to the pattern. Next, continue with blue yarn, but alternate shades in reverse order, then 2 p. st.s/n. Bend the piece in half and make a seam, leaving a hole for your finger. Tie around the edges with blue st.b/n. For the finger, tie the hole with three rows of double stitch. Tie the second one symmetrically.

Turban headband with overlap and flower

60s style
The turban headband has been popular since the 60s of the last century. This is a beautiful feminine accessory that can be worn not only for warmth, but also as a decoration and addition to the image. It is made of strips overlapped with relief columns.
The width of the bandage is 10 cm to fit the head circumference of an adult woman.
You will need 100 grams of yarn with parameters 50g/90m of any composition, hook No. 5 and No. 6.5. If you plan to wear it for the street, then take woolen threads, for going to a restaurant - viscose.
Density: 17 p. crochet No. 6.5 = 10 cm
How to crochet a turban headband with an overlap? You should understand the general principle of knitting: we make about a third of the length of the headband, then we divide the loops in half and knit each sector separately for about a third, overlap the halves, then combine all the loops and knit the last third of the rows. This is a general pattern for knitting an overlapping headband. What pattern you will knit depends on the model, but the general principle is this.
Description of work:
- Start with a chain of 17 chain stitches using crochet no. 6.5. Main knit stitch: treble s/n in the 4th loop of the chain from the hook, 1 treble s/n in each stitch of the chain (PC), 1 treble s/n to the end of the chain, turn over (= 17 stitches)
1 r.: 3 VP, skip a loop at the base of the VP, (1 RLSN around the leg of the next loop, 1 relief stitch (RISN) around the leg of the next stitch) - repeat until the end of the r., tie the last RISN around the rotary air. etc., turn it over.
2p.: 3 VP, pass a loop into the base of the ch.p., (1 RIST around the leg of the next st., 1RLSN around the leg of the next st.) - repeat until the end, when you tie the last one. Radar radar around the rotary VP, turn it over.
Repeat only 2 rows. - In total you need to knit 13 rows, ending with a knit p.
- Having finished knitting the third part of the bandage, knit separately on the first 8 loops, knit a third in length, then the second half of the same dimensions, make an overlap, and finish the rest of the strip.
- It is necessary to decorate the strip with large flowers; to do this, make 5 VP. 1 round row: 20 Ch, (1 double stitch in a circle) - 30 times. Fasten and gently pull the thread to tighten the ring.
- Then we will make a small flower: 5 VP. 1 round p.: (10 VP, 1 st.b/n in a circle) - 15 rubles. Strengthen and gently pull the yarn to tighten the ring.
- Stage of assembling the product: sew the central back seam, sew on flowers, as in the photo, place a button with a bead in the center.
Floral stripe

Collected large crocheted flower motifs with a convex center make up a purple feminine stripe. The knitting idea was translated from Crochet magazine.
The width of the bandage is 15 cm, the circumference of the head is 54 cm.
It is proposed to knit with Berroco Ultra Alpaca Chuncy yarn (50% alpaca, 50% wool, 120mt/100g) - consumption is one hundred grams, you will need a No. 8 hook.
1 flower = 15 cm
Attention: initial 5 air.p. counted as 1 column. with 3 yarn overs. All rows end with a connecting stitch, unless otherwise specified.
What is “knitting by the butt?” loop turn" - this is the name of the turn that is adjacent to the back and just below the rear wall. The photo shows the rear view of the pole. with 3 yarn overs and the required turn is shown.
Knitting pattern for a flower headband: 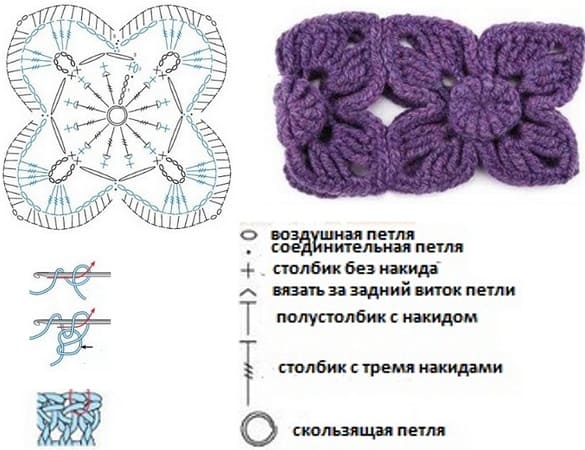

And for those who are pros in crocheting, I offer a pattern for knitting a women's headband from a Japanese site: 
See a selection of stripes for the head with knitting needles

Craftswomen, we have prepared two video master classes for you on how to make a headband in the form of a braid and an openwork strip:


