A hundred years ago, almost every house had a dowry, which was decorated with hemstitch embroidery. The photos given in the article convey all the charm and elegance of filigree art.
What is hemstitch?
At all times, women have been involved in handicrafts. This included embroidery with beads and pearls, cross stitch, hemstitching using gold and silver threads, and lace weaving. Due to the passage of time and the impossibility of using materials of that time, some techniques have been forgotten. But one type of needlework has not only survived to this day, but is also quite popular among both craft lovers and modern fashionistas. This is hemstitch embroidery.
General provisions
Hemstitching (embroidery) is through seams on fabric from which a certain number of threads located in one direction have previously been cut or pulled out. The fabric used to perform this technique must have a structure from which the threads can be easily pulled out. Complex and intricate weaving of threads will prevent the fabric from being properly prepared for work.
Hemstitch embroidery is an ancient type of needlework that has survived to this day. This type of craftsmanship does not require special skills, nor sewing or sewing. The main thing is perseverance, accuracy and a large supply of patience.
What can be decorated with hemstitching?
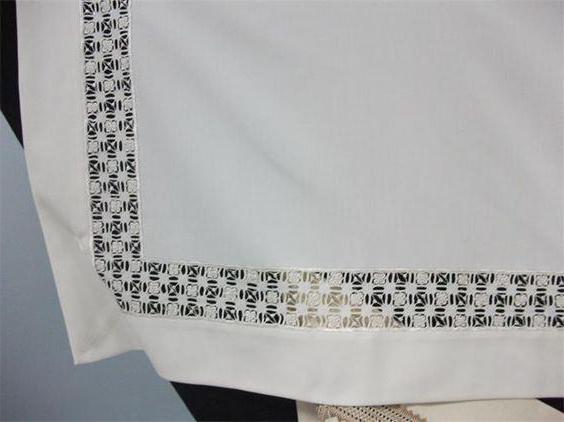
This pattern is used to decorate not only dresses, men's and women's shirts, children's clothes, collars, cuffs, blouses, but also bed linen, scarves, tablecloths, towels, and napkins.
The most technologically advanced fabrics for hemstitching are linen, cambric, silk, canvas or cotton.

Tools and threads
Threads are selected based on the density of the fabric, using bobbin cotton threads in the range from No. 10 to No. 120. For thin light fabrics, threads No. 60-80 are used, for coarse ones - threads of medium numbers. Both types of fabrics can be decorated with floss, folded several times. A non-standard solution is to pull out threads from the prepared fabric and then use them to create a pattern. The color of the finish is chosen by the needlewoman based on her ideas and preferences. The tools required are small, sharp scissors and an embroidery needle of suitable thickness.
How to properly care for things with a pattern?
Embroidery (hemming) requires not only careful storage, but also proper care. Embroidered items are washed by hand in warm water, and when washing by machine it is better to use the delicate cycle. For greater safety, the product is placed in a special bag. It is better to iron embroidered areas through a thin damp cloth (gauze), pressing with an iron from above for 1-2 seconds. Try not to move the iron back and forth to avoid possible deformation of the embroidery.
Such different hems
All types of hemstitching in hand embroidery are made based on basic techniques. A simple hemstitch is an ordinary hem used to hem the edges of napkins, tablecloths and sleeves. Over the past decades, the seam has changed and became a “tassel” hem. To make this seam from fabric, it is necessary to pull the threads out of the warp until a strip 3-5 mm wide is formed. Since the hemstitch is embroidered without a single knot, it is necessary to secure the working thread.
How to secure the working thread?
This can be done in two ways, the first of which is suitable for the hemstitch technique, the embroidery of which is done with thread folded in half: thread the ends of the thread folded in half into the eye of the needle, and wrap the loop formed at the other end around the required number of threads needed to create one tassel. Then pull the needle and working thread through this loop.
However, most cases force you to use the second method - single thread embroidery, and here they act differently. To fix the working thread (hereinafter referred to as RN), it is necessary to insert a needle into the future tassel, and then, stepping back from the edge of the fabric by 1-2 threads, withdraw it. Having picked up the required number of loose threads of the fabric (hereinafter referred to as NT) with a needle, place the RN in a counterclockwise loop and tighten it, holding the RN with your left hand. For reliability, you need to make one more loop. Using the third stitch, we insert the needle from the wrong side over the tightened NT and bring it out to the front side. Next, using a needle to pick up the same amount of NT as when fastening, we separate the second tassel and tighten it.
The beauty and neatness of the hemstitch directly depends on the equal number of threads for the tassel and the same stitch length. To ensure that the hemstitch embroidery is even, we stick the needle in, leaving two threads from the edge of the strip, and also leaving one on the left side of the border of the tassel. When embroidering, the RN must be pulled upward from you.

From simple to complex
Hemstitch “Simple column”
The threads are pulled together on one side of the threaded track of the fabric. A “tassel” is formed, and then these same threads are pulled together from the opposite side. We get columns drawn on both sides. If the hemstitch is made according to the lobar arrangement of the threads and 5 threads are pulled out, 4 of them are taken for the “tassel”. If the hemstitch is arranged according to the transverse arrangement, then 5 threads will be used for the column, and 4 need to be pulled out.
Merezhka “Column in split”
The upper edge of the column is made as in the previous pattern, but the number of threads in the column must be even.
The lower edge of the hemstitch column must be pulled together from half the threads of adjacent columns. In other words, you need to “split” each column in half. This technique is applicable for narrow hemstitching.
Hems on an embroidered base
Merezhka "Snopik"
This hemstitching is done on top of a “simple column”, which should be 1-2 cm or more wide. The working thread runs through the center of the hem, pulling 2-3 stitches into bundles. When two or four columns are pulled together, we get a “sheaf” pattern. When three columns are pulled together, you will get a “bug”. RN make a loop counterclockwise, insert the needle under the RN and tighten. It is important to note that when tightening the loop, the connecting thread should not sag. Therefore, first we tighten the loop against the embroidery, and just before the knot we change the direction to the opposite. Sheaves can be combined into an unlimited number of columns. This technique is used in complex hemstitching.
Merezhka "Goat"
It is a pairwise connection of columns: adjacent ones are connected in twos, sometimes from above, sometimes from below, at a third of the height of the column. Each new one must be attached to the finished tightened column in such a way that each of them is connected to two adjacent ones.
By joining the two stitches at the top, the RN will make a counterclockwise loop from top to bottom. The needle is inserted into the resulting loop from left to right, picking up the RN and columns that are simultaneously pulled together.
By combining two stitches from below, the thread will make a loop clockwise from bottom to top.
When the loop is tightened, the needle with the working thread must be pulled along the hem to the right. This will allow you to get a beautiful loop, and the RN and alternate embroidery steps run along the wrong side.

Complex multi-row hems
The hemstitch embroidery “openwork mesh” consists of two parts: first, a “simple column” 2-3 cm wide is embroidered, and on top of it is a “goat” in 2 rows: top and bottom. When completing the second row, we separate the columns combined in the first row. Leaving two “goats” from the first row in the second row, we get a wide linen hem. By stretching a bright ribbon or braid into the resulting wide holes, we give clothes or bed linen an unusual look.
Pattern "Intertwined hems"
From the loose threads of the fabric, thin columns of 3-4 threads are pulled together, forming a “column”. Fastening a thick twisted thread to the right in the middle of the hemstitch, crossing two columns at a time. We string two adjacent posts onto the needle, direct it from the bottom up and towards ourselves, prying the second one and wrapping it behind the first one.
Double weave hemstitching is done with 4 columns. They are intertwined in pairs: 1 and 3, 2 and 4. We string 1 and 3 columns onto a needle, and pass 2 under the needle and connect them using the “intertwined hemstitch” method. Then we pull the thread against the direction and string 2 and 4 columns, intertwining them in the same way.
About ready-made hemstitch sets
Modern needlewomen have modernized techniques such as hemstitching. The beaded embroidery of the dress, complemented by hemlines, looks elegant and sophisticated. Using ready-made embroidery kits, even a novice craftswoman will create a real
Hemstitch embroidery with beads
The set includes panels with a colored pattern that does not fade or wash off when washed, as well as instructions for embroidery. The diagram that needs to be consulted is located on the dress blank itself, with symbols of the required bead colors. After decoration, the corresponding parts of the dress (front, back, sleeves, etc.) are cut out from the panels and sewn together. If you have difficulty working with beads, you can decorate the blanks with floss.
The set "Hemstitching: bead embroidery" may include beads matched to the workpiece. When ordering an embroidery kit through some online stores, you must separately indicate this item in the comments.
Cross-stitch
In addition to those previously described, the “Hemstitching: cross stitch” sets are also interesting. Here the composition is slightly different: cotton canvas "Aida" No. 14 white, a diagram with color designations, a set of necessary floss threads, a needle and instructions.
The eyes are afraid, but the hands do

To master the described technique, in addition to preparing the right tools for the job, you need to read the step-by-step instructions for performing a basic simple seam. Figure it out, and hemstitch embroidery for beginners will not seem difficult to you. Remember: any pattern is always done from left to right.
- To independently gain the first skills of hemstitch embroidery, you first need to select the fabric. It is better to use cotton, it is enough to simply pull the threads out of it.
- Then a neat small incision about 2-3 cm long is made on the fabric.
- Based on the pattern of the fabric, pull the threads from the warp using tweezers.
- Pull the threads into bundles of 6-8 pieces. You can take less, then the columns will be thinner and more elegant.
- Having finished tightening the bottom and top rows, cross two adjacent bunches, forming a “tassel”. The pH must pass through the center of each “tassel”.
The method of hemstitch embroidery is quite within the capabilities of not only experienced craftswomen, but also debuting needlewomen. It's based on simple techniques that can be used to turn dull and uninteresting things into a work of art.
Hemstitching has been around as long as weaving itself. Models decorated with it always look elegant and noble. Having mastered this method of finishing products, you can create real masterpieces of tailoring art.
These are embroidery through counted stitches formed by the simplest stitches made on fabric thinned by pulling out threads.
Various numbers of threads are pulled out of a fabric, usually plain weave, and the remaining threads are secured - collected, pulled together into bundles and columns. The number of threads pulled out determines the width of the embroidery.
The range of designs is so wide thanks to different execution techniques and selection of stitches that, despite the almost geometric rigor, hemstitching has many interesting and individual possibilities.
In addition to decorating individual parts of the product, hemstitching is excellent for finishing the bottom of the product and sleeves, the edges of napkins and tablecloths, scarves and stoles.
Attention: you cannot hem the edge of the fabric, as the edge may shrink during washing and the embroidery will be damaged; in addition, the thickness of the threads on the edge is greater than the thickness of the threads on the material.
Embroidery threads should have the same thickness as the threads of the material, or be a little thinner. Sometimes pulled threads from the material are used for embroidery.
It is very important to accurately determine the type, number of threads and location of the pattern. Only after accurately identifying all the lines can you begin to pull out the threads.
Tip 1: if at the end of the hem the elongated threads need to be secured, for example, at the corners, then you should leave the fabric threads of the appropriate length and, to prevent tangling, secure them at the ends by wrapping the bundle of threads with tape.
After pulling out and securing the threads in the material, the remaining threads are secured in various (depending on the type of embroidery) methods. Embroidery is done from left to right. It is necessary to monitor the number of threads being attached.
Tip 2: Working threads should always be secured at the beginning and end of the stitching with several locking stitches.
Hemstitch "column"
The simplest and most basic type of hemstitching. Many types of hemstitching are made on the basis of the “column”.
The needle grabs a bunch of threads (3-5 threads) on the fabric, then a securing stitch is made on the fabric: 2-3 threads of the fabric are rolled with the needle. The “columns” are located parallel to each other.
Merezhka "split"
For a zigzag "split" hemstitch, the number of threads in the bundle must be even.
One edge of the thinned section of fabric is shaped as shown above.
When securing bundles of threads in the second row, you should grab half of the first bundle and half of the next bundle with a needle, i.e., the bundles are pulled together diagonally.

Herringbone hem
This pattern is made between two sparse areas on the fabric. The needle grabs bundles of threads, first from above, then from below. To achieve a greater effect, the embroidery thread can be of a contrasting color. The sides of the sparse sections of fabric that remain free are secured with a thin thread in accordance with the technique described above.

Hem "bug"
The “bug” pattern is made on the basis of the “column” pattern.
It is possible to perform the pattern in different sequences: first, connect the bundles of threads in the middle, and then secure the bases of the bundles to the fabric; or first make “columns” and then secure the bundles of threads in the middle.
To secure the “columns” in the middle, you need to use a strong thread.

When making a goat pattern, the first bundle is connected by two or three stitches at 1/3 of its length with the second bundle. Then the second and third beams are fixed at 1/3 of the length of the beam, etc.
To connect bundles of threads together, use a strong thread. The connecting thread should not be visible from the front side of the embroidery.
This pattern is especially effective if its edges are decorated with satin stitch embroidery.

Hemlock with flooring
Hemstitch flooring is made for beauty, strength and durability.
The flooring is done with stitches tightly adjacent to each other on two or more posts. When performing flooring, the needle is located between the bundles of threads.
Corner treatment: securing fabric threads
Mark the location of the hems on the material, pull out the threads, trimming some of the fabric threads in the corners or leaving them on the wrong side of the part so that the corner of the part (product) remains intact. Wrap the ends of the remaining threads with tape.
The more threads that are pulled from the fabric for a corner pattern, the larger the hole and the more carefully the threads of the fabric must be secured. The corners are embroidered after the hemstitches are embroidered.
The corner cuts are secured to the material with threads that match the color of the fabric or with threads pulled from the fabric.
If the corner of the embroidery is located next to the cut of the part, then the following simple but labor-intensive technique can be used to secure the threads of the fabric: the threads in the area of the entire corner of the part are pulled out of the fabric one at a time; then the remaining threads are threaded into the needle and passed into the resulting “paths” in the opposite direction.
If the threads in the corner of the embroidery are cut, then the cuts are secured with overlock stitches, which are located tightly to each other.
If the embroidery consists of several hems, a “lattice” is formed in the corner, which can be secured with flooring.
Using hemstitch to finish the edge of a product
Finishing the edge of the product with a hem and hem stitch can be done on both the front and back sides.
If the edge of the product is not hemmed, then only one or, depending on the thickness of the fabric, two threads should be pulled along the hem line. In this case, it is faster and easier to process the bottom on the wrong side of the product. Only small horizontal stitches will be visible on the front side. The seam is made from left to right. Each bundle has the same number of threads.
If the edge of the product is hemmed and, accordingly, more threads are pulled out of the fabric, then the bottom is processed on the front side.
Mankind knows many embroidery techniques; hemstitching is considered to be one of the oldest. It was used to decorate wedding dresses and bed linen tens of hundreds of years ago. Girls were taught to embroider from an early age, in this way they prepared their dowry; over time, the home hobby turned into a craft. Embroidery using the hemstitch technique was sold at bazaars and fairs, and entire workshops were created where one could order an embroidered product.

Hemstitch embroidery can be either a separate embroidery option or combined with the technique of cross stitch or satin stitch. In ancient times, the clothes of nobles were always decorated with hemstitch embroidery; they were used to decorate the sleeves of blouses and the edges of handkerchiefs; they were considered an invariable attribute of every self-respecting person. In the modern world, you rarely see clothes decorated with hand-stitched embroidery, however, if it is present in clothing design, it attracts everyone's attention and admiration among connoisseurs of beauty.
If you want to master this hemstitch embroidery technique, you just need to be patient and prepare the materials in advance. Despite all the confusion in the embroidery technique, even schoolchildren can understand this type of needlework.
Preparing to embroider
To do needlework, in the old days, women had to work hard to get all the necessary components for embroidery. Today there is no shortage of materials and everything you need for hemstitch embroidery can be found in the first best store. In addition, in some stores you can purchase a ready-made needlework kit, where the longitudinal threads have already been pulled out for you.
IMPORTANT! You can embroider hemstitch on any fabric, as long as it has a tight weave. Ideally, embroidery is done on thick but well-washed burlap. The thicker the threads of the selected fabric, the easier the preparation will be, which consists of pulling out the longitudinal threads.
In addition to burlap, fabrics such as:
- canvas
- batiste
- linen with lavsan
 linen with lavsan
  batiste
 tablecloth fabrics
  silk
silk
 plain fabrics
  cotton
Required accessories
- Hoop
- manicure scissors
- floss threads


Sometimes knitting needles are used instead of needles
Video review of hemstitching with knitting needles
Using nail scissors, you need to cut two threads at a time. There is a chance that you will cut the wrong thread and in the future you will encounter a number of errors in the pattern. You should not work in poor lighting or when you are tired; hemstitch embroidery requires extreme care. It is best to use a rectangular hoop, this simplifies the preparation process and the embroidery itself. If the fabric has intricate weaves of threads, then it is not suitable, because you simply cannot pull them out without damaging the base itself.
When you have pulled out the required number of threads, you need to prevent the fabric from unraveling at the edges; to do this, make a column of horizontal even stitches, no more than 3 mm long, its height should correspond to the height of the given line of threads. A regular needle is suitable for sewing, but the threads are cotton or floss. Experienced craftswomen recommend using the threads that you pulled directly from the fabric. The color of the threads cannot be bright, it should blend in with the fabric or shade it a little; white threads are considered a universal option. In the future, the products must be washed in a fabric bag and ironed through gauze.
Embroidery technique
Taking into account the fact that each region has its own methods of hemstitch embroidery and a set of patterns, it is important for novice needlewomen to learn how to make basic ornaments; they can be combined with each other in a fairly orderly manner. In fact, everything is not as confusing as it might seem at first glance. By performing elementary patterns correctly, you will achieve a stunning effect and the finished work will exceed all expectations.

It is best to start learning hemstitch style embroidery on checkered cotton fabric. This way it will be easier for you to make cuts along the lines, determine where to pull out the threads and figure out the pattern. For example:

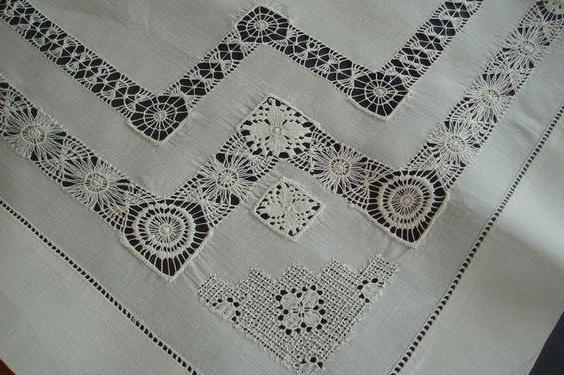
A variety of openwork hemstitch patterns
Column

The first of the main patterns is considered to be a column; it can be embroidered with a different number of threads, it is better to start with 3 captured threads. Using a needle, pierce the fabric under the elongated threads at a distance of 3 mm and insert the needle from the front side into the area of free threads, grabbing the selected number of threads from the back. Next, the needle and thread are circled around the selected number of threads and the needle is inserted from the inside under the post. You should end up with slanting stitches at the bottom and a knotted column of thread. The operation is repeated along the specified perimeter and the product is wrapped on the other side. You need to embroider similar stitches on the opposite side, being sure to adhere to the specified distance between the posts. Ultimately, there will be embroidery on the fabric that resembles a ladder. It can be used to decorate the edges of the product or, complemented by a bright ribbon that is pulled between the posts, used along the entire length of the tablecloth or dress.
Split

In a similar way, a pattern is made that is called a split. The upper part of the columns is made without changes, but on the opposite side, the threads of one column are divided into two halves and stitched with a knot separately.
Interlaced columns

The pattern of intertwined columns looks good. It is performed on the basis of ordinary stitches, but then the following instructions are followed: the needle is brought out to the front side of the fabric in the middle of the stitches, counting out 4 groups of threads, insert the needle after 4 and stretch between the second and third. The tip of the needle is turned to the left and inserted into the wrong side to the right of the first thread, continuing to turn the needle to the left, stick it in front of the 4th group of threads and tighten the resulting knot tightly. Ultimately, you end up with columns tied in the middle that are connected to each other with a thin thread. It will look very original if the spaces between the columns are supplemented with small beads or seed beads.

columns intertwined with beads
By using your imagination, you can combine the above-mentioned hemstitch options and elegantly perform seamless embroidery. On specialized sites, you can familiarize yourself with complex patterns - diamond, goat and basic hemstitch. Many people think that hemstitch embroidery is a boring craft, but this is not so; every day you get acquainted with a new pattern, you open up a “field for imagination”. The peculiarity of embroidery in the openwork hemstitch style is that it makes it possible not only to decorate interior items, clothing and household items, but will also become an excellent hobby with which you can relax after a hard day at work, without financial expenses.

Video master class on hemstitch embroidery for beginners
Hemstitch embroidery patterns for beginners


Women's needlework in Russia has never disappeared; at all times, Russian beauties wove lace, embroidered beads and decorative pillows and icons. Gold and silver threads were used in embroidery.
Today, many materials of that time are inaccessible to us, some handicraft techniques have been forgotten, but still a lot remains and can become a fascinating hobby for us, which will give us truly original products. For example, hemstitch embroidery, with its help you can decorate yourself and stand out from the crowd in the best sense.
Hemstitch embroidery history and technique
Hemstitching is an ancient method of embroidery that was available to every woman. It is not necessary to have a sewing machine, so this type of embroidery has always been popular in many European countries and in Russia. Hemstitching was used to embroider napkins, tablecloths, collars, scarves, shirts for both men and women, and of course dresses, skirts, and blouses.

It will take a lot of time and patience to complete the hemstitching. First, you need to pull out a certain number of threads from the fabric, going in one direction, and you need to do this carefully and counting. In this case, it is better to use a fabric from which the threads can be easily pulled out. If the structure of the fabric contains intricate weaves of threads, then such fabric is not suitable for hemstitching. The best fabrics can be linen, cambric, linen with lavsan, silk and others like them and, of course, smooth ones that do not contain prints. The threads also need to be selected according to the density of the fabric. They can be not only spool threads (cotton), but also floss with several threads, linen and threads that you pulled out of the fabric. You can choose the color of the threads you will use to embroider that will effectively convey the hemstitch pattern, but it is better to do this to match the color of the fabric.

It is better to wash items with hemstitching in a special bag, if in a machine, but it is better to wash them carefully by hand. It is better to iron such areas with hemstitching through the fabric, as if pressing it with an iron; do not try to move it back and forth - you can deform the embroidery.
You can trim the edges of the sleeves, the bottom of the dress, the bodice, basically anything you want, depending on the cut of your clothes. Using hemstitching you will turn your clothes into a lace fantasy.


Hemstitching is a very old method for decorating things such as tablecloths, napkins, shirts, the history of which takes us far back into centuries. It used to be very popular for decoration on clothes. To this day, this cross stitch technique has not lost its popularity. This type of work is accessible to almost all girls because it does not require a sewing machine or any other large expenses. There are many types of embroidery - this includes a column and a tassel, a goat, a bug, a spider and other types. You can find and download diagrams on the Internet completely free of charge.
What is the meaning of the technique of this skill? Some threads need to be pulled out of the fabric, and those that remain are collected in a bundle and, as a result, a beautiful pattern is obtained.
Which materials We will need for work:
- Canvas, plain or silk fabric.
- A sharp knife or blade.
- Needle and thread of a certain color.
If you want to work on a uniform pattern, remember that for beginners, the best fabric option is canvas, because it is very simple and easy to work with. Silk can be taken if the skills are already developed and there is extensive work experience. Preparing fabric is a delicate job. Each type of fabric requires a special an approach.
- You need to start by slowly cutting several horizontal threads on the canvas with a knife. We create a width of no more than 1.5 centimeters so that the finished item looks neat and cute.
- The new stage of our lesson will be pulling out the threads; this is easier to do with a needle. The threads must be removed from left to right gradually. Having reached a certain length, you need to cut six elongated threads on the right. You need to be very careful that the ends of the cut edge do not fall off. If you only need a horizontal hem, there is no need to cut the vertical threads.
- In order to process the embroidery, secure the edges and move one square away from the beginning of the thread removal. Thread a thread with a knot into the needle and insert the thread into one square twice. Then we'll move on to the next one. This stage must be done no matter what pattern we will work with.
Gallery: hemstitch embroidery (25 photos)


Hemstitch tassel master class
The brush method is the easiest way. This type of seam can be used both as an independent type and as the main basis for other types of seams.
 Let's start embroidering a tassel from the right or left corner of our item, in dependencies depending on what is more convenient for you. Insert a needle and thread into the created stripe on the canvas, secure it with two stitches and bring it to the front of the item. Then we grab a couple of threads (three or five), twist them around and make a loop and sew like this without creating gaps. Let's grab the same number of threads.
Hemstitching on canvas master class
And then, we will look at how to create a hem on canvas with a “split” pattern. The canvas is very loose, so you need to work with it carefully, otherwise everything can easily be ruined. But, besides this, such a unique weaving will help to get the drawing right, especially for a new craftswoman.
First, you need to learn how to pull out the threads. This must be done using a blade, which we will use to cut about six threads. You don’t have to use a wide hem, as the image may get lost in this case.
First of all, we go through one edge. It's worth starting right away process so that it does not bloom further. Then we decorate the second edge in the same way.
After preparing the outline, let's move on to creating the drawing. Let's look at how you can gradually make stovpchik embroidery. For newbies, the “split” pattern will be easy to perform. On one side of the fabric we make a tassel of two threads. Slowly we go through the seam so that the loops are clear and visible. On the other side, we attach threads of different columns into one tassel.
Merezhka bug.
Let's pull out another row of threads to create such a seam. It is made from column embroidery and the thread is threaded through the middle of the processed edge. Next, we cover three columns with a needle, again we pass the needle behind them and under a special thread. Tighten the created loop. Let's count the number of columns so that there are no single columns left at the end.
 To create this look, you need to pull out two rows of threads with an interval of three cells. We will treat it around with our “brush”. Further, the principle of processing the central part is similar, but the actions from different sides are absolutely the same.
The rows should be decorated with seams already known to us. Having made the middle in the lace embroidery or “bug”, you can begin to string the beads. These are such easy and beautiful types of hemstitching for beginners. You can decorate various things with such embroidery, making complex lace patterns.


