The ability to create paper figures will not be superfluous in life, especially if you have children.
Origami paper animals are the best children's toys, although they are short-lived. Such animals can decorate a home, becoming unique decorations, and the process of creating them can take even the most restless child for a long time.
If you don't have the skill, you can start with a paper swan. This is the simplest DIY paper craft. You can also use other origami paper animal patterns.
First you can make a swan using one sheet of paper.
- To do this, you need to take a sheet in the shape of an even square and bend it in half diagonally.
- When the line has acquired sufficient clarity, the sheet is returned to its original state.
- Then the parts of the paper that are located below are brought to the created line.
- After this, the sheet is turned over and the procedure is repeated. The lower corners are brought to the line.
- The resulting figure is divided in half and the bottom corner is brought to the top.
- To make a swan head, the thinnest corner is folded down.
- Then the entire structure is bent in half again, but on its own side.
This is how the swan neck is formed. She rises and her head moves to the side.
- To make the swan's head more expressive, the inner folds unfold and fold along the fold lines.
- Then the beak is folded - the bird is ready.
Of course, you can make more than just swans. Today there are various patterns of origami paper animals for beginners.

Of course, this type of paper origami for beginners, when animals are made, is easier to create than volumetric origami of paper animals for beginners, for example, the same swan, only created using modular technology. Such toys turn out to be very beautiful and interesting, for example, a hare or a toad, although they take quite a long time to put together, since each component is made separately and subsequently fastened together.
Volumetric figures
To learn how to make three-dimensional origami animals from paper, you can search the Internet for a master class where people with experience show how to work in a modular style or provide diagrams.
There are many finished projects frogs, wolves, dogs, cats and many other animals. The whole process is described step by step. By strictly following the instructions, even a beginner can do this activity.
A voluminous swan can be made using satin ribbons. The bird turns out to be very beautiful, elegant, and most importantly, it will please the eyes for much longer. But creating a swan from ribbons is incredibly difficult because ribbons don't hold their shape like paper.
Photo lessons for beginners with step-by-step instructions will help you make a three-dimensional animal.
You can not only fold animals out of paper, but also make a kite. This Chinese toy is very loved by children: they enjoy watching the snake wriggle in the sky under gusts of wind.

To make a kite you need to have:
- For the frame - tubes or slats. The materials should not be heavy, otherwise the kite will not rise into the sky. You can also adapt branches.
- Paper, cellophane or light fabric are suitable for the surface material for the kite. They should be selected based on the weather outside the window. If it is very windy outside, you can use fabric, and if there is only a slight breeze, then paper or cellophane.
- You also need a reel. Anything you can wrap a rope around will do.
- Strong thread or rope, as well as material for creating the tail.
The “monk” snake is very easy to make, and models of wild or domestic animals are made using the same principle.
How to make origami animals out of paper, for example, a snake? You will need a thick sheet of A4 format, PVA glue, thread and scissors.

Step-by-step instruction:
- A square is formed from a piece of paper.
- The square is bent diagonally. The longer side of the triangle is turned towards itself.
- The free corner of the triangle is pulled towards the fold to align the lines.
- Turn the craft over and repeat the process.
- The corner that has become free stretches away from itself towards the previously outlined bend.
- Turn the craft over again and repeat the process.
- Then the very first bend should be straightened - the base is ready.
- A 30-centimeter thread is cut, treated with glue and inserted into the resulting pockets. Until the thread dries, the toy should not be touched.
To form the tail of the snake, you can take thin threads of 50 centimeters each. This is the most optimal length for flight. Suitable threads for knitting. You need 5-6 of them. Then the threads are tied into a tassel. It should be secured in such a way that the tail is at the tip. Glue and a piece of paper are used to secure it. A skein of thread is attached for control - the toy is completed.
What can be done using origami technique? Paper animals make great animals. Children can also be involved in this activity. The assembly diagrams are quite simple, kids will be delighted with their new hobby.
Origami paper animals: assembly diagrams
We suggest making a chanterelle first.
- Prepare a sheet of paper and fold it first once diagonally, and then a second time (Illustrations 1 and 2).
- Then fold the left and right corners of the resulting triangle from the center line (Illustration 3).
- Fold the piece in half (Illustration 4).
- Unscrew the top half of the figure a little and divide its top into two parts (Illustration 5).
- Unfold the spread and turn the piece on its side (Illustration 6).
- Fold the right corner (Illustration 7).
To make the craft completely complete, draw a face for the fox.
Cute paper pig using origami technique
The master class will tell you, from paper.
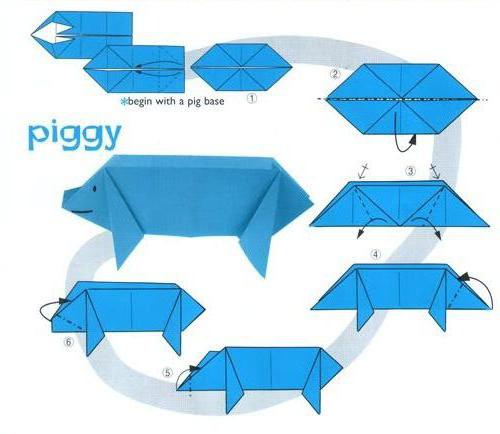
Animals can be absolutely any color. It will be better for the child if you take bright colored paper.
First, a rectangular blank is made. To do this, a sheet of paper is folded in half lengthwise. To make the pig beautiful, it is better to use a regular leaf rather than a square one.
To facilitate further assembly of the craft, make an accordion from the blank in three folds. Then flatten the rectangle. As a result, you should have four fold lines.
Now pull the left edges so that the bottom and top of this part are straightened. The purpose of this movement is to make a pointed rectangle shape. Repeat the same action with the other side (picture 1).
Turn it over and fold it in half lengthwise (picture 2).
Unscrew the sides of the side triangle (picture 3).
Do the same on the other side.
Fold the right triangle inside (picture 4).
Fold the tip of the left triangle inward (picture 5).
Raise the bottom of the figure as in picture 6.
Draw a face and straighten the paper.
Our origami pig is ready!
Paper origami: savannah animals
Using this technique you can make not only cute animals, but also real predators. We offer you a master class on how to make origami from paper.

Savannah animals include zebras, giraffes, lions and many others. We think that children will find it interesting to make a lion. Therefore, take yellow paper.
- Make a diagonal fold line (picture 1).
- Tuck the top and bottom parts to the center line (picture 2).
- Bend the corners of the figure slightly inward (picture 3). This is done diagonally.
- Fold the top and bottom of the figure onto the reverse side diagonally (see Illustration 4 for more details).
- Bend half of the figure back (picture 5).
- Visually draw a diagonal line that intersects the two halves of the figure. Fold the front part of the part inward along this line (picture 6).
- Bend down half of the right side (picture 7).
- Fold down the part shown in picture 8.
- Fold in the bottom triangle of the part (picture 9).
- Wrap the right side diagonally (picture 10).
- Bend back half of the tip (picture 11).
- Fold half of the tip in the opposite direction again (picture 12).
- Tuck in a small corner (picture 13).
The cute predator is ready. All that remains is to draw his eyes, mouth, nose and mustache.
Paper craft tip: Origami (savannah animals) will look better if you use paper that has White color, and on the other - orange. This makes the mane stand out more clearly.
Furry animals
After the predators, I want to make some cute crafts. Therefore, it would be appropriate to describe the procedure for assembling an origami cat from paper.

Making animals (scheme of work).
- Prepare a sheet of paper. To do this, roll it diagonally twice (Illustration 1).
- Flatten the sheet and tuck the top and bottom corners to its center line (Illustration 2).
- Bend the lower and upper right parts a few millimeters (Illustration 3).
- Turn the figure over (Illustration 4).
- Fold the bottom and top of the right side of the part to the fold line (Illustration 5).
- Tuck half of the figure (Illustration 6).
- Unscrew the top half (Illustration 7).
- Wrap the “wings” of the part, as in illustration 8.
- Straighten the “nose” of the figure, as in illustration 9.
- Fold the bottom triangle (Illustration 10).
- Tuck the “ears” on both sides (Illustration 11).
- The top part should also be removed back (Illustration 12).
- Fold in part of the bottom triangle as shown in illustration 13.
- Spread the “wings” of the lower triangle (Illustration 14).
Draw the kitten's face (eyes, mouth, nose, antennae). If you wish, you can add a forelock.
The craft is ready!
Paper rabbit

To make a rabbit, you need to assemble the usual blank (pictures 1, 2 and 3). Then tuck the protruding triangle twice in different directions and turn the resulting figure over (pictures 4, 5 and 6). Now fold the piece in half, first lengthwise and then widthwise (pictures 7 and 8).
All that remains is to form the rabbit's ears. To do this, the right triangle needs to be cut and the halves unfolded (pictures 9 and 10).
Draw a face and the craft is ready!
The most simple models origami - animal faces. Even children 3-4 years old can do them. The basis for such crafts is the basic shape of origami “triangle”. When explaining to children how to make a triangle, you can do without complex geometric terms. We simply fold a “kerchief” (a square) into a “kerchief” (actually a triangle). The faces made of paper very vaguely resemble the animals we make. Therefore, it is necessary to further decorate them - draw eyes, nose, mouth, etc. with felt-tip pens. If you are doing work with older children, then you can not draw the details, but make an applique.
Having made such faces, you can put them in an origami house, send them on a journey on a fun train, make finger puppets or set up a tabletop paper theater.
Origami animal faces: cat.

Let's bend our triangle in half, marking the center line. Then we'll expand it again.


Let's turn the figure over. Fold the triangle back at the top of the muzzle.


All that remains is to draw the details.

Origami animal faces: dog.
Let's make a basic triangle shape.

Bend and then unfold the triangle, marking the center line.

Focusing on the center line, at an arbitrary angle with the sides of the triangle folded down, as shown in the photograph.

Bend back the triangles at the bottom and top of the muzzle.

All that remains is to draw the eyes and nose with a felt-tip pen.

Origami animal faces: fox and wolf.

Bend the edges upward from the center of the triangle at an arbitrary angle, as shown in the photograph.

Let's turn the figure over. The fox's face is ready. All that remains is to draw the details.


The origami wolf face is made in the same way, but from gray paper.

Origami animal faces: mouse and bear.
Now let's make the faces more complicated. Children 3-4 years old are unlikely to cope with these faces. But for 5-6 years old it’s just right.
Let's make a basic triangle shape.

Fold the triangle in half.

Let's expand the triangle. Bend the corner, as shown in the figure, from the center of the figure (we marked the center in the previous step)

Bend the corner in the opposite direction. This is a mouse ear.

We will also make the second ear.

Let's turn the figure over. Bend the triangle at the top of the muzzle back, as shown in the figure.


Bend the corners of the mouse ears back to make them more rounded. You can use scissors to do this and round off the ears.

Let's draw a face.

The bear is made in almost the same way as a mouse. But we make the bear’s ears smaller (cut it off with scissors) and bend the triangle at the bottom, forming a heavy bear jaw.

Origami animal faces: hare and frog.
Let's make a basic triangle shape.

Bend the triangle in half and straighten it, marking the center.

Fold the base of the triangle up.

Bend the small triangle at the top of the figure down.

Fold the bottom edges of the figure up, aligning them with the center line.

Let's turn the figure over. The origami hare face is ready.

Let's color the face with felt-tip pens.

The frog is made in the same way as the hare. But we need to trim and round off the “ears” with scissors so that we can get eyes. And at the bottom of the muzzle we bend the triangle back - the muzzle will become more round.

Origami, or the art of folding paper into a variety of shapes, is enjoyed by children of all ages. Schoolchildren can be offered schemes of varying levels of complexity for self-made paper animals, flowers or other products. Fine motor skills children aged 7-10 years are already quite well developed; they love to make beautiful and original compositions with their own hands, and are happy with the results of their work.
How to prepare for an origami lesson
Of course, to create paper figures, you will first need paper of several colors. It is better that it is not very thin - firstly, it is easier to work with thick paper, and secondly, crafts made from it retain their shape for a long time.
In addition to paper, you need to prepare:
- ruler - with its help it is convenient to fold or tear sheets evenly, as well as measure the required distance;
- scissors;
- a pencil will be needed to mark the fold or cut line;
- colored pencils, paints, felt-tip pens for coloring finished crafts;
- diagram;
- accessories for decoration - beads, ribbons, eyes for animals and everything that your imagination suggests.
An origami “Animals” pattern suitable for children should be chosen in accordance with their skills and capabilities. A job that is too easy will not bring satisfaction, and if the pattern is too complex, the child may even refuse to complete the craft.
Origami diagrams or how to make an animal figurine out of paper
Origami on the theme "Animals" is great for children of primary and secondary age. school age. They make figures from colored or white paper, on which you can later finish drawing the animal’s face. A ready-made crafts used for playing or decorating a children's room.
Origami "Bear's Head"
For this craft you will need two-color paper - brown on one side and white or beige on the other. You can ask your child to paint the sheet brown in advance.
Stages of creating origami:
- Cut out a square.
- Fold it in half diagonally, brown side out.
- Place the resulting triangle with the fold line facing upward and, using a ruler, divide it into three equal parts. There will be a bear's muzzle in the middle, and his ears will form from the corners.
- Bend the corners along the marked line towards the center.
- Then turn most of them outward from the center.
- Finish the formation of the ears by bending their tips back towards the center of the craft.
- Turn the figurine over so that the ears remain on its reverse side. Mark a straight fold line for the bottom corner of the triangle.
- Bend the top sheet of paper along the intended line, and then fold (hide) its corner.
- Fold the corner of the bottom sheet over to the reverse side to complete the formation of the head.
- Draw a bear's face.
Origami "Whale"

Children can cope with this simple origami pattern even without the help of adults. Suitable paper for this craft is black, grey, blue or white.
Stages of creating a figurine:
- Cut out a square from paper.
- Mark a fold line that connects two opposite corners of the square.
- From one of these corners, draw two more lines, to the center of the opposite sides.
- Fold along the side fold lines towards the center.
- Fold the remaining corner of the square towards the center.
- Bend the resulting figure in half along the previously marked fold line.
- Form a tail by lifting a corner of the resulting figure. Draw or glue eyes on the whale.
Origami "Penguin"

This easy origami pattern turns out surprisingly cute and attractive. For the penguin you will need double-sided paper: blue or cyan on one side and white on the other.
Stages of creating a figurine:
- Place a square sheet of paper with the colored side up.
- Fold in half diagonally, then unfold, fold along the other diagonal and unfold again.
- Mark a fold line located just below one of the diagonals.
- Bend the sheet along it. The colored side of the paper is located inside the fold.
- Fold the corner of the paper down - this will be the penguin's nose.
- Turn the sheet over with the white side up.
- Fold the side corners towards the center.
- Then turn most of them back.
- Fold the top corner down.
- Turn the figure over, draw or glue eyes. The little penguin is ready!
For children, origami paper animals is good way creative self-expression and acquisition of useful skills.
By adding figures, the child learns to concentrate, work step by step and get the planned result. These skills will come in handy many times in the future.


