We offer you to make Christmas tree decorations with your own hands from plastic bottles!
We've been waiting for a long time New Year's holidays when all your most cherished dreams come true. Therefore, it is worth thinking about such pleasant chores as: choosing the right outfit, creating a festive atmosphere and decorating the Christmas tree.
Many needlewomen love to create Christmas tree decorations with their own hands, so I often use the simplest materials to create a new masterpiece: paper, felt, plastic bottles, etc. Combining them with sparkles, tinsel and bright decor, you can create an unusual and elegant Christmas tree decoration.
Due to the fact that these are very easy to make, you can create more than one Christmas tree decoration with your own hands that will delight you and your loved ones. In order to make a craft you will need:
- 2 plastic bottles;
- paints or markers;
- multi-colored ribbons;
- Double-sided tape;
- paint brush;
- stationery knife.
Process of creation:
- First of all, you need to cut out the bottom of each bottle. These blanks will be needed to make one toy.
- Now we take brushes and paint and draw a snowflake on the inside of each blank.
- After this, you can put tinsel, confetti, decorative balls or sparkles into the toy.
- Then we connect the two parts together using double-sided tape.
- To hide uneven lines, you will need a ribbon that matches the color of the paint you are using. It's best if you wrap the ribbon in several layers and tie it in the shape of a bow. This way you will complete the top of the toy.
- Now the craft is almost ready and you can secure it with a paper clip, which must be bent into the shape of a hook.

Despite the fact that such toys are considered the easiest to make, they open up great prospects for your imagination. This is a great way to teach your child new ways to decorate and create their own New Year's masterpiece.
Christmas balls
In order to make a Christmas tree decoration in the form of a ball, you will need to take a plastic milk or water bottle (preferably the surface is transparent). Their shape is most suitable for creating this decoration.

Now let's prepare the following auxiliary tools:
- dye;
- glitter;
- stationery knife;
- glue.
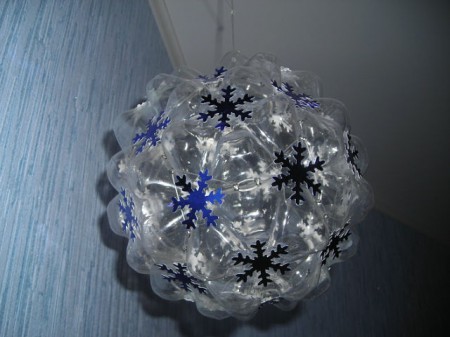
First of all, you need to take a utility knife and cut four circles (up to 1 cm wide) from the bottle, and then connect them into a ball. After this, you need to fasten them together with glue.

You can use clothespins to hold them on both sides to keep them in place until the glue is completely dry. You can decorate the balloons at your discretion. For example, you can glue ribbons to the side edges or strew them with a large amount of multi-colored sparkles. The main thing is that the result pleases you.
Decoration in the form of Chinese lanterns
Christmas tree decorations in the form of Chinese lanterns, which you can make with your own hands, will look very original. To do this you will need the simplest materials:
- plastic bottle;
- ruler;
- marker;
- thin thread;
- beads;
- decorative elements (rhinestones, sequins, sparkles, etc.);
- scissors.
It is worth noting that there are several options for creating this toy. Let's look at one of them:

- First you need to remove all unnecessary elements (label, glue) from the bottle. This will be easier if you put it in water for a while.
- Now take the measuring tape and apply it to the top of the bottle. We mark points in a circle that should be located at a distance of 1 cm from each other.
- Then you need to attach a ruler to any point and draw a small line downwards. And make the same marks at the bottom of the bottle, near the bottom.
- After that, take the scissors and make holes in each of the marks using rotating movements. You can also use an awl for this.
- Now we make cuts between the top and bottom marks that you previously made. Carefully bend each strip upward. And then we select the middle and make another fold.
- Take scissors and make holes in the middle of the bottom and lid plastic bottle.
- Now you need to take a pre-prepared bead and thread it through a thread or wire. Connect the free ends together. It is only very important that the bead is in the middle of the thread. To do this, you can secure its position by twisting the wire several times. Then we thread the ends of the wire through the hole in the bottom and stretch it along the entire length of the bottle to the hole in the cap. After this, the lid can be screwed on. The remaining thread or wire can be used to create a loop to hang the toy on the Christmas tree.
- You can remove marker marks using nail polish remover.
Use your imagination and decorate a plastic bottle toy as you please. The main thing is that your Christmas tree decoration is created with your own hands and with all your soul.
Plastic garland
We have already seen that you don’t need much to create a festive atmosphere. And you don’t have to spend a lot of money on expensive New Year’s toys and decorations. Continuing preparations for the New Year, we can create another Christmas tree decoration with our own hands in the form of a garland made of plastic bottles. This DIY Christmas tree toy made from plastic bottles can attract the attention of even the most demanding guests.

To do this you will need:
- electric garland;
- plastic bottles;
- wire;
- scissors.
Process of creation:
- First make sure that the one you choose led garland OK.
- Then lay it out on the floor to get an idea of how many plastic bottles you will need to make the craft.
- After that, you need to cut off the bottom and cut a small hole in it to place the bulbs in it.
- Carefully connect the resulting parts using wire.
- As a result, you will have a beautiful flower garland!

There are several more options for DIY Christmas tree decorations made from plastic bottles that will help you quickly decorate your home for the upcoming holiday.
Christmas tree decoration – pine cone
This pine cone toy will be a great addition to your holiday decor. To create one blank you will need:

- dark brown plastic bottle (2 l) – 1 pc.;
- green plastic bottle – 1 pc.;
- templates for each layer;
- wire;
- pliers;
- large beads;
- scissors;
- candle;
- marker.
Main stages of work:
- Before you get started, you need to prepare your existing plastic bottles. You need to place them in soapy water and leave them there for a few hours. This is necessary to make it easier for you to clean it from the label and adhesive layer.
- After the bottle has dried, you need to cut off its neck and bottom. As a result, you should get an oblong cylinder, which we cut along one of the side faces.
- Now you need to take a marker and draw blanks of different sizes on the resulting rectangle - these will be the layers of our cone. Then we cut them out and make a hole in each with a hot awl, and two in the smallest one (the core of the cone). The wire will be threaded through these holes.
- Now you need to shape each part to get a more natural look to the product. To do this, you will need pliers, it will be more convenient for you to hold the “layer,” and an ordinary candle. We take each piece and hold it over the fire for several seconds. After this, the plastic will begin to wrap inward and acquire the necessary shape. We repeat these steps with the remaining parts. It is worth noting that when heated, plastic may release harmful substances, dangerous to our body. Therefore, do this step with the windows slightly open.
- It's time to collect our pine cone. To do this, take the wire and put each layer on it, starting with the largest.
- Once you have secured the last piece, take a large bead and thread it through the center of the piece. This will be our core. Now pass the wire along the same path, only in the opposite direction. Twist its outer ends, you need to twist them together, we will need them later.
- Now you will need a green bottle. From it we will cut a blank that resembles a twig. After that, bring it to the candle and process the edges. After this you can attach it to the wire.
- From the remaining parts of the brown bottle you need to cut a thin strip. Then we heat it with fire and begin to gradually wrap the wire around it. But if you are unable to do this, then you can take some brown beads and decorate the wire with them.
In this article we looked at the most simple ways creating Christmas tree decorations with your own hands, using economical material - a plastic bottle.
The Christmas tree is, of course, the main decoration of the New Year. On the eve of the upcoming holiday, the whole family dresses up the forest beauty. Standard Christmas tree decorations have already become boring. However, you can decorate the Christmas tree with something you made yourself; for example, a Christmas tree toy made with your own hands from plastic bottles will look great. In addition, the creation process will bring a lot of pleasure to your children.
Today, making your own Christmas tree decorations is not difficult. Even if you lack skills in this area, you can always use a helper such as the Internet. This article will look at the simplest ways to create toys for the Christmas tree with your own hands.
Volumetric toys
Before diving into the creative process, you need to decide on the type of material used. You can make a three-dimensional decoration from absolutely any available materials. Naturally, paper products are the most popular. They have earned their fame due to their ease of manufacture. In addition, such Christmas tree toys, created with your own hands, look quite impressive on the forest beauty.
A voluminous toy can also be made using thick thread or twine. It’s just important to take into account the fact that creating such a masterpiece will require a large amount of glue. Jewelry made from beads looks quite original. Of course, it will take a lot of time to make such a toy, but it is worth it.
Volumetric paper decoration
To make jewelry you will need the following:
- Colored paper.
- Ribbon.
- Paper glue (preferably quick-drying).
Step-by-step instruction
Do-it-yourself voluminous Christmas tree toy is done as follows:
- First of all, you need to cut out eight circles from paper. To make the decoration look impressive, it is recommended to use different colors. It is important that the circles are the same size.
- Each piece is folded in half, with the front side on the inside.
- After that, glue must be applied to the wrong side of each half, then the parts are connected to each other.
- And finally, the first and last halves are glued together. Don’t forget to thread a ribbon through the toy, with which it will be attached to the Christmas tree.
A DIY Christmas tree toy created using the method described above can be made not only using colored paper. You can also use clippings from old magazines, old postcards, or even your children’s self-drawn pictures.
New Year's balls made of threads
As mentioned above, Christmas tree decorations can be made from more than just paper. Balls made of thread look quite attractive. And most importantly, their creation does not require special skills or large financial costs.
To make Christmas tree toys from threads with your children’s hands, you will need the following:
- Yarn.
- A bowl.
- Balloons.
- Scissors.
- Fat cream (vaseline).
- PVA glue.
How to make balls of thread - instructions

- First you need to inflate the balloons. Their number depends on how many Christmas tree decorations you plan to make. Please note that you do not need to inflate the balloons to a gigantic size, because the decorations on the Christmas tree should be miniature.
- Once the “template” is ready, you should move on to the main stage of the creative process. To do this, you need to dilute water and PVA glue in a bowl in a ratio of 1:3. Yarn is placed into the resulting mixture (for about 5 minutes).
- While the “base” of the toy is soaking, it is necessary to cover the balls thick cream or Vaseline. This is done so that the thread does not slip off the workpiece.
- The yarn should then be wound around the ball. The distance between the threads must first be large. When wrapping the ball with thread, this distance will be reduced.
- At the end of this process, the thread must be cut and glued to the ball. Now the almost finished Christmas tree toy, made with your own hands, must dry.
- A day later balloon is deflated and then removed from the toy. The Christmas tree decoration is ready. All that remains is to attach the rope.
When making this decoration, you can use multi-colored yarn. Also ready-made craft decorated with sparkles, tinsel or beads.
Christmas tree decorations - heart and ball
For such decorations you will need the following tools and materials:
- Scissors.
- Tweezers.
- Glue gun.
- A reel of small plastic beads.
- Small and large plastic garlands.
- Decorated cord.
- Heart and ball made of foam.
This method is perfect for decorating not very catchy Christmas balls made of plastic or updating old ones. In this case, you can use cords and beads of various diameters. For small balls, it is advisable to take a thread of small beads and a thin cord; on large ones you can stick both small and large beads. A Christmas tree toy decorated with your own hands using three threads and cords at the same time looks no less original.
Manufacturing instructions

- Unravel the finished garland into separate threads. Take the cord and use tweezers or small scissors to plunge the end into the foam ball.
- Apply a small amount of glue to the surface of the ball (in the place where the cord is attached) and secure the end of the bead thread.
- Then the ball is gradually covered with glue and at the same time beads and cord are laid on it (row by row) until the entire surface is filled.
- Then you need to cut off all the excess and immerse the end of the cord in foam. Thread the needle, then pass it through the cord to create a hanging loop.
The foam heart is decorated in the same way. Using a glue gun, a string of beads is attached to its edge. The beads are glued to one side, the turns are gradually laid in the direction from the edge to the center.
It is not at all necessary to use beads of the same color and size. When you get close to the center of the heart, cut the thread, then glue small pieces of it, cutting off the required number of beads using scissors. After completing one side of the craft, move on to the other. Finally, attach a ribbon or string for hanging.
DIY Christmas tree toy: big balls
To do Christmas balls from plastic bottles, you will need:
- Plastic bottle (it is important that stiffening ribs run around the bottle in rings).
- Old CDs.
- Beads or small balls for decoration.
- Sequins.
- Rain - preferably dense, which does not stretch from tension.
- Glue (it is better to use “Moment”).
- Stationery knife.

How to make Christmas tree balls from plastic bottles
- First you need to thoroughly wash the bottle. As a result, a layer of glue from the label will remain on its surface. It can be easily removed with tape; to do this, stick it to the place where the glue is and then tear it off. Such manipulations should be continued until the glue is completely removed from the plastic.
- Let's proceed directly to making a masterpiece. So, 1 ball - 1 bottle. There are grooves on the side surface, along which you need to cut the bottle using a stationery knife.
- The resulting rings need to be trimmed with scissors so that they are the same in width.
- 4 rings are connected and secured to each other using rain. Do the same on both poles, making a loop on one of them.
- For passionate fans of minimalism, this Christmas tree toy, made with your own hands from plastic bottles, is completely ready. Everyone else can move on to the next step.
- Balls can be decorated different ways and materials. For example, wrap it in rain, cover it with pieces of a CD or sequins. You can also use plastic beads, rain trimmings, shells, beads and much more as decoration.
DIY Christmas tree toy: large plastic decorations
Almost every home has used plastic bottles, but not everyone knows what kind of bottles can be made from them. beautiful crafts. For example, a flower made from the bottom of a bottle. To make such a toy you will need:
- Super glue.
- Decorations.
- Gouache or acrylic paints.
- Colorless plastic bottle.
- Scissors.
- The cord for fastening is approximately 30-40 cm long.

Manufacturing
A DIY Christmas tree toy for kindergarten made from a plastic bottle is done as follows:
- Using a stationery knife or scissors, carefully cut off the bottom of the plastic bottle.
- The surface of the bottom is covered with acrylic paint. This paint is resistant to any weather conditions, so the toy can later be used to decorate a street Christmas tree. If you don’t have acrylic paints, use gouache to create a decoration for home use.
- The bottom can be decorated with rhinestones, beads or painting. Glued along the edge of the cut satin ribbon.
- Using an awl, a hole is made for fastening. A ribbon or cord is pulled through it so that a loop appears on the outside, and the knotted ends remain inside the flower.
- A DIY Christmas tree toy for kindergarten!
If you use two bottoms, you will get a more voluminous toy. The sequence of actions when making such a decoration will remain the same, only at the end the halves are connected by cuts. To do this, you will need superglue or double-sided tape, as well as satin ribbon to mask the connecting seam.
Soft fabric Christmas tree
It is not at all necessary for the Christmas tree to be green and prickly; it can be soft and pink. We will sew a decoration that is suitable not only for the Christmas tree, but also as New Year’s decor for your home.
For this you will need:
- Fabric size 15 x 22 cm.
- Pattern.
- Embroidery threads.
- Decorative tape.
- Polyester filling.
- Pins.
- Embroidery needles.
Step-by-step instruction

So, soft toy The “Christmas tree” is made with your own hands according to the following scheme:
- Download the pattern or make your own, print and cut out. It is advisable that it be on cardboard.
- Fold the fabric in half. Place the pattern on it, circle it with chalk, then mark the hole through which your Christmas tree toy “Christmas tree” will be stuffed with your own hands.
- Next, without touching the holes, sew the pattern. In order not to spoil the shape of the tree, you need to be especially careful when bending.
- Now cut out the pattern as close to the seam as possible. You need to leave a little more space at the material hole.
- Turn the Christmas tree inside out, shape it and iron it.
- Make six marks on the fabric where the knots should be.
- Fill the decoration with a small amount of polyester (about the size of a chicken egg).
- Then you need to sew up the hole. At the top, fasten the thread and tie it with a knot.
- In order to make knots, in the places marked with dots on the pattern, you need to sew stitches in front, back and back.
- Then you should tie a bow from decorative tape and sew it at the very top with a few stitches.
- Now the educational toy “Christmas tree”, sewn with your own hands, is completely ready.

Funny toys for the Christmas tree
- After you select the shape you like, cut out a template from thick cardboard. Then select the threads - they should be voluminous and dense.
- A thread is attached to the template, after which we wrap it around our Christmas tree toy with our own hands so as to cover all the cardboard.
- Next you should sew on a rope for hanging.
- The toy must be thoroughly soaked on both sides with glue.
- Once the glue has dried, you can start decorating. If we plan to make a giraffe, then first we apply brown acrylic paint.
- After the paint has dried, use masking tape to cover the areas not intended for painting.
- Next, a second layer of acrylic paint is applied.
- After drying, the toy can be decorated with beads or sequins, and details can be outlined (ears, eyes).
- The Christmas tree decoration is ready.
New Year with toys in which a piece of your own heart was invested will become the most unforgettable event!
Plastic bottles are a material available in every home. If you haven’t figured out how to “put them into action” yet, the Motherhood portal offers craft ideas for joint activities with baby!
You can make many things from plastic bottles, from animals and toys to sports equipment, from elegant flowers to lampshades and curtains.
Toys made from plastic bottles
Using 1.5 liter plastic bottles, you can construct animal figures. Look what a wonderful dog made from green bottles!Try to simulate an airplane. You can cover the frame with colored paper and make portholes with passengers. Or simply place your favorite toy in a special slot.

Using a plastic bottle, cocktail straws and a ping-pong ball, you can construct a helicopter using a stapler.

A real “waterfowl” catamaran for dolls can be made from two plastic bottles.

A more complex craft using heating and melting of structural parts looks simply gorgeous. Look, it turned out to be a real Frog Princess!

By heating and melting plastic, you can make a naturalistic crayfish, and then “place” it in an aquarium.

A series of colorful nesting dolls can be made from plastic bottles covered with colored self-adhesive paper. The second option is paints for glass surfaces.


From several bottles, movably fastened together with screws, you can get a bright and memorable snake or shark, whichever you prefer.

Within New Year theme Try making adorable colorful penguins from the bottoms of plastic bottles. We cut them, put a “hat” on the penguin, paint them, add bright details: a pompom and a scarf.

If you need a Christmas-themed craft, try making an Orthodox church out of plastic bottles. Domes are most easily sculpted from plasticine, crosses are made from wire, and then wrapped in gold metallized paper. The white edging of the window openings on colored plastic gives the craft a special elegance. They can be done using a “stroke” corrector, or a thin strip of white plasticine.

You can build an entire castle in a similar way. Plastic bottles will form the frame for the four corner towers. Slots are made in them for windows or loopholes, and they are coated with plasticine on top, on which the texture of brick and “white stone” decorations are applied. The walls of the castle are made of cardboard and also coated with plasticine. This impressive craft is sure to bring a lot of joy to your child.

Insects
Children are interested in insects. Together with them, draw and cut out a beetle, butterfly, cockroach or caterpillar from a plastic bottle. They should love it!

If you approach the issue more carefully, you can build an insect out of bottles in all its details.

Starry sky in a bottle
You can create a magical and fairy-tale galaxy inside an ordinary bottle. We will need: cotton wool, glycerin, colored glitter and a little dye. Place a piece of cotton wool inside a transparent jar or bottle and add glitter. Pour in a jar of glycerin to obtain a viscosity effect. Then add food coloring. You can make several shades inside one container. But at the same time, we add cotton wool and glitter every time. Carefully fill everything with water. We glue the bottle cap around the edge so that it is airtight.
Homemade flowers
From an ordinary green bottle you can make a bouquet of lilies of the valley in a vase. To do this, cut the bottle according to the diagram. We put large polystyrene balls on thin twig-stems.
By cutting out and melting the necks of plastic bottles you can create gorgeous flowers.


With some skill, you can depict cacti and other indoor plants.


Do you want to add color to a dull winter landscape and plant fabulous plants right in the snow? Plastic bottles come in handy here too!

You can make asters from colored plastic cups. To do this, cut off the rounded edge, make cuts, wrap the edges of the cups and connect them according to the diagram.

Vases and stands
Using the lower parts of plastic bottles, we model flower vases. Such homemade vases are not inferior to real crystal ones!

Household crafts
We invite practical craftswomen to start making handicrafts that come into use in everyday life.Make a beautiful stand for storing needles. A wonderful gift for mother or grandmother, easy to make and affordable even for a small child.

Schoolchildren and teenagers can please their mother or girlfriend with a unique holder for their mobile phone while charging. Such a useful hand-made, painted with stained glass paints according to your own sketch, will undoubtedly bring joy to your loved ones!

The housewife always needs a transparent container in which it is easy to find the right thing. A boy can make such a storage box as a gift to his mother. To do this, you need to cut a plastic bottle, walk along the future joints of the parts of the box with a heated awl, forming holes. All that remains is to connect the parts of the product with lacing or zipper.

If you are a school student and are wondering what to give your dad or brother, pay attention to these homemade dumbbells for sports. You will need several bottles, two wooden sticks for the handle, glue, electrical tape and regular sand. Funny and useful gift guaranteed!

It’s easy to make a convenient dustpan from a plastic bottle with a handle.

You can even make slippers from a plastic bottle. This product looks unusual. But the question of convenience remains open.

A stand for jewelry and jewelry can also be made from the bottoms of plastic bottles.

Interior details
Greatly surprise and amuse your guests themed party you can by making wall compositions-heads from canisters and plastic bottles.
You can cut out such delicate and elegant panels from plastic from bottles that viewers will hardly guess what it is made of.


Using plastic bottles you can create a lamp, night light or chandelier.

You can also make a lampshade from plastic cups.

Using bottoms from transparent bottles, you can create original and stylish curtains.


Crafts for the New Year from plastic bottles and disposable cups
A Christmas tree made from disposable cups and tinsel can decorate your lobby or school classroom.
The top of the bottles makes stylish New Year's bells.

Having painted the bottoms of bluish plastic bottles, we create a round dance of snowflakes.

A plastic bottle can serve as a frame for a funny Santa Claus. Face New Year's grandfather we make it from a napkin or colored paper, the hair and beard are made from cotton wool.

And such a snowman can be made by the whole group in kindergarten. Success at the show New Year's crafts guaranteed!

Get inspired and start creating! After all, there is still so much to do before the New Year!
Photo sources:
Hello, friends! Well, have you already started the New Year's bustle? Yesterday we finally bought an artificial one, but there really isn’t much to decorate it with. Therefore, an interesting idea came to my mind about making Christmas tree decorations with my own hands.
I would like to invite you to do such an exciting thing. So throw laziness aside, call your kids and start creating New Year's!
After all, in any case, you have paper, glue, plastic bottles and other available materials. Well, there is, right? We will need all of them today. From them you can make animal faces, carved ones, as well as the Snow Maiden and Father Frost and a bunch of other wonderful decorations. So don’t think for a long time, but rather start the fun process.
Moreover, there will be more than enough ideas for such an undertaking. As always, I tried and found the most best options making toys for the Christmas tree. And if you are ready, then we begin. 😉
Do not forget that in any business you need to use your own imagination. This is the only way you can get amazing and exclusive souvenirs.
DIY Christmas tree toys from scrap materials for children
First of all, I want to offer you interesting ideas on creating jewelry from different and almost any materials that are in every home.
Be sure to involve your children in creativity, because they are the ones who are looking forward to this most of all. magical holiday- New Year. And they will be incredibly pleased to hang toys that they make themselves on the Christmas tree.
I suggest you make an interesting decoration in the form of a small Christmas tree from an egg tray.
"Christmas tree from an egg tray"

You will need:
- gouache;
- Super glue;
- paper egg packaging;
- scissors;
- brushes;
- PVA glue;
- thread;
- pencil.

Manufacturing process:
1. Take a paper egg carton and cut out 5-7 cells. Cut out parts from them as shown in the photo. Cut one of the cells in half, this will be the top.

2. Glue the parts together to form a tree. Roll the parts that come out of the halves into a cone and glue them at the top.

3. Take green gouache and paint the workpiece.

4. Cut out decorations from the leftover paper packaging and, if necessary, glue them together. Make small balls from a mixture of small pieces of paper and PVA glue.

5. Color the decorations.

6. Decorate the Christmas tree by gluing all the decor. Don't forget to glue the string by which you will weigh the toy.

7. Coat the product clear varnish, dry. All is ready!

If you are a lover of expensive wine, then after emptying the bottle, do not rush to discard its cork. Collect them. And at the right time they will come in handy. For example, use them for the following purposes.
"Souvenir made from wine corks"

You will need:
- 6 natural wine bottle stoppers;
- natural twine;
- Super glue;
- scissors;
- confetti, small beads.

Manufacturing process:
1. Carefully cut each cork into 3 equal parts with a knife.

The knife must be sharp so that the corks do not crumble.
2. You should end up with 18 pieces.

3. Now lay out small triangles from these pieces on a hard surface. One triangle should consist of 6 pieces of corks. There should be 3 triangles in total.

4. Glue each resulting triangle.

5. Cut three 40 cm ropes from twine.

6. Tie each string in the middle, forming a loop.

7. Take a dried triangle, attach a loop knot to the top, coating the place where they touch with glue.

8. Loop the twine around the entire triangle and tie the loose ends tightly in a knot.

9. For a tighter fixation, the thread can also be coated with transparent glue.

10. Make the same thing from the two remaining triangular blanks.


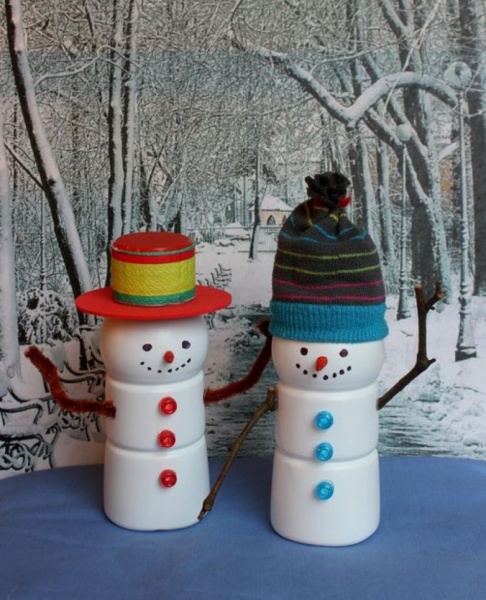
Well, now try to make beautiful snowmen from iron corks.
"Snowmen"

You will need:
- ribbons;
- bottle caps;
- acrylic paints;
- buttons;
- glue.
Manufacturing process:
1. Take three good, non-deformed bottle caps. Wash and dry them. Then paint with white acrylic paint.

2. Once the pieces have dried, glue the lids onto the tape, leaving a loop on top.


4. Cut a small strip from a satin ribbon. This will be a scarf. Tie it over the plugs. And glue a button in the middle. The bright decoration in the form of a snowman is completely ready.

You can also use not only corks, but also the bottles themselves. Just not glass, but plastic. For example, by cutting them into halves and then gluing the parts to the required length, you get an excellent blank for any toy. Let your imagination run wild. And then, using paints, bring the plastic blanks to life.
This is how beautiful and bright you can make a penguin. I think everything will be clear to you from the diagram.

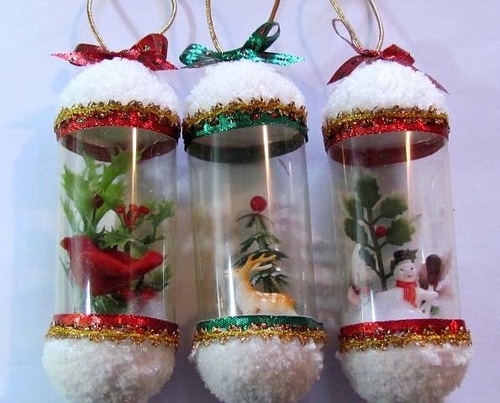
Or fill the bottles with any New Year's souvenirs and decorate the top.

You can also cut strips from plastic and assemble a ball.


Here simple idea making small toys from paper and satin ribbons. Find New Year's pictures on the Internet, print them in the shape of a circle, and cut them out. Then glue it onto the cardboard. Weave the ribbons together and cover the outline with them. Glue the loop.

And here's another paper assembly for you. Also a very simple product, just for kids. Print the diagram and cut it out. Assemble the craft along the fold lines and glue it together. Decorate with beads, plasticine, etc. Glue a bow loop. That's all!

"Crystal Ball"

You will need:
- half beads made of glass and plastic;
- foam balls;
- trimmings of satin ribbons;
- scissors;
- glue gun
Manufacturing process:
1. Take foam ball and start pasting it in a circle with half-beads. At the same time, you can lay out a specific pattern, or make the craft monochromatic.
Remember that the glue must be applied in a thin layer, otherwise the foam will melt.
2. After you have completely covered the entire ball, all you have to do is embellish it a little more. Simply tie a bow from satin scraps and glue to the item. Don't forget about the loop.

In the same way you can make balls from buttons. Just paint the foam balls first, and then glue on the multi-colored buttons.

And disposable plastic cups are generally a godsend for creativity. They just need to be turned upside down and covered with paper decorations, sequins, adhesive tape or painted with paints. And in the end you may end up with ringing bells and funny snowmen.


For variety, choose a very simple product - sew or assemble a large Christmas tree bow. You can make many small bows.

I also came up with the idea of combining the purchased version with homemade creativity. Buy transparent Christmas tree balls, carefully unscrew the top and add glitter. Screw the product. Or apply glue to the surface of the ball in the form of any pattern and also sprinkle with glitter. The crafts come out very beautiful.

Of course, don’t forget about needlework using thick threads and regular glue.


Moreover, the use of this technology will allow you to make anything you want.

You can learn more about this technique here.

And here are the instructions on how such a miracle can be created.


Interesting products are also made from pasta. Usually they are glued together and thus made into snowflakes.


And a cool idea would be to decorate unnecessary old light bulbs. They are usually painted with acrylic paints and decorated with knitted, rag and other attributes.

You can also make toys from salt dough, plasticine or clay.

Or bake real edible souvenirs.

In fact, there are still a large number of holiday products that you can make with your own hands from improvised materials, it’s impossible to list them all. Therefore, we move on.
Christmas tree toys, crocheted with patterns
Now a selection for those who are interested in knitting. I found the coolest, in my opinion, crocheted souvenirs. I am sending it to you along with the diagrams. Knit for good health!
- "Bell";

- "Herringbone";

- "Angel";

- "Snowflake";

- "Father Frost";

- “Sweetie” and “Sock”;

- "Snowmen";

- "Dog";

- "Mouse";

- "Piggy".

DIY Christmas tree decorations made of felt and fabric (patterns and templates included)
From crocheting we move on to sewing from felt and any other fabric. Guys, this time I won’t explain to you what and how to sew, I’m sure you already know all this. After all, the main thing is to find patterns. This is exactly what I will help with.
I pumped up a wide variety of options. I kindly provide them to you. Save, cut and start sewing.


Master class on making a star for the top of a Christmas tree from paper and cardboard
Well, now let’s start making almost the most important attribute of a green tree - a star.
Of course, you can choose a different method of making, but I really liked the following magical transformation.
"Star made of shiny cardboard"

You will need:
- shiny cardboard;
- scissors;
- glue gun
Manufacturing process:
1. Take cardboard and cut strips of equal width and length from it.

If your cardboard is shiny on only one side, then first glue two sheets of cardboard together so that both sides are shiny.

3. Now bring the free ends of the strips together and glue them together as shown in the photo.

4. Connect the side strips together. You should end up with something like this.

5. Repeat steps 1 to 4, that is, glue another exactly the same part.

6. Connect and glue the two blanks together so that you end up with an eight-pointed star. Your three-dimensional star on the top of the spruce is ready.

I think that such a masterpiece will bring a lot of pleasure, especially when the lights flash on the branches and the star also sparkles with new colors.
Christmas tree toy 2019 in the form of a symbol of the year of the pig
Do you remember what year is coming? That's right, the year of the Pig. So don’t forget to appease the Mistress and make souvenirs in the form of funny pigs.
"Piglet made of colored paper"

You will need:
- double-sided tape on foam;
- pink and red half cardboard;
- black marker;
- pencils;
- markers;
- glue;
- scissors.

Manufacturing process:
1. Take pink half-cardboard and cut out many strips 1 cm wide and 7 cm long.

2. Now use a pencil or scissors to twist each strip.

3. Apply glue to the top of one of the strips, and place another strip on top. Glue the strips in a circle in this way.

4. In the end you should get something like this.


6. Now cut out a long pink strip 0.5 cm wide.

7. Twist the strip so that you get a curl, like a pig’s tail.

8. Glue the tail to the ball.

9. Cut out two circles of different diameters and ears from half-cardboard. Cut out two small circles from red paper - these are the nostrils.

10. Glue a piece of double-sided tape onto a circle of smaller diameter. Attach it to a large circle. Using glue, glue the “nostrils”.

11. Using a black marker, draw eyes and outline the outline.

12. From red paper, cut out two strips 2 cm wide and 5 cm long. Paint them with the same black marker. This will be a scarf.

13. Glue the scarf to the back of the pig's head. Then glue the head to the body (volumetric ball). And don't forget to cut and glue the ribbon loop.

Agree, this is very easy craft and is available for children's creativity.
Step-by-step instructions on how to make a New Year's toy from cotton wool
And what awaits us ahead detailed master class on creating another Christmas tree decoration in the form of a bright cockerel. We will make it from ordinary cotton wool.
"Cotton Cockerel"

You will need:
- cardboard (thick but cutable);
- cotton wool (from a pharmacy, regular in a roll);
- cotton pads;
- white threads;
- potato starch;
- black half-bead eyes;
- tailor's pin (with a loop at the end);
- paints for painting.
Manufacturing process:
1. Take cardboard and draw the outline of a cockerel on it. Cut it out.

2. Unwind the cotton wool from the roll and tightly wrap it around the cut out outline to the legs.

3. Now wind the thread over the cotton wool. Do the same with the leg.


5. From cotton pads cut out the wings (4 pcs.) and parts for the tail (4 pcs.).

6. Cut out one comb and two parts for a beard from a cotton pad.

7. Make a starch paste and coat our rooster figurine with it. Then wrap thin pieces of dry cotton wool around our product. Apply paste to all uneven surfaces. Next, saturate all other parts with paste and carefully attach them to the cockerel. Form folds, fluff the tail, you can additionally make a thin strip of cotton wool and glue it around the neck. Glue on the eyes.

8. Dry the product upside down (hang it on the thread we left). And then paint it to your liking. Cut the thread and insert a pin, thread an elegant rope.

Use this technology to make other animals, fairy-tale heroes and characters.
Christmas tree toy “Garland” made from plastic bottles
Now we will make a decoration in the form of a garland. Moreover, the garland will not be simple, but made from plastic bottles. How do you like this idea? Personally, I'm delighted.
"Flower Garland"

You will need:
- plastic bottles with caps;
- spray paints;
- scissors;
- electric garland;
Manufacturing process:
1. Cut off the tops of the bottles. Make cuts to create a flower.

2. Round the petals and paint the blanks in any color.
3. While the flowers are drying, make cross-shaped cuts in the caps of these bottles. Insert light bulbs from an electric garland into the cuts.

4. When the pieces are dry, screw them to the lids, spread the product over the Christmas tree and turn on the electric garland. Admire the creation!

Well, a simple manufacturing option garlands of icicles Christmas tree crafts made of polymer clay
I’ll briefly tell you what figures can be made from clay. You can use plasticine as a material.
Here it is important to come up with a character, sculpt the details, then put them together, and then make a loop.
Here are a couple of patterns for sculpting winter characters.
- Father Frost;


- Monkey;

- Girl;

- Snow Maiden;

- Piggy.

And options for finished work.


Video selection of the best wooden Christmas tree toys
Well, if you are interested in woodworking, then you will be interested in the following story. It contains ideas for creating wooden toys at home. So watch and create. By the way, such souvenirs are perfect as...
And this is where I end today. I look forward to your comments! Was I useful and creative? 😀 I think it’s undeniably yes.
I wish you to make what you like and, together with the kids, decorate the Christmas tree with homemade toys. With coming!
Content
And we come to you, as always, with our interesting and original ideas New Year's crafts. This time we will create crafts from plastic bottles. Firstly, don’t forget that plastic takes more than 100 years to decompose, so we should use it as much as possible in order to do less harm to the environment.
Secondly, these crafts will not require too much money from you. Thirdly, you can make a lot of interesting things from this scrap material. In our article you will find figurines, a garland, a piggy bank, Christmas tree decorations and many other crafts made from plastic bottles.

New Year figures made from plastic bottles
These New Year crafts from bottles are very easy to create. Here is a set of necessary items:
- plastic containers;
- scissors and stationery knife;
- paints, brushes;
- textile;
- Knitting;
- felt;
- glue gun.
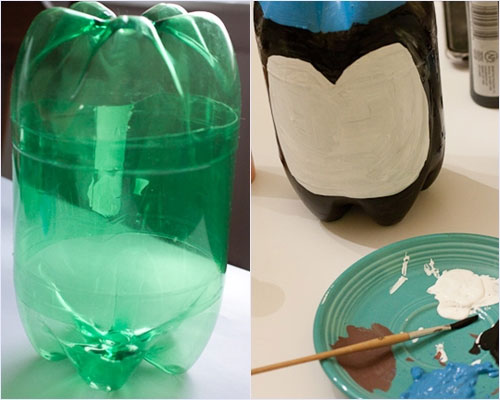
For example, you can make adorable penguins. To do this, you need to cut the workpiece in half, and cut off the bottom for the cap. Next, you need to paint them like penguins, glue the parts together using a glue gun and decorate the figures with textiles.
A little advice - instead of a glue gun, you can use tape, which you can simply paint over later.
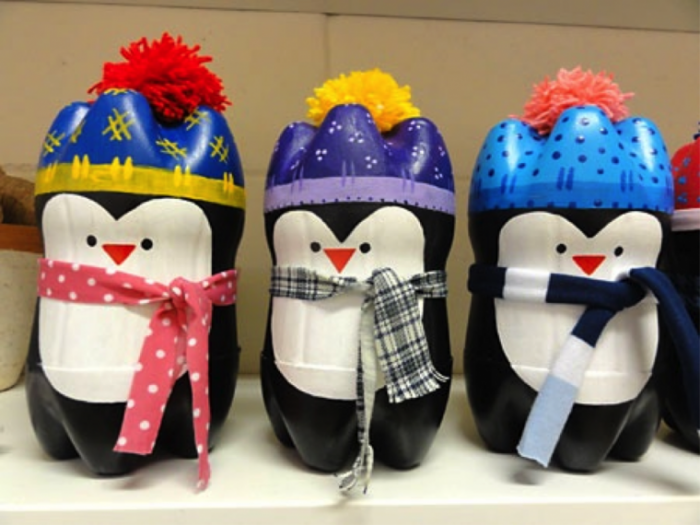
Use acrylic paints, they adhere better to plastic.
From this simple and affordable material you can also make bright and beautiful apples, which can be placed under the Christmas tree or used to decorate the kitchen. By the way, the decor is suitable not only for the New Year, but also for other holidays.

You can make a toy for a child - a horse on a stick. If you improvise, you can also create a dog, because this is a symbol of the upcoming 2018. And the color, by the way, is yellow! So use more yellow when creating your wonderful crafts.
Christmas tree decorations made from plastic bottles
If you have collected a lot of material that we need in the house, and you no longer know where to put it, then our advice to you is to get creative! Use this container for creativity! You can make wonderful snowflakes from the bases. They just need to be slightly decorated and a string attached so they can be hung. Use a thin brush to apply the design. From such blanks you can create a whole garland or a wreath for the door.

Crafts for the New Year from bottles are both original and inexpensive.
But these bells are obtained from the tops:

A whole ball can be created from the bases of bottles. The parts can be decorated, or they can be used in their original form:

Crafts made from plastic bottles for the New Year are an opportunity to give old things a second chance, an opportunity to join the culture of recycling things and sorting garbage. Thus, we consciously approach the use of resources, and besides, you can always call yourself a trash art artist, and this, by the way, is a very fashionable movement today. In general, this handicraft is good on all fronts!
And the following Christmas tree balls are made of strips, which are decorated with various beads, paints, ribbons and other decor:

Snow globes
Another cool idea is to use plastic bottles to create Christmas snow globes. What we need:
- smooth plastic bottles;
- acrylic paints, brushes;
- glitter;
- decorative figures;
- glue;
- foam or artificial snow;
- sequins, beads.
First, you need to cut off the top and bottom parts of the bottle so that one tube remains. You need to cut a circle out of polystyrene foam along the diameter of the pipe; we will attach our decorative parts to it.
Then, having coated the sides of the foam with glue, it needs to be glued to the main part of the composition, placing the decorations inside.
The top and bottom of the pipe can be decorated with cut-off parts of the bottle, gluing them with a glue gun and decorating them with artificial snow and ribbons. Crafts from plastic bottles are ready! You can also sprinkle sparkles, sequins and beads inside.
You can, on the contrary, use only the top and bottom to create a kind of New Year's snow globe.

Cones made from plastic bottles
Another decorative option when plastic is used to create a cone. It is better to use brown blanks right away.
You need to cut out something like daisies from your material and string them on a string. Make blanks of different sizes so that you end up with a cone. You can cut fir branches from a green bottle.

Wreath made from plastic bottles
For this we will need the bottoms of plastic bottles, wire, a bow and other decorations.

The details can be painted gold to give the craft pomp and completeness, and also to disguise the material from which the wreath is made.

Candlestick for New Year
One of the New Year's attributes is a candle. Well, you and I can make some pretty good candlesticks.

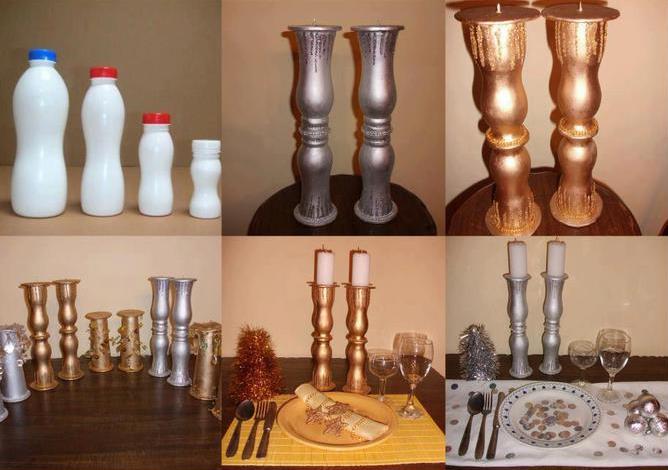
The next candlestick is made of two components, decorated with coffee beans, but, most importantly, it is a beautiful decorative candle.

By the way, don’t forget that you can use not only mineral water bottles or sweet water, but also from yoghurts, kefir and other products.
Souvenirs for the New Year
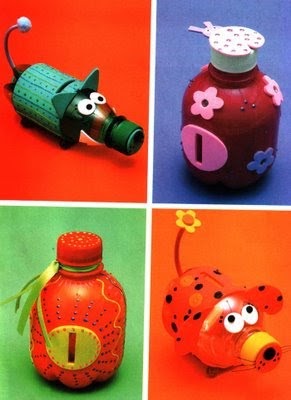
You can prepare something humorous and funny for guests or children. For example, make a pig piggy bank out of a plastic bottle. And what? Very original! If you manage to make a dog piggy bank, it will be even better!
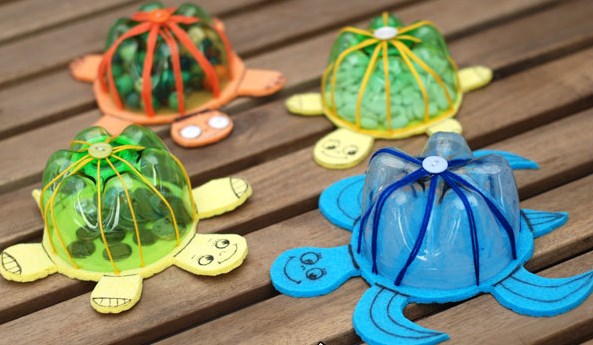
Use acrylic or spray paint, felt parts, fabric, beads and various other decor for decoration. But children will definitely be delighted with such funny turtles. For the base, use thin kitchen sponges or foamiran. We have already described how to work with this material in our articles.
How do you like a whole flowerbed of tulips in the middle of winter? This composition can be used to decorate a summer cottage or the courtyard of a private house. Guests will definitely not understand at first that these beautiful flowers are made from ordinary plastic bottles. As they say, crafts made from plastic bottles for the New Year are a manifestation of imagination and ingenuity.

And a few more options for completely non-winter flowers made from the simplest and most accessible materials at hand:


Cup made from a plastic bottle
If you want to stand out from the crowd, have a special attribute, or you need to have a cup to match your costume, then it can very easily be made from the material we know. By the way, read our articles where we tell you how to make crafts for the New Year from a bottle of champagne - this may also come in handy. So here's the cup:
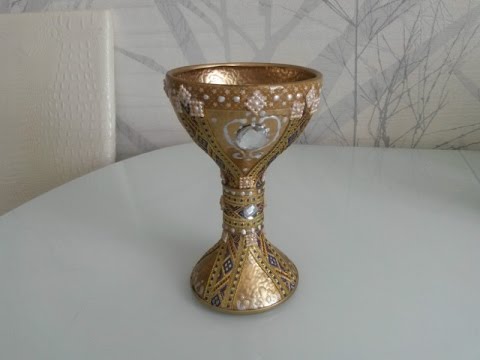
Luxurious, right? And, at first glance, you can’t tell at all what it’s made of, and at the second glance, too!
The design of a future cup for wine or as a reward may look something like this:
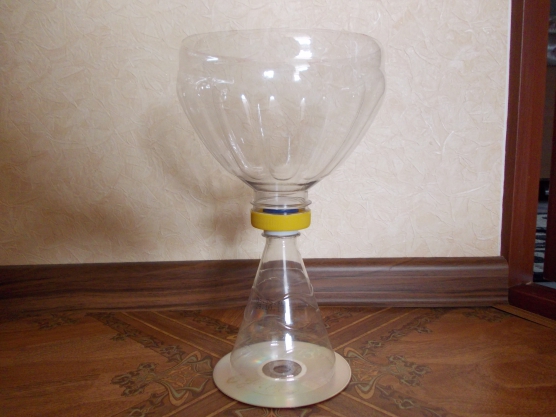
Or like this:

We really enjoy telling you about different unusual crafts, about materials from which you can make amazing things and which are found in almost every home. All this so that you can find a moment for creativity, for relaxation, for your hobby. Slow down time around you, let, as they say, the whole world wait while you create beautiful things. Well, in conclusion - crafts for the New Year from bottles video master class:
See how you can create a fun garland that you can hang in the kitchen or in the children's room, or wherever you want, at your discretion.
Post Views: 298


