Who is not only a needlewoman in many directions, but also simply an amazingly creative person with a bright outlook on both the world and things. Her handicrafts are full of light and warmth.
She works in many directions: sews, knits, including toys, makes bead jewelry. But her calling card is wire weaving, which in my opinion is completely unique.
Look for yourself - these are large and small objects, first woven from wire along a contour, which is then filled mainly with beads, but also with all sorts of other small objects, such as pebbles, corks, buttons, lids, etc. The result is amazing!
These items can be used to decorate a room if the object is large or to use as jewelry in the case of a miniature:


Among her wire weaving works, fish stand out. This is simply fantastic!


Master class “fish made of copper wire”
Necessary:
- copper or other wire: thick (1-2 mm) for the frame and thin (approx. 0.2 mm) for connecting parts;
Round nose pliers, wire cutters, thin nose pliers for working with wire;

Paper and pencil for layout;
- several beads.
1. Choose the shape of the fish.
2. Develop a layout (or use ours).
3. Use round or thin-nose pliers to bend the outline of the fish from thick wire. Twist all ends of thick wire into spirals (rings) for beauty and safety.


or some other way
4. Connect the individual parts of the fish frame at the points of contact with thin wire (shown in red). Check if the piece is flat, carefully straighten if it is not completely flat

5. Trace the resulting fish on paper and remove the wire frame for now.
6. Divide the back and belly of the fish drawn on paper into 6 (or less if the size is small) parts, connect the dots as shown in the figure. It turned out that the body of the fish is divided into rhombuses and triangles.


7. Figure out what pattern to fill the diamonds and triangles with, for example:

8. Indicate on the diagram where each drawing will be, evenly distributing the different options:

9. Looking at the resulting diagrams, bend the necessary elements, applying them to the layout for correction. Some pieces of wire can be pre-attached with beads. Do not forget that the tops of the diamonds and triangles on the fish are slightly deviated to the side to create volume of the body. The resulting fragments can be beaten with a hammer on a flat and level surface to provide stability.

10. Received fragments in in the right order attach with thin wire to the back and belly of the fish frame (you can tie the parts in several places with separate pieces of thin wire or braid the lines of the back and belly of the fish with thin wire). If necessary, make adjustments to some fragments. Do not be alarmed if not all fragments are included in the final version of the product. If there is a place that does not look like a diamond, twist the missing part according to its shape, applying the wire to the paper.
11. Fasten the parts tied to the belly and back of the fish together; if unwanted gaps form, add beads.


12. Fill the tail and fins with wire according to your own taste - “snake”, spirals or wavy lines.


13. Make an eye. Place a bead on a thick wire. On one side of the bead, bend the wire into a ring to secure it, and bend the other end of the wire into a flower. Attach the eye to the gills and back of the fish with thin wire.

14. Shorten the protruding thin wires, wrap their ends into rings using pliers to prevent pricking. The fish is ready!

Lizard.
Necessary materials: Thick wire (for small products - approximately 1 mm in diameter, sold in electrical stores in the form of an electrical cable in a plastic braid, which is better to remove) and thin (about 0.4-0.6 mm) - you can use beading wire from hardware stores or wire from a multi-core electrical cable (1 meter will last you a long time). It is better if this wire is stiff enough so that the sides of the lizard keep their shape. Needle nose pliers, wire cutters, beads of 3-4 colors (I like large ones, 3-4 mm in diameter, but this is a matter of taste), a couple of beads of a contrasting color for the eyes. Paper, pen.
Safety precautions: You need to be careful when working with wire, protect your eyes so as not to accidentally scratch them with the tails when turning the product. You also need to be careful with the pliers to protect your fingers. There are also chipped beads that can cut you. If you work with children, monitor the process.
3. Frame. Draw a sketch on paper: draw a curved line (spine), draw parallel sides on the sides of it - outline the body, narrow the tail on one side, mark the head on the other, draw straight lines perpendicular to the spine line, mark the place where the paws are attached, draw the paws. If you don't like something, fix it. It should be taken into account that the beads make the lizard slightly thicker than the frame. It should look something like this:

4. Take a fairly long piece (6 times longer than the resulting lizard) of thick wire, bend a ring at one end of such a size that you can thread the wire freely, and bend the wire with thin-nose pliers according to the drawn sketch, starting from the nose. Pass the end of the wire that returns to the nose through the initial ring

and lift it up, and then bend it towards the tail to create the middle of the back at some distance from the tummy. Don't forget to make a bend between the head and neck and a descent to the end of the tail.

Cut off the wire at the end of the tail with wire cutters, leaving a margin of a few cm in case of unexpected correction. Tie this end temporarily with a thin wire to the end of the tail. If you are confident in yourself, you can immediately bite off the wire with wire cutters 1-1.5 cm behind the edge of the tail, make a ring at the end and attach it to the tip of the tail, similar to the nose.

Level the frame so that it lies flat on the table.


5. Prepare fasteners. Take 2 pieces of thin wire about 5-6 lizards long, tie them in the middle and thread them into a ring on the nose - 2 tails to the right, 2 tails to the left. One of the wires is the working wire for beads, the other 3 auxiliary wires will attach this wire to the three edges of the frame, wrapping them around each row. You can fix 3 auxiliary wires on the corresponding stiffening ribs of the structure with turns around a thick wire. At first the structure will crumble, but gradually it will hold together.
6. We begin to weave. The working wire will run in a circle near the lizard's body in parallel turns. To prevent the coils from spreading out, each row is attached with an auxiliary wire to a thick wire (this helps the beads not to fall apart) and at the same time is attracted to the previous row. So, we put one bead of the main color on the working wire and place the working wire across the thick wire of the frame and wrap them once with an auxiliary wire, pulling them towards the nose. The auxiliary wire after the coil returns to the top, to its working condition. Then we put on another bead of the desired color and screw it to the next stiffener with the appropriate auxiliary wire. It is advisable to twist all three auxiliary wires in one direction to avoid tangling. It is necessary to avoid kinks in the wire, straighten it so that it does not break off at the wrong moment.
My lizard has a green back and a yellow belly. Yours can be any color. This must be taken into account when placing beads on a wire. Each next row is lengthened or shortened by adding beads and gradually fills the frame.
7. Don’t forget to make eyes on your head by putting beads of a contrasting color in the right place. If you wish, you can weave some kind of pattern on the back, I have a simple three-color zigzag, but you can randomly add beads or beads of a different color along the back.


8. The paws can be made after the body. To have something to cling to the auxiliary wire in the gaps where the legs are attached, you can stretch the auxiliary wire, when needed, from the shoulder to the armpits and back and then work with this support.
If some wire runs out, it is extended in the usual way - they tie the rest of the old wire to the frame, bite it off with wire cutters to 1-1.5 cm, twist a ring at the end with thin-nose pliers so that it does not prick, and hide it inside the product. Tie a new wire in the right place and continue.
This is how the lizard braids itself to the end of its tail. If the central thick wire was not attached to the end of the tail at the beginning of the work, it is secured shortly before completion.

9. Paws. A wire is tied near the paws and the paws are filled with beads as it turns out :).
At the end of the work, you need to fix all the ends of the wire and bend them inside the product.
All! keep it away from your friends, everyone will want to take it away :))
Handicraft is a unique way to create beautiful things and objects with your own hands. For example, wire weaving, which will be discussed further, allows you to create beautiful jewelry, decorative items, and makes it possible to decorate your clothes, accessories, home and garden. What can be made from a material such as wire? Where is the best place for beginners to start?
A little history about wire weaving
Wire products are valuable accessories and items that have always been very popular among both traders and the fair sex. This is confirmed by artifacts found by archaeologists and lovers of antiquities during excavations on ancient Russian burial mounds. In particular, the following decorations and objects were found from wire products:
- chain mail;
- bracelets;
- rings;
- pendants;
- chains;
- temporal rings.
It is interesting that each of the finds had its own individual wire weaving, which made the exhibit stand out among other household items and other utensils. Among the above-mentioned items, some were found that were made of thick forged wire.
Let us remember that the production of such material was previously considered a very complex and lengthy process. That is why the value of such items was equal to the price of products made from cast precious metals.
In the process of creating accessories, for example, one ring for a chain, blacksmiths first forged a kind of metal rope, then beat it with a hammer until it took the shape of a cylinder. Accordingly, to create a complete chain it was necessary to make many such rings and only then weave with wire. Today, the process of making products has been greatly simplified, so with sufficient skills and some help, any Internet user can make a beautiful ring or earrings.
What tools are needed for the job?
If you decide to make any product from wire, pay attention to the standard set of auxiliary tools required for the job. So, you will need:
- pliers;
- wire cutters;
- round nose pliers;
- metal file;
- hand or bench vise;
- portable anvil.

What types of weaving are there?
Currently, there are several weaving techniques that are used by craftsmen all over the world. For example, one of the most popular is the Wire Wrap technique. It helps to beautifully weave a variety of beads, stones, accessories, and create original earrings, cuffs, brooches, earrings and other jewelry. There is also a weaving technique that visually resembles similar handicrafts made from ordinary yarn and threads. The simplest technique is considered to be the “chain mail” technique, as well as Viking Knit. What kind of wire weaving is suitable for beginners?
How to choose a weaving technique?
It is very difficult to be a beginner in any field of activity, including needlework and hobbies. There is always a risk of making the wrong choice, jumping to conclusions or making the wrong decision. Therefore, it is best to start with the simplest and easiest to understand technique for a beginner. Let's do this together.
Making a Viking Knit Bracelet: Tools
"Viking Knit" is a simple wire weaving that does not require soldering each link individually and involves working with a large piece of wire. In this case, each link is artificially “increased” until the entire chain is closed. For this we will need the following materials and tools:
- thin copper wire;
- a simple pencil;
- scissors;
- ruler (preferably metal).
We create the basis for the product
Before you start weaving with wire (diagrams and photos can be found in our article), you need to prepare a base. To do this, take a ruler, cut a wire 40 cm long and wrap it around your ruler exactly 6 times. Next, remove the resulting loops and secure them using the free end of the wire. Then move part of the fastening down a little, and make a flower from the freed loops.

Loop by loop: let's start weaving
At the next stage, we take a pencil, put it on top (on the unsharpened side), cut off more wire with a length of about 70 cm, insert its free end into one of the first “petals” of our “flower”. Next we move to another “petal” and make the second, third and fourth loop. We move to the second row, now clinging to the received loops of the previous one. We do this for a few more rows until the length of your working wire is reduced to 10-12 cm. This is exactly how weaving wire with your own hands is done.

We build up the wire and move on
To prolong the weaving, it is necessary to artificially increase the wire. To do this, we screw a new “working thread” to the small tip of the previous one, and hide its end under other links and loops. We cut off the excess and continue to create new rows and loops.

Once you feel that the resulting loops are sufficient, remove the weave from the pencil and gently stretch it. It turns out to be a whole bracelet. Next, disconnect the excess, cut and fix. This product can be complemented with beads and a clasp. The bracelet is ready. You can also make this kind of weaving from colored wire.
How to make a bracelet using colored wire?
In addition to jewelry, you can make beautiful bracelets from colored wire. For this you will need:
- scissors;
- pen rod;
- two- or four-color wire with a polymer layer;
- large and small beads.
Making the base for the bracelet
Take a small piece of wire (about 15-20 cm) and bend it so that you get a kind of cross. Next, take a new piece of wire and begin wrapping it in a zigzag motion. After 1-2 rows have been “knitted”, transfer the resulting workpiece to the handle shaft (fasten it to the back of it). Start weaving the new wire step by step, making loops as in the first example.
Once your bracelet is the right length, you can remove it from the bar, fasten it, trim off the excess, and add beads and a clasp for added beauty. The bracelet is ready. The main thing is that it is easy and quick to do, and also has bright color, so even children will like it.

Wire weaving (bracelets): what to consider when working?
When working with wire, you must follow safety precautions. For this purpose, it is best to wear gloves on your hands and protect your eyes with glasses. When calculating the length of the product, remember that with tight weaving, the figure will double if the wire is removed from the frame.
You should work with scissors, pliers and side cutters carefully, as there is a possibility of injury.
In a word, when working with wire, do not rush anywhere. Do everything without rushing. And then you will get the most beautiful wire products.
Weaving from wire, felt, from newspaper tubes will allow you to use waste material and make a chicken for Easter, a basket, a vase, a cat, a lizard.
How to make a chicken for Easter - paper weaving
You can make it from paper straws.

To create such a character, you will need:
- yellow paper tubes;
- round form;
- Titan and PVA glue;
- acrylic lacquer;
- knitting needles with a diameter of 3 mm;
- brush;
- clothespins;
- elastic bands;
- a piece of wire;
- scissors;
- twine or thread;
- glass eyes for toys.

First you need to roll 70–80 tubes from yellow paper. Now we need to prepare them for subsequent work. To do this, take more than half of the tubes, moisten them with a spray bottle, leaving the ends dry. Wrap the tubes in cellophane, and the ends that are not moistened with water should look out. If they suddenly become wet, then dry them with a hairdryer.
Thus, these blanks must wait 15 minutes. The rest of the tubes will be dry, take 2 pieces from this series. Place two more of the same on them perpendicularly. These will be the racks. Place a pre-moistened tube diagonally on them, folding it in half. Now fly around the posts using a rope pattern.

Thus, you need to complete two rows, then spread the racks and braid each separately. You will get something like a sun with a small middle and four rays.

Take 8 dry tubes and place them between the existing rays. You will get 18 racks. Braid them to make the bottom. Next, the chicken should have a semicircular shape, to do this, continue to create it on a product of this shape.

To prevent the bottom from moving out of the mold, tie it to it with twine.
At this stage, the working tubes will gradually end and need to be expanded. To do this, cut the ends so that they become sharp and connect at an angle to another tube using glue.
When you have weaved the shape to the desired height, remove it. Pull the posts slightly toward the middle and make three more rows.

Press the bottom of the basket slightly inward to make the product more stable.

You need to cut off the tip of one working tube, grease it with glue and secure it on the back side, hiding it there. Leave the second one, as you will use it to create the chicken's tail.

This weaving is very interesting, as it allows you to create wonderful things from paper. Using the chintz pattern, you will need to complete 5 rows. Gradually narrow them so that you get something like a triangle.

Secure the working tube at the top by tying a knot like this.

Secure it with PVA glue and clothespins. Wait for these materials to dry. Don't forget to bend the ponytail back a little so that it takes the correct shape.
Fill a syringe with hot water and spray on the posts. Then they will become more pliable. But first you need to wait 10 minutes for this to happen.

Grab one of the posts with a knitting needle and pull it out. You need to do the same with all the other struts that will form the wings. There will be 3 pieces on one side and the same number on the other.

Now start shaping the head. It is performed similarly to a ponytail using a chintz pattern.

But this part should be 25 cm long. Therefore, you need to gradually increase the tubes, gluing them to the previous ones, weave a rectangle like this.

Cut the working tube and posts. Secure them with glue, and using an elastic band, secure the rectangle folded into a circle.

To carry out paper weaving further, you need to insert a tube next to the wings to now weave them.

Make them like a ponytail so that these parts also become triangular. Now you can start working on the beak. It consists of two paper tubes, insert a wire into the middle of each. Fold each of these pieces in half.

Paste these elements into place. Take a thread and a needle and tie the thread around the beak.

If your thread is orange, then you don't need to dye it. If it’s a different color, then take a color of that shade and paint over the nose. Glue the chicken's eyes into place, after which you need to let the work dry and you can put an Easter egg or candy inside.

The threads are also very interesting to weave with. Many needlewomen still have scraps of this material that you can use.
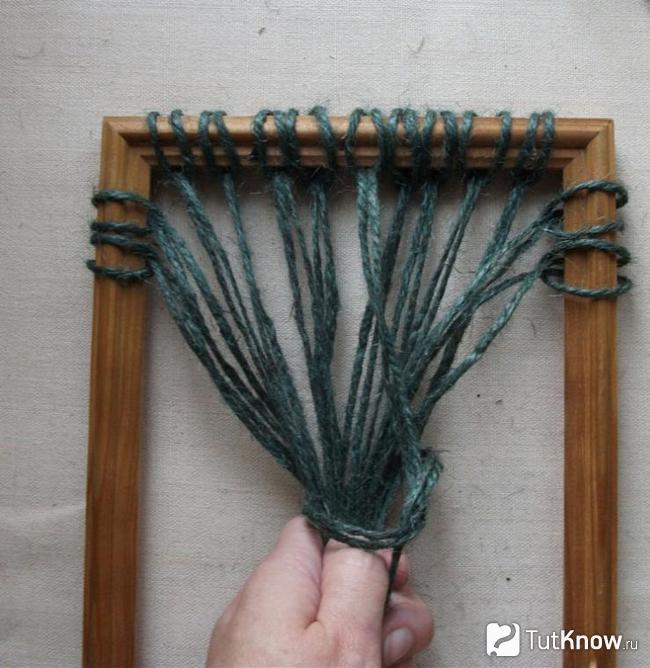
How to make a panel from threads?

This tree looks great against the backdrop of bright, plain wallpaper. By hanging it on the wall, you can admire such a picture. But first you need to take:
- wooden frame;
- twine or thread;
- PVA glue;
- beads.
Place beads on some threads. These wooden elements will symbolize tree leaves.

Now weave braids from the ropes. Take the threads not in a row, but skipping several pieces at a time.

Again, in such a chaotic order, take several strands and weave further tree branches.

Then divide all the threads into 3 parts and weave a trunk from them. Now distribute these ropes horizontally and tie them to the bottom of the frame with knots.

Trim off any excess strings. If you wish, make another panel from threads, then you will have such a cheerful tree with ribbons.

Cut an even number of ropes so long that when you tie them, they are 2 times larger than the frame, plus 10 cm. One should be the longest, you will hang it in the middle of the frame. Attach all the rest on both sides of it.

Wind the loose thread around the bottom of the frame. Pull the others here and tie them down.

Start making knots, gradually moving from the bottom to the middle. Then you will have a trunk.
Weave a ribbon into the crown, moving from the middle to the top.

Sew on a few beads to make the tree festive and elegant. Weaving from felt will allow you to use leftover materials. You can take fabric of several or pubic colors.
How to weave a felt basket?
This idea will appeal to those who do not know how or do not like to sew, since the work involves weaving fabrics without using a sewing machine and needle. Take:
- strips of felt measuring 50 by 2 cm - 19 pieces;
- scissors;
- sticker;
- lace;
- pins or clips.

Find the middle of this base and weave the 8th strip here in a checkerboard pattern.

As you can see, next to it you need to fasten another one in the same way, and it’s convenient to hold this workpiece with clips. Next come five more stripes, all of them should be located symmetrically to the middle and in a checkerboard pattern.

Now you need to make the walls from the remaining 5 strips. Connect them into a ring, fixing them in this position with a stapler, glue or thread and a needle.

Now twist the first one into a ring, creating side walls from it, gradually giving it a square shape. Secure this workpiece with clips or pins.

Now, in the same way, but in a checkerboard pattern, attach the second ring here.

Using this principle, you also need to secure the remaining strips. At this stage you will have already created the bottom and walls.

The long ends of the felt strips need to be cut and bent through one, either from the inside or the outside. Attach these parts with clips.
Now you need to tuck the tips of the top ribbons inside. This way you will make the outside beautiful. To make the inside look amazing, turn the basket inside out and tuck the ends here in the same way.

Return the product to its original position and you can decorate it. For this you will need a cord. It needs to be pulled from above through the outer side of the tapes in a checkerboard pattern.

If you want to decorate the product with a sticker, then take light felt and a sublimation picture. Place the sublimation picture on the felt and place masking tape or thermal tape on them. Iron to transfer the image. Once you've done this, remove the tape and remove the paper-based image itself to take out the felt one.

Cut it out and stick it on the basket. This is such a wonderful thing for storing various little things.

Using weaving, you can create other wonderful interior and exterior items.
How to weave from wire - diagrams and master class

This cat is very durable. It can be left at home or taken out into the garden for the summer as a sculpture. Such a cat is not afraid of precipitation, and you can save a lot, since then you will not need to buy figurines for the garden.
If you have wire lying around in your workshop or garage, then you don’t even have to spend money on it. If not, then here's what you'll need to purchase:
- wire with a diameter of 2 mm, from which you will form the base of the cat;
- wire with a diameter of 9 mm and 1.5 cm to decorate the surface of the sculpture;
- wire with a diameter of 1.5 cm to create the body;
- thin wire with a diameter of 5 mm for the mustache.
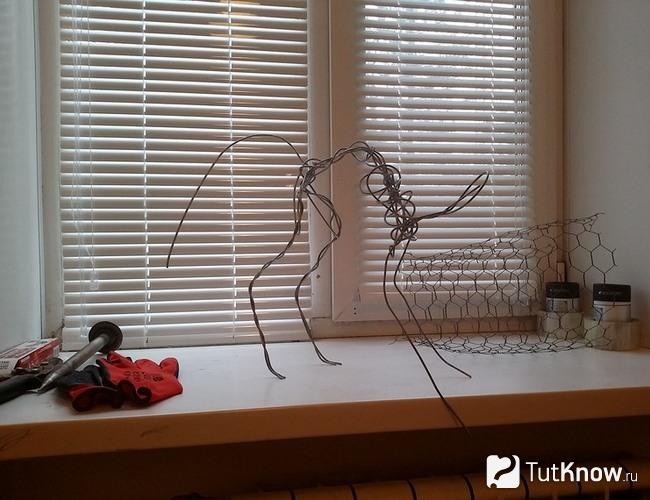
Now you need to give the product volume. To do this, take a wire with a diameter of one and a half cm and begin to wrap it around the frame in the area of the body and upper legs. Twist this material randomly, but so that the cat begins to take shape.
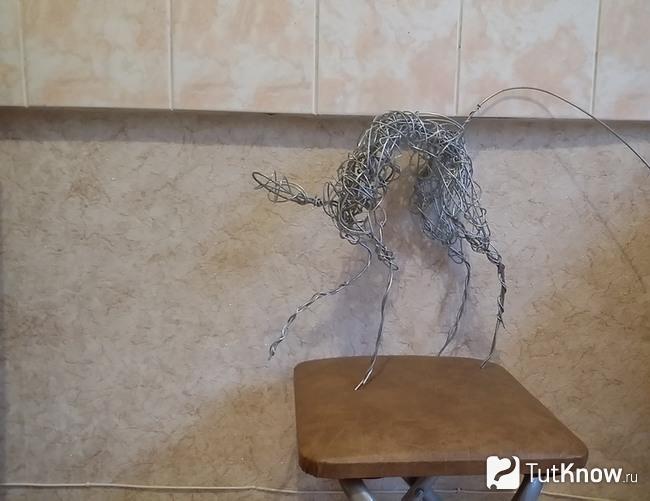
Continue in the same way, but now take a thinner wire with a diameter of 0.9 mm. This is good for highlighting small details such as paws, head, ears. Also compact the cat's body with it.

To form the ears, first make 2 triangular frames for them from thick wire, and then braid them with thinner wire.
Now remember what a cat looks like and wrap part of its body with wire so that they make a realistic sculpture. Attach several pieces of wire to her nose, which will turn into a mustache. Paint your new pet, you can also use silver paint for the body and whiskers, and black for the rest of the parts.

You can make not such voluminous figures from wire, but flat ones to hang on the wall. Look next master class, in which you will learn how to make beautiful, long-lasting fish. This is how it will turn out.

To do this, take:
- thick copper wire for a frame with a diameter of 1–2 mm;
- thin wire 0.2 mm to connect the parts;
- wire cutters;
- round nose pliers, thin nose pliers;
- pencil;
- paper;
- beads.

We continue weaving from wire further. Where these materials come into contact with each other, you need to connect them with thin wire. These places are marked in red in the photo.

Now place the wire frame on a large piece of paper and trace it. Divide the belly and back frame into 6 parts and connect these parts as shown in the photo.

You've got small fragments. Create your own or use the patterns provided to fill them in.

You won't get confused if you number these parts.

Look at the hint diagram and start bending the elements of the fish with the appropriate tools. Some you can put beads on.

To ensure that the braided wire pieces are level when you create them, tap them with a hammer on a flat surface. Now, looking at the main hint diagram, you need to fill the fish with the created elements. Strengthen them with thin wire, and if there are any gaps left, put beads here and fix them.

Fill the tail and fins with wire, bending it wavy, snake or spiral.

To make an eye, take a bead and thread a wire through it. Curl the tip of this metal stick to secure the decoration. Next, bend the wire around the bead, helping yourself with special tools. You can attach the eye to the base with a thin wire.

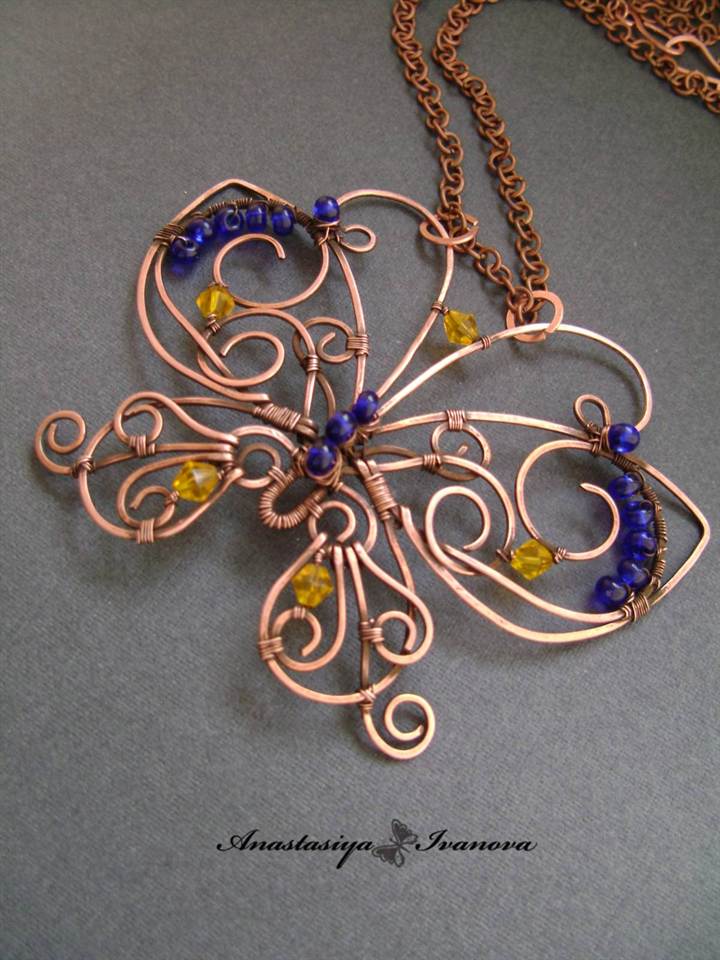
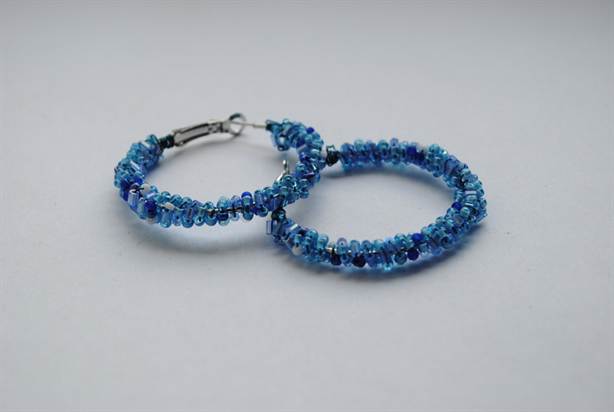
Wire weaving goes well with beads.

If you like this kind of lizard, then take necessary materials to create it. This:
- thin and thick wire;
- beads;
- wire cutters and pliers;
- two beads;
- pen;
- paper.
First, draw a sketch of a lizard on paper, see what curved elements it will consist of.

Take a thick wire, it should be 6 times longer than the resulting lizard, and start bending it as needed. Attach the wire to the face of this reptile by making a loop here.

Using pliers, mark the wire, then shape the legs and body of the animal, as well as the tail, and pass the wire from the lizard's nose to its tail.

Attach a thin wire to the reptile's head. Place beads on it and fill the lizard’s body.

Fix the thin wire on the central thick one, also on the sides to secure the turns. If the wire runs out, you will need to extend it. Thus fill the entire body and begin to form the paws.

To do this, you need to tie a small diameter wire on them and also string beads.
If you like to weave with wire, then watch another small master class with step by step photos, which will tell you how to make a vase.
Take:
- copper wire;
- dark electrical tape;
- wire cutters;
- scissors;
- a piece of fabric;
- hot glue gun.

Use the wire to create two more circles of different sizes. Attach the large one to the center of the vase, the small one at the top. Also connect the parts using electrical tape.

Cut strips of fabric and wrap them around the metal parts of the product. Secure these strips using a hot gun.

All that remains is to place a vessel with a real plant in this vase or put artificial flower. This product looks fresh and modern.

This is how interesting weaving from various materials. Decide which type of job is most interesting for you. If you have a lot of newspapers at home, you can use them. Then you don’t need to spend money on consumables. You will decide what to make from newspaper tubes by watching the presented video.
If you want to weave with wire, then the second video will help you understand the intricacies of such needlework. Make the same stylish bracelet, which the master class will teach you how to make.
The history of this type of needlework, such as weaving jewelry from ordinary wire, goes back thousands of years, because... BC there was still wire weaving, which was found during excavations by archaeologists. The production of wire was very complex and time-consuming, so in the past products were quite expensive, but now you can make an original product for beginners.
Nowadays, wire is a material that is relatively easy to make and its uses are widespread. They even create wonderful jewelry, accessories, figurines, baskets from ordinary, unremarkable wire and decorate household items with it.

This creativity requires perseverance and perseverance, as well as, in addition to the material itself, many tools (pliers, round nose pliers, a needle file, a triangular file, a hammer, wire cutters, tweezers, a small vice, a piece of flat iron sheet and a number of small nails).
The wire used is thin, no more than 3 mm in diameter, it is called knitting wire, it can be made of brass, galvanized steel, aluminum or copper (it is better for beginners to start weaving with it). Often, in addition to weaving, for decoration, beads, beads or ornamental stones, then the product gets a more complete look.
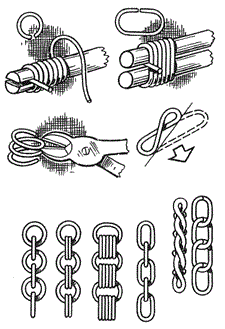
It is better for beginners to take their first steps in wire weaving with rings, spirals, curls and chains, because... they are the basis of even the most complex products.


Weaving wire jewelry for children
Children also want to join in the creativity of adults, and for starters, you can offer them braiding pencils with wire. The weaving will be created using macrame knots.
Another example of a pencil braid looks like this:

Little is required - a rod that will be braided, colored wire of two colors, beads for decoration and scissors.
According to the following simple pattern, you can braid not only a pen or pencil, but also any handle, for example, a toy (sword), as well as thicker wire, which can then be twisted into a circle, so you get a bright bracelet.

It is necessary to tie the first knot according to this scheme, then the rod is inserted and then the entire rod is braided with the same knots to the end.

Pencil braiding is suitable for preschool and younger children school age, they can also be asked to twist various simple shapes from colored wire. Simple figures are preferable because more complex ones may lead to loss of interest in this needlework.


Older children can learn beadwork and weave more complex items from beads and wire.


Beading is used in weaving costume jewelry, but wire is used instead of fishing line.


Easy Wire Weaving Tutorial
The bracelet presented below can be woven by a child as a gift to his mother or friend. Let's look at a master class on weaving jewelry.
You will need multi-colored beads, thin wire suitable in thickness for the holes in the beads, a clasp for the bracelet and a pencil.
First of all, the beads are strung on a wire, which is bent into a ring at the end so that the beads do not fall off. Next, several layers of wire with beads are twisted into one bundle, which is wound around a pencil. This beaded spiral must be carefully removed from the pencil and the bracelet is almost ready, all that remains is to fasten the clasp.
An important warning - adults must tell children about safety precautions before starting to work with wire, because the work uses sharp wire and tools that can cause injury, so it is safer to work with gloves and goggles.
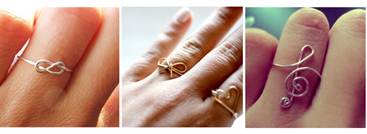
DIY wire jewelry for beginners
If a wire product has unusual knots, then jewelry weaving patterns will make the process easier for beginners.
The diagrams show the sequence of actions in weaving knots.
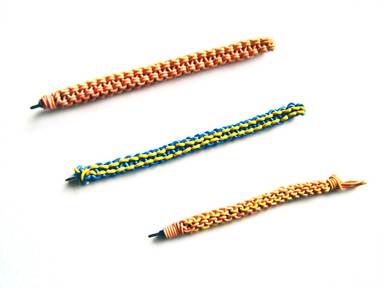
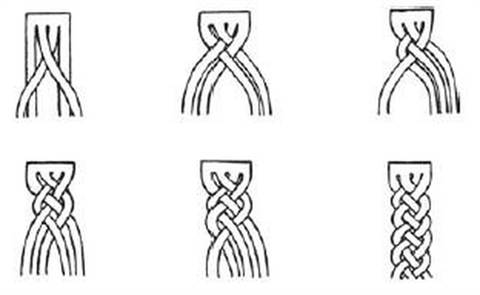
1) A bracelet braided with four strands.

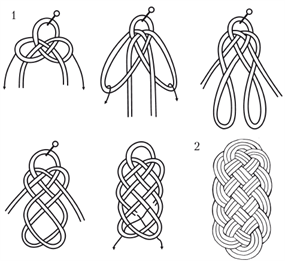
2) Necklace made of a decorative macrame knot with several weaves.
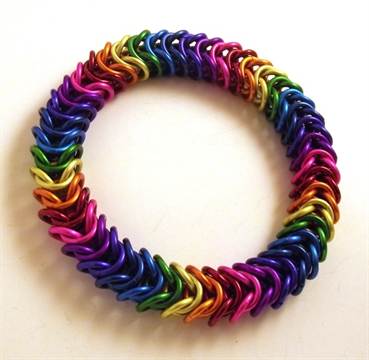
3) Bracelet made of chain mail weave “box”.
Handicrafts allow you to create beautiful objects and things with your own hands at home. For example, wire weaving allows you to make beautiful jewelry, clothing decorations, and various decorative items for your living space and garden. Wire, oddly enough, opens up wide horizons for the flight of creative thought and creative ideas.
Wire products are quite valuable items and accessories that were in particular demand not only among ladies, but also among ordinary traders. This can be confirmed by looking at artifacts from excavations by antiquities enthusiasts and archaeologists. Scientists have discovered:
- Chain mail.
- Rings.
- Bracelets.
- Chains and pendants.
 It is worth clarifying that each find was distinguished by its individual wire weaving. Some of the listed crafts were even made from a forged wide element. Producing such material in those days was not an easy task: the process required not only a lot of time, but also effort. Based on this fact, one can understand why wire objects were so expensive and equated to cast valuable precious metals.
To create a simple ring or chain, a blacksmith must first forge a strand of metal. After which the product was beaten with hammers until it acquired a cylindrical shape. Moreover, for the chain it was necessary to create a large number of such elements, and only then perform the wire weaving.
Currently, the process of creating a product has become simpler. Therefore, with minimal skills, you can weave beautiful earrings or a ring at home. Do-it-yourself wire weaving, work diagrams can be viewed on the Internet.
After deciding to make any item from wire, you should pay attention to the tools required for the work process. These include:
- Wire cutters and pliers.
- Hacksaw and file for metal.
- Vise (manual or benchtop).
- Portable anvil.
 As for the types of weaving, there are currently several of them. The most popular of them is called Wire Wrap. Thanks to it, you can weave a variety of beads, stones and other accessories, create brooches and earrings. In addition to this technique, there is another wire weaving technique - Viking Knit. It is a little reminiscent of needlework made from threads and yarn.
When choosing a weaving technique, it is worth considering several features and reviews from craftsmen. It is always difficult for a beginner, regardless of the chosen field of activity. And handicrafts are no exception to the rule. You can always choose the wrong materials for a job or make a mistake in creating a product. Therefore, it is best to master the skill with simple option, accessible to everyone.
A simple weaving that does not involve soldering each individual link and involves working with a large piece of wire can be called Viking Knit. In this technique, each subsequent link in the chain must be artificially increased until the entire chain is completed. It’s not difficult to make a beautiful wire bracelet with your own hands. To do this you will need to acquire:
- Thin copper wire.
- Scissors.
- Metal ruler.
- With a simple pencil.
 Creating the base of the product must be done first. To do this, a wire longer than 40 cm is wrapped 6 times around a simple metal ruler. After that, the resulting loops are removed and fixed with the free end of the material. Then move this part of the fastening down slightly. The released loops are folded into a flower.
At the second stage of work you will need a pencil. It is put on from above (with the non-sharpened side). After this, a wire with a length of 70 cm is cut off. Its free edge is inserted into the first petal of the improvised figurine. Then you can switch to the next petals, performing loop after loop. After the first row, the transition is made to the second; now you need to cling to the loops in the previous row. Thus I complete a couple more lines. The length of the working material should be reduced to 10 cm.
To prolong the weaving, it is necessary to increase the material artificially. To do this, a small edge of the previous “thread” is connected and screwed to the new material. The tip of the new wire should be hidden under the other loops and links of the weave. The excess piece is cut off and the creation of new loops and rows of the product continues.
After the number of loops obtained is sufficient, the weave is removed from the pencil and carefully stretched. This way you can already see the entire bracelet. After this, the excess is cut off and fixed. Such weaving will be complemented by a decorative clasp and beads. The master class on how to weave a bracelet yourself is completed. Such weaving from colored wire can become the basis of earrings or a beautiful decorative chain or basket.
In addition to jewelry, you can create interesting bracelets from colored materials. For this you will need:
- Ballpoint pen refill.
- Scissors.
- Wire with a polymer layer of several colors.
- Beads of different sizes.
 To create the base, take a piece of wire, the length of which is 20 cm, and bend it in the form of a kind of cross. Then they take a new piece of metal thread and begin to wrap it in a zigzag motion. After knitting several rows, the resulting workpiece is transferred to the ballpoint pen. Attach the material to the back of the item. After this, new wire is woven in, creating loops, as in example No. 1.
As soon as the product acquires a suitable length, it is removed from the rod, secured and, after cutting off the excess ends, completed with a clasp and beads. The product is ready. Thanks to its non-standard and bright appearance, the bracelet will appeal not only to adults, but also to children. A wire basket is also made using this technique.
 Wire weaving for beginners step by step involves observing safety precautions during the work process. The master's hands must be gloved, and his eyes must be protected with special glasses. Calculation of the length of the material should be carried out taking into account the density of the weaving. After all, this figure may be higher if the wire is removed from the improvised frame. Working with pliers and scissors must be careful, because there is a risk of injury.
In a word, weaving from wires and wires should be done without haste, and then the finished products will delight you with their appearance masters


